006ip Static Proxy User Guide
1. How to purchase static residential proxies?
Log in to the 006ip dashboard, open Static Proxies in the left sidebar, then choose ISP Proxies or Datacenter Proxies to enter the purchase page. On this page you can configure and purchase static proxy resources. Follow the steps below:
1.1 Proxy attribute settings
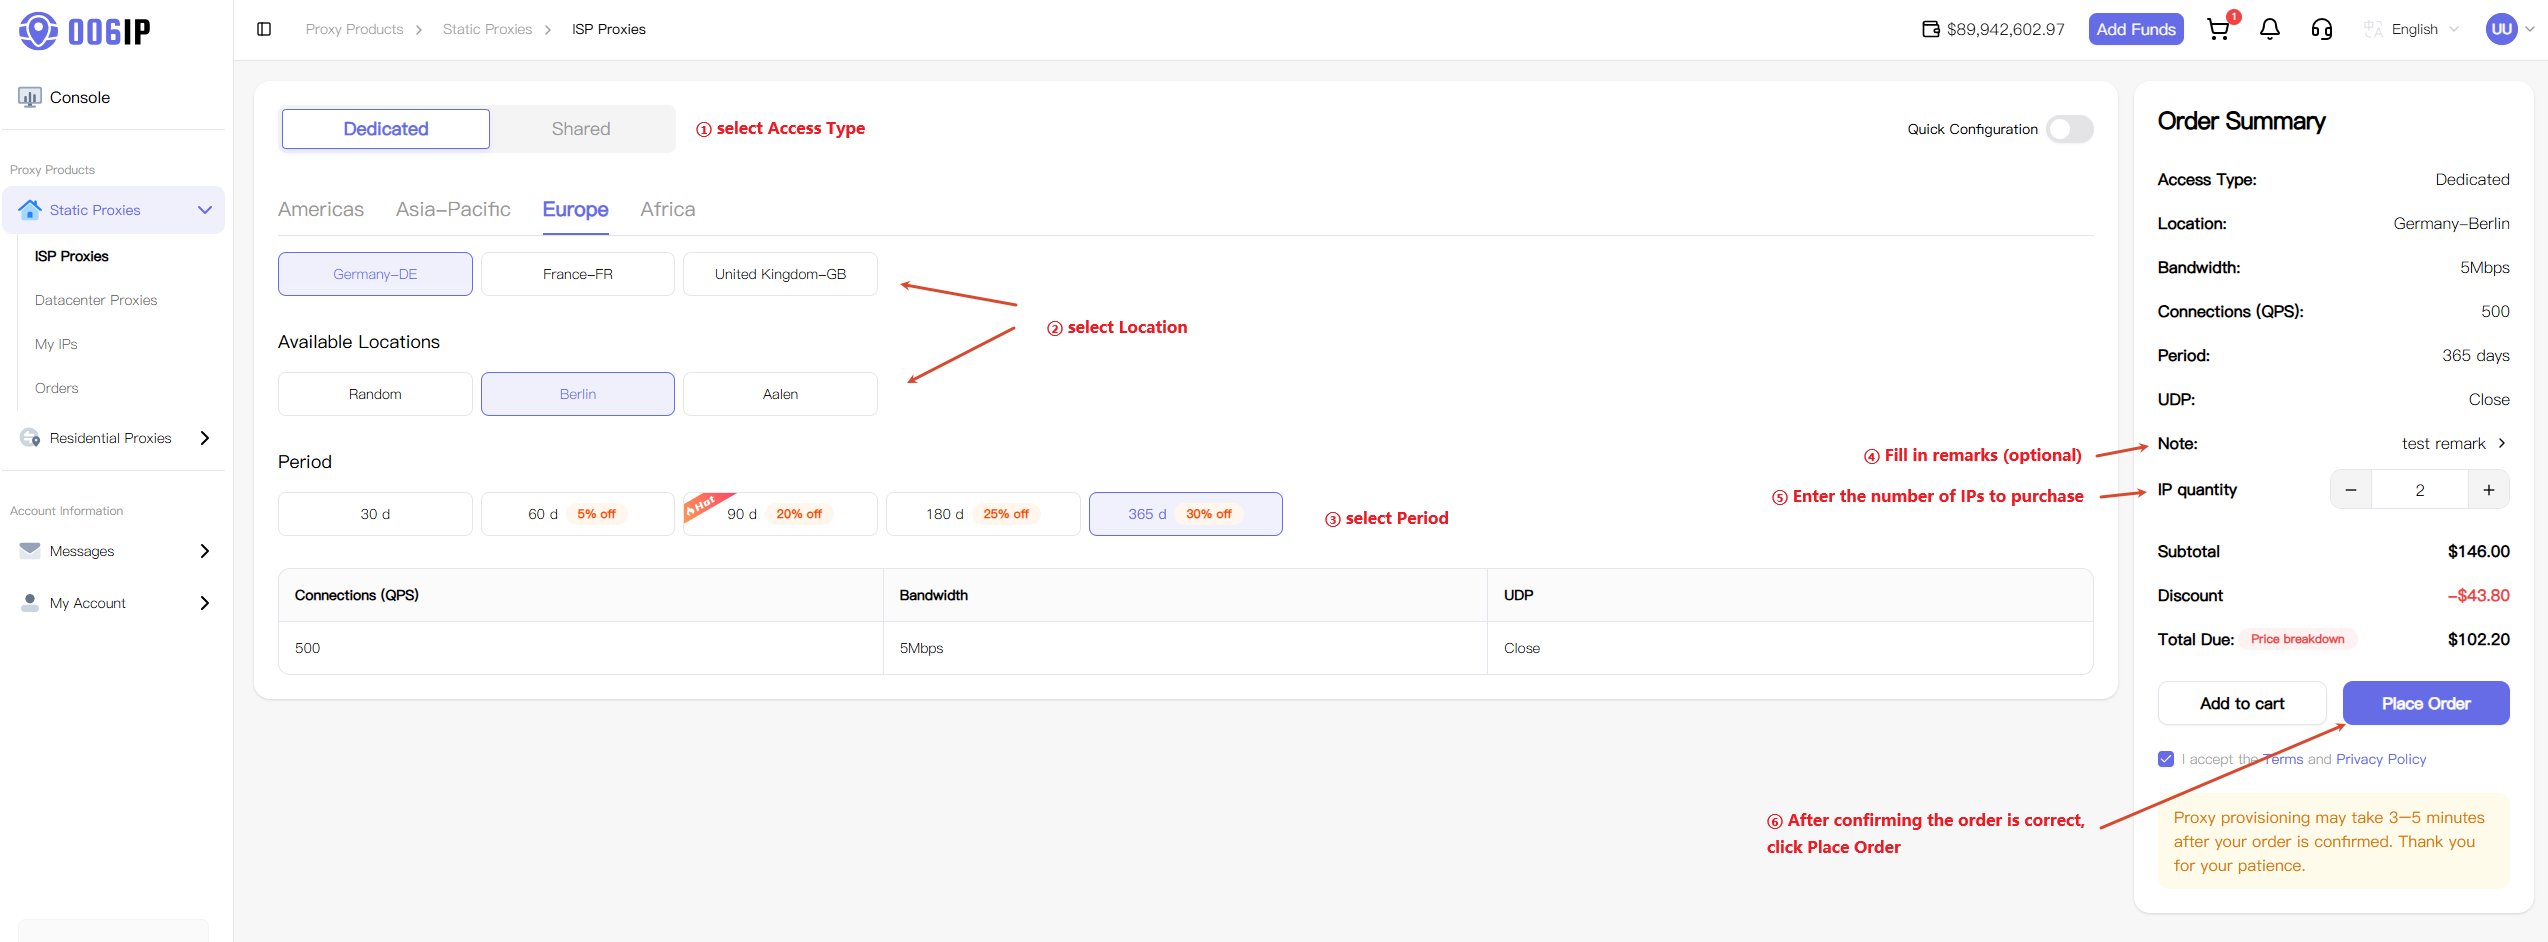
Quick Configuration
-
Access Type: Choose between Dedicated and Shared allocation. Dedicated IPs offer higher environment purity and stability for workloads with strict IP isolation requirements. Shared IPs suit cost-sensitive, general browsing scenarios.
-
Precise geo targeting: Select country/region and a specific city for exact coverage, or choose Random range for country-wide distribution.
-
Period: Plans from 30 to 365 days. Longer terms (e.g. 90 or 365 days) include tiered discounts.
-
Fixed configuration: Connections (QPS), Bandwidth, and UDP use fixed default settings. Refer to the values shown on the platform page for the actual configuration.
Custom Configuration
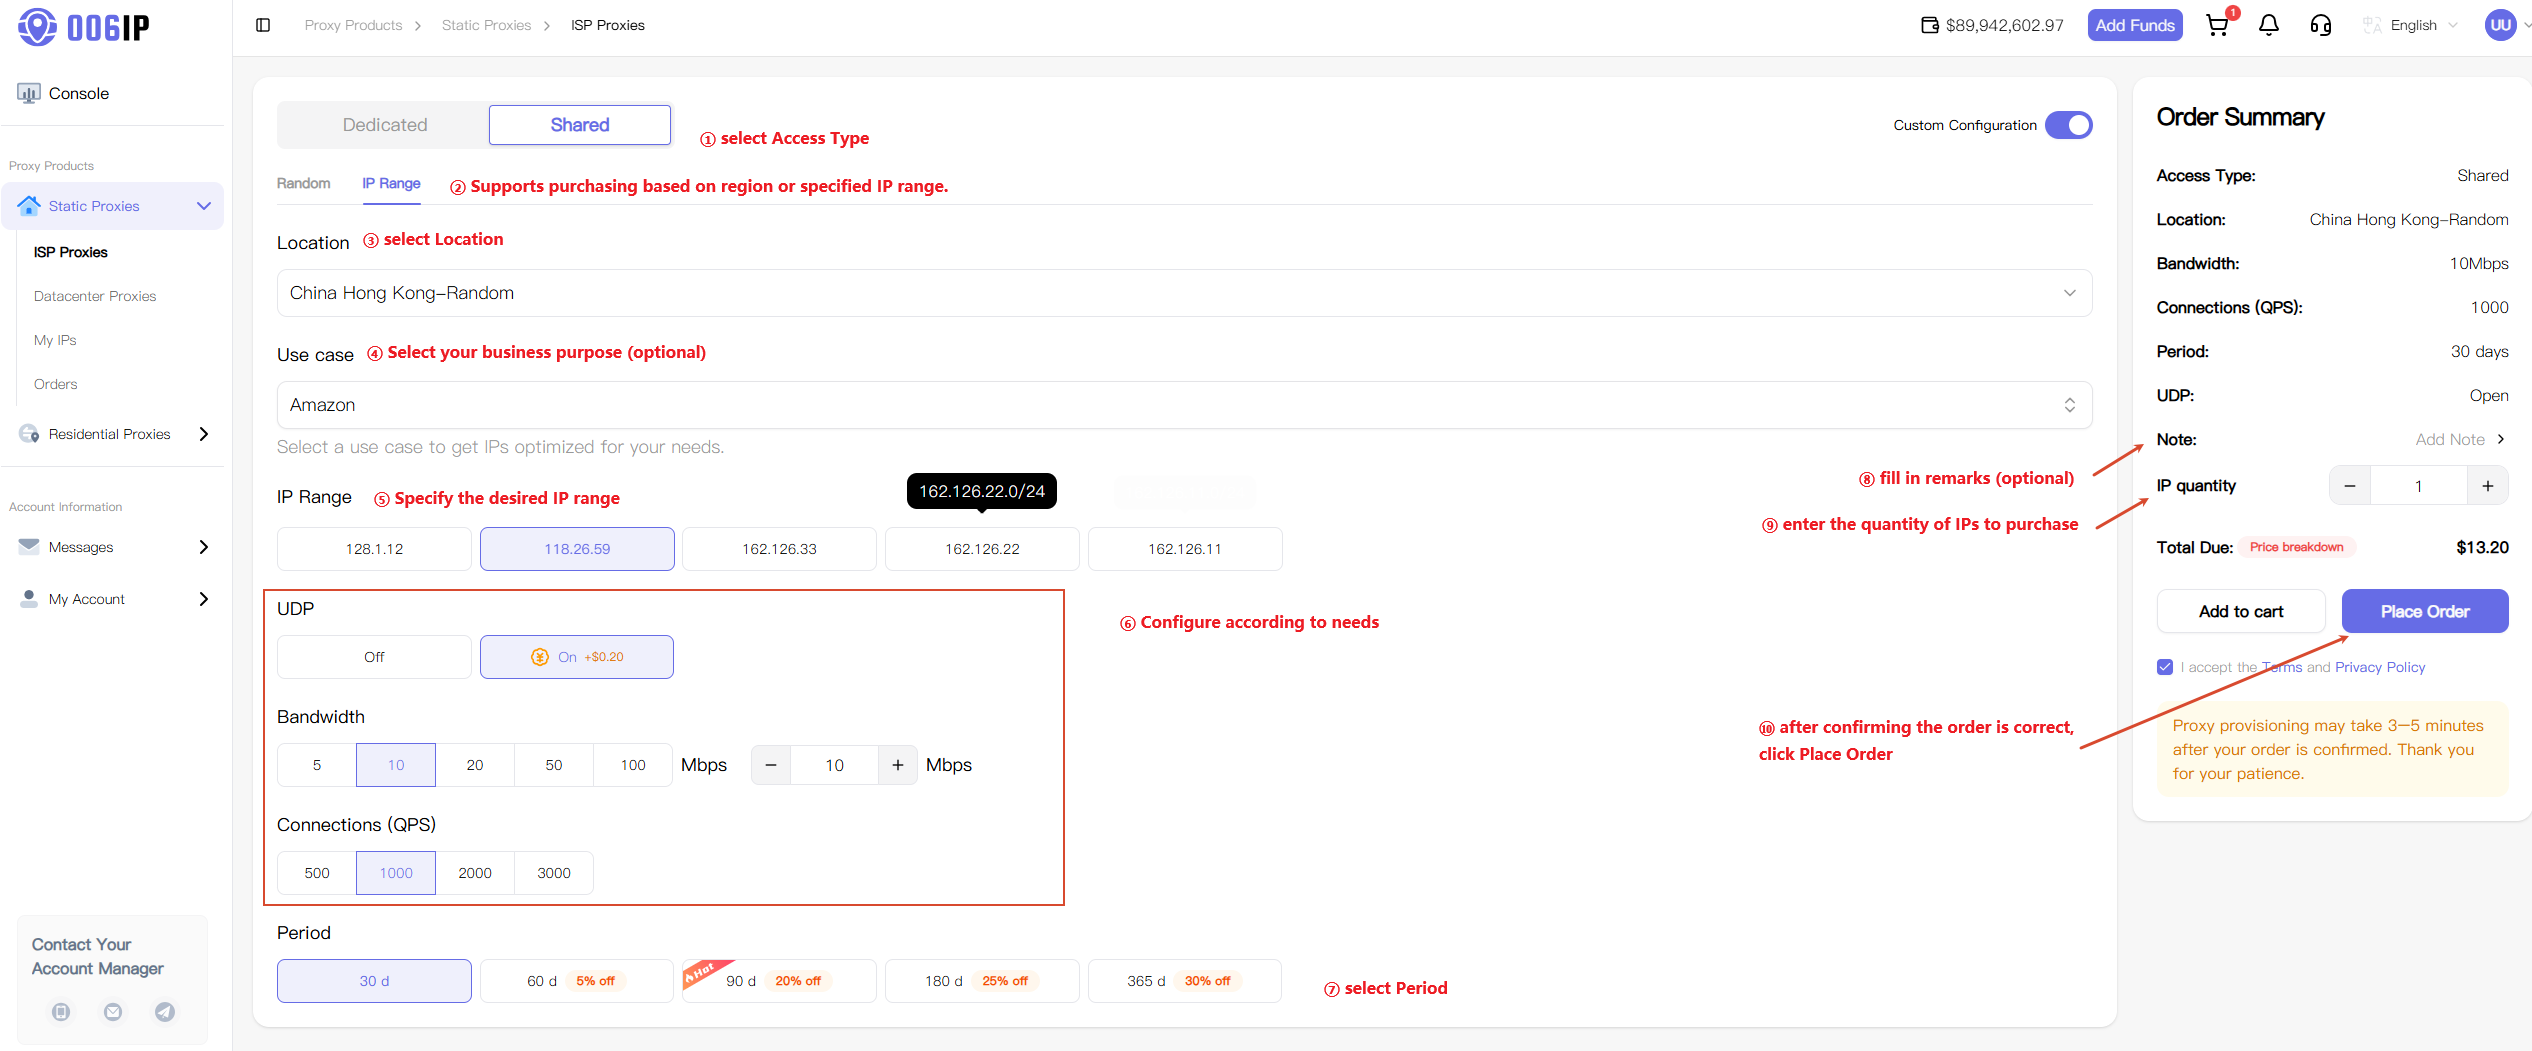
After enabling Custom Configuration, you can purchase by specific IP segment and customize Connections (QPS), Bandwidth, and UDP. Different settings affect pricing.
-
Use case: To maximize success rates, the platform optimizes routing for popular scenarios. Select the intended use case for the IPs you purchase; sensitive IPs will be filtered based on your business needs.
-
Allocate by segment: On each city IP segment card, review subnet details and available stock, then enter the quantity to purchase from that segment.
-
Bandwidth: Choose from multiple peak rate tiers based on your throughput needs, with a Custom input option.
-
Connections (QPS): Queries per second. Presets include 500 and 1000, covering workloads from basic access to high concurrency.
-
UDP: Disabled by default. Enable it if your application requires real-time data or UDP-based protocols (additional fees apply).
-
Period: Plans from 30 to 365 days. Longer terms (e.g. 90 or 365 days) include tiered discounts.
1.2 Order summary
The Order Summary panel on the right of the purchase page is your real-time billing center. It aggregates all selected configuration parameters, supports adding remarks, and requires you to enter the IP purchase quantity. The system validates inventory and calculates pricing. After discounts are applied, the final Due now is shown.
- You can click Add to cart for batch purchasing. Click the cart icon in the top bar to open the cart page, review items, then click Place Order to check out together.
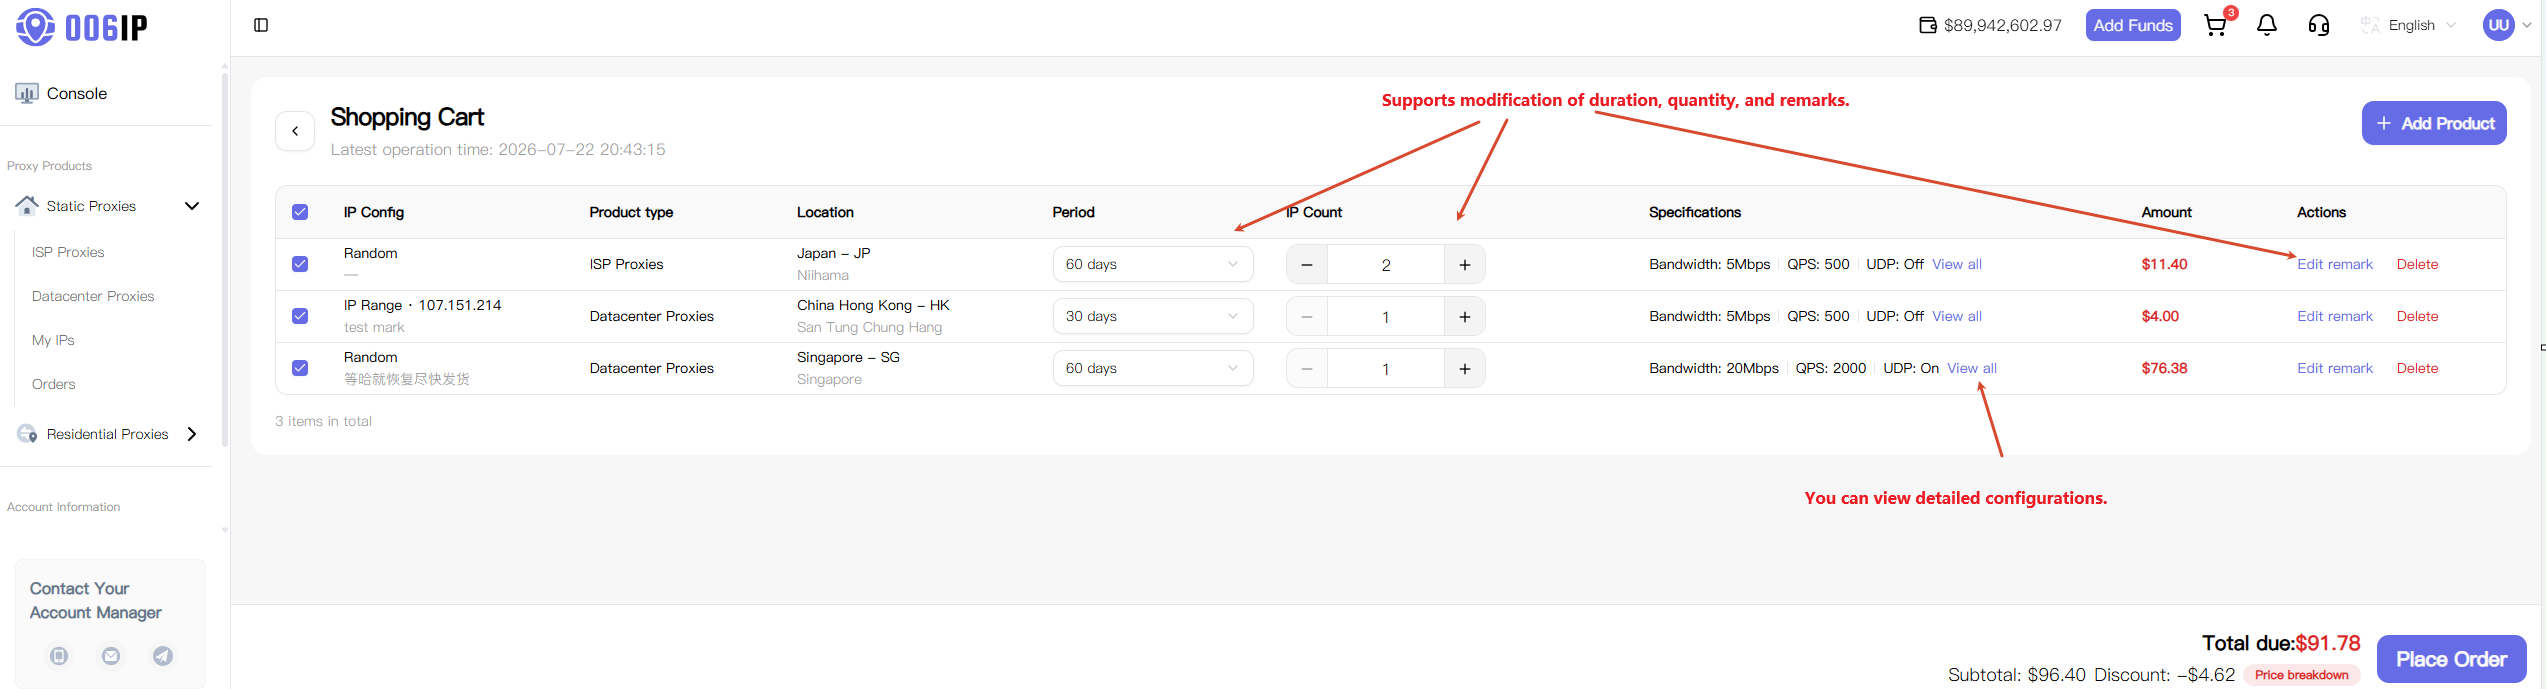
- Or click Place Order to go directly to the checkout page.
1.3 Order payment
-
Selected IP resources are reserved for 15 minutes on the checkout page. Unpaid orders release the reservation when the lock expires.
-
Payment methods include account balance, online payment, and combined balance + online payment. Balance payment requires your platform payment password.
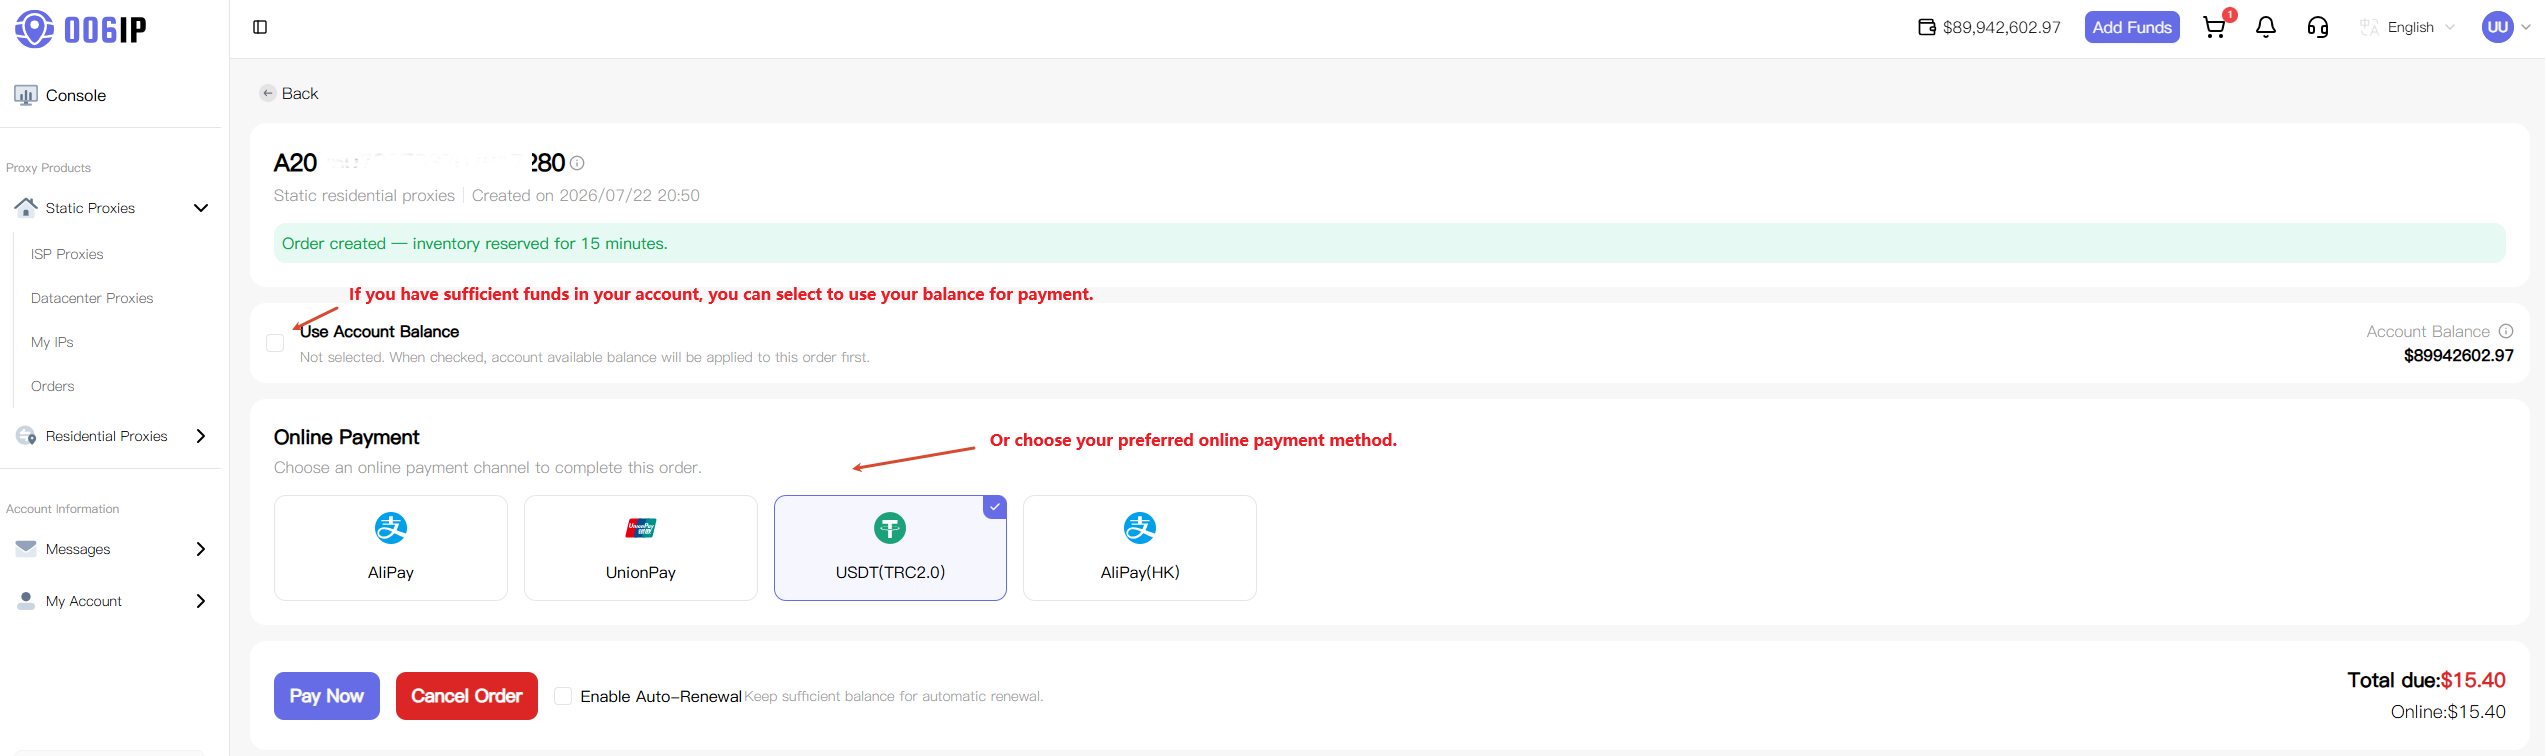
Inventory lock: On checkout, the system locks the configured proxy IPs in the network pool for 15 minutes. If payment is not completed in time, the batch is released automatically.
Flexible payment: Use account balance, online payment, or a combination. When balance is insufficient, the full available balance is applied first and the remainder can be paid via online channels (e.g. USDT, WeChat Pay, Alipay). Balance deductions require your payment password. The checkout page shows Total Due.
2. View purchased static IPs
After payment succeeds, open My IPs to see all purchased IPs. You can renew, disable, enable, export credentials, and more.
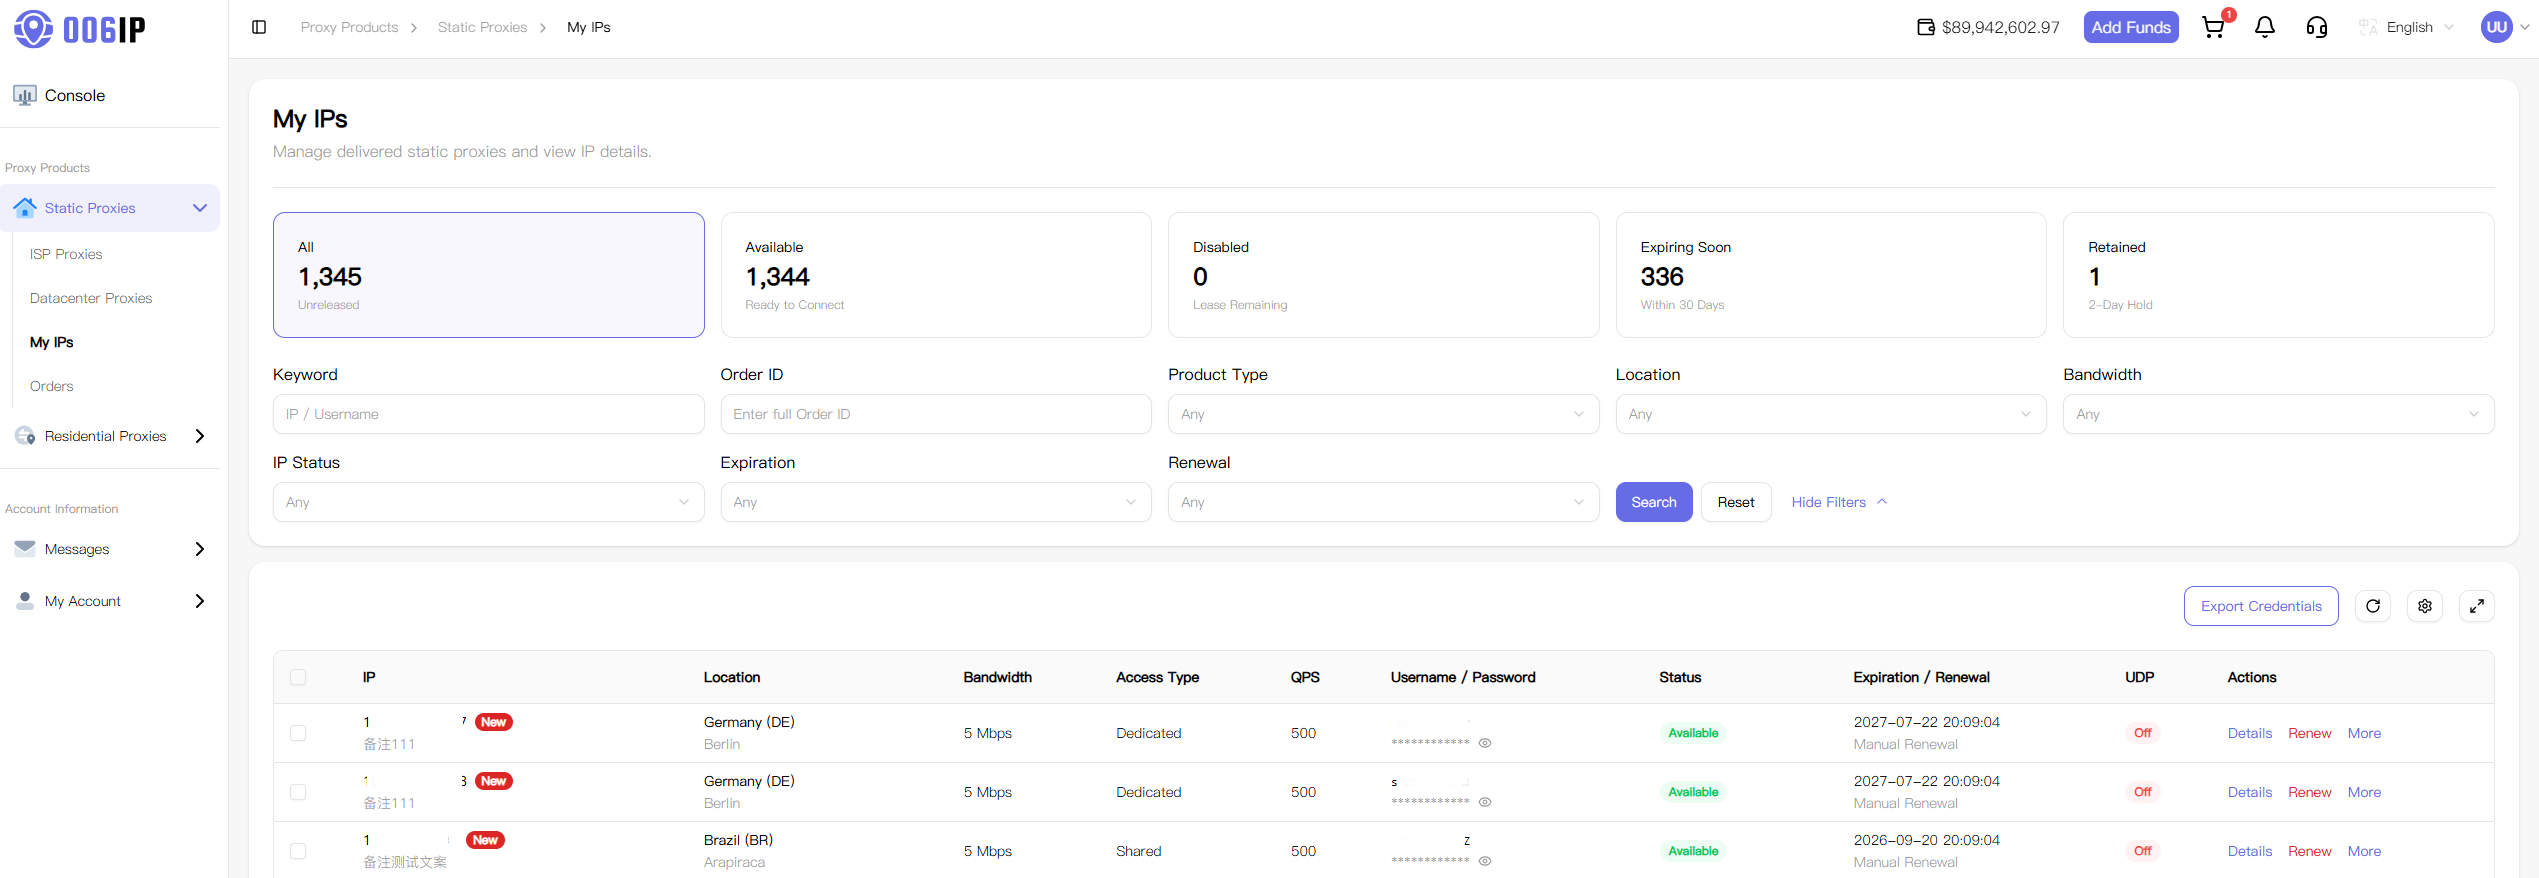
Node status monitoring: The list shows bandwidth, QPS, UDP status, and lifecycle state (available, disabled, expiring soon, expired retention, etc.).
Lifecycle management: From the actions column, Renew to extend authorization, Disable / Enable to block or restore connectivity, or open Details for network information.
Credential export: Click Export Credentials in the top-right corner to batch-download authentication details (username/password) for integration with your automation stack.
Auto-Renewal
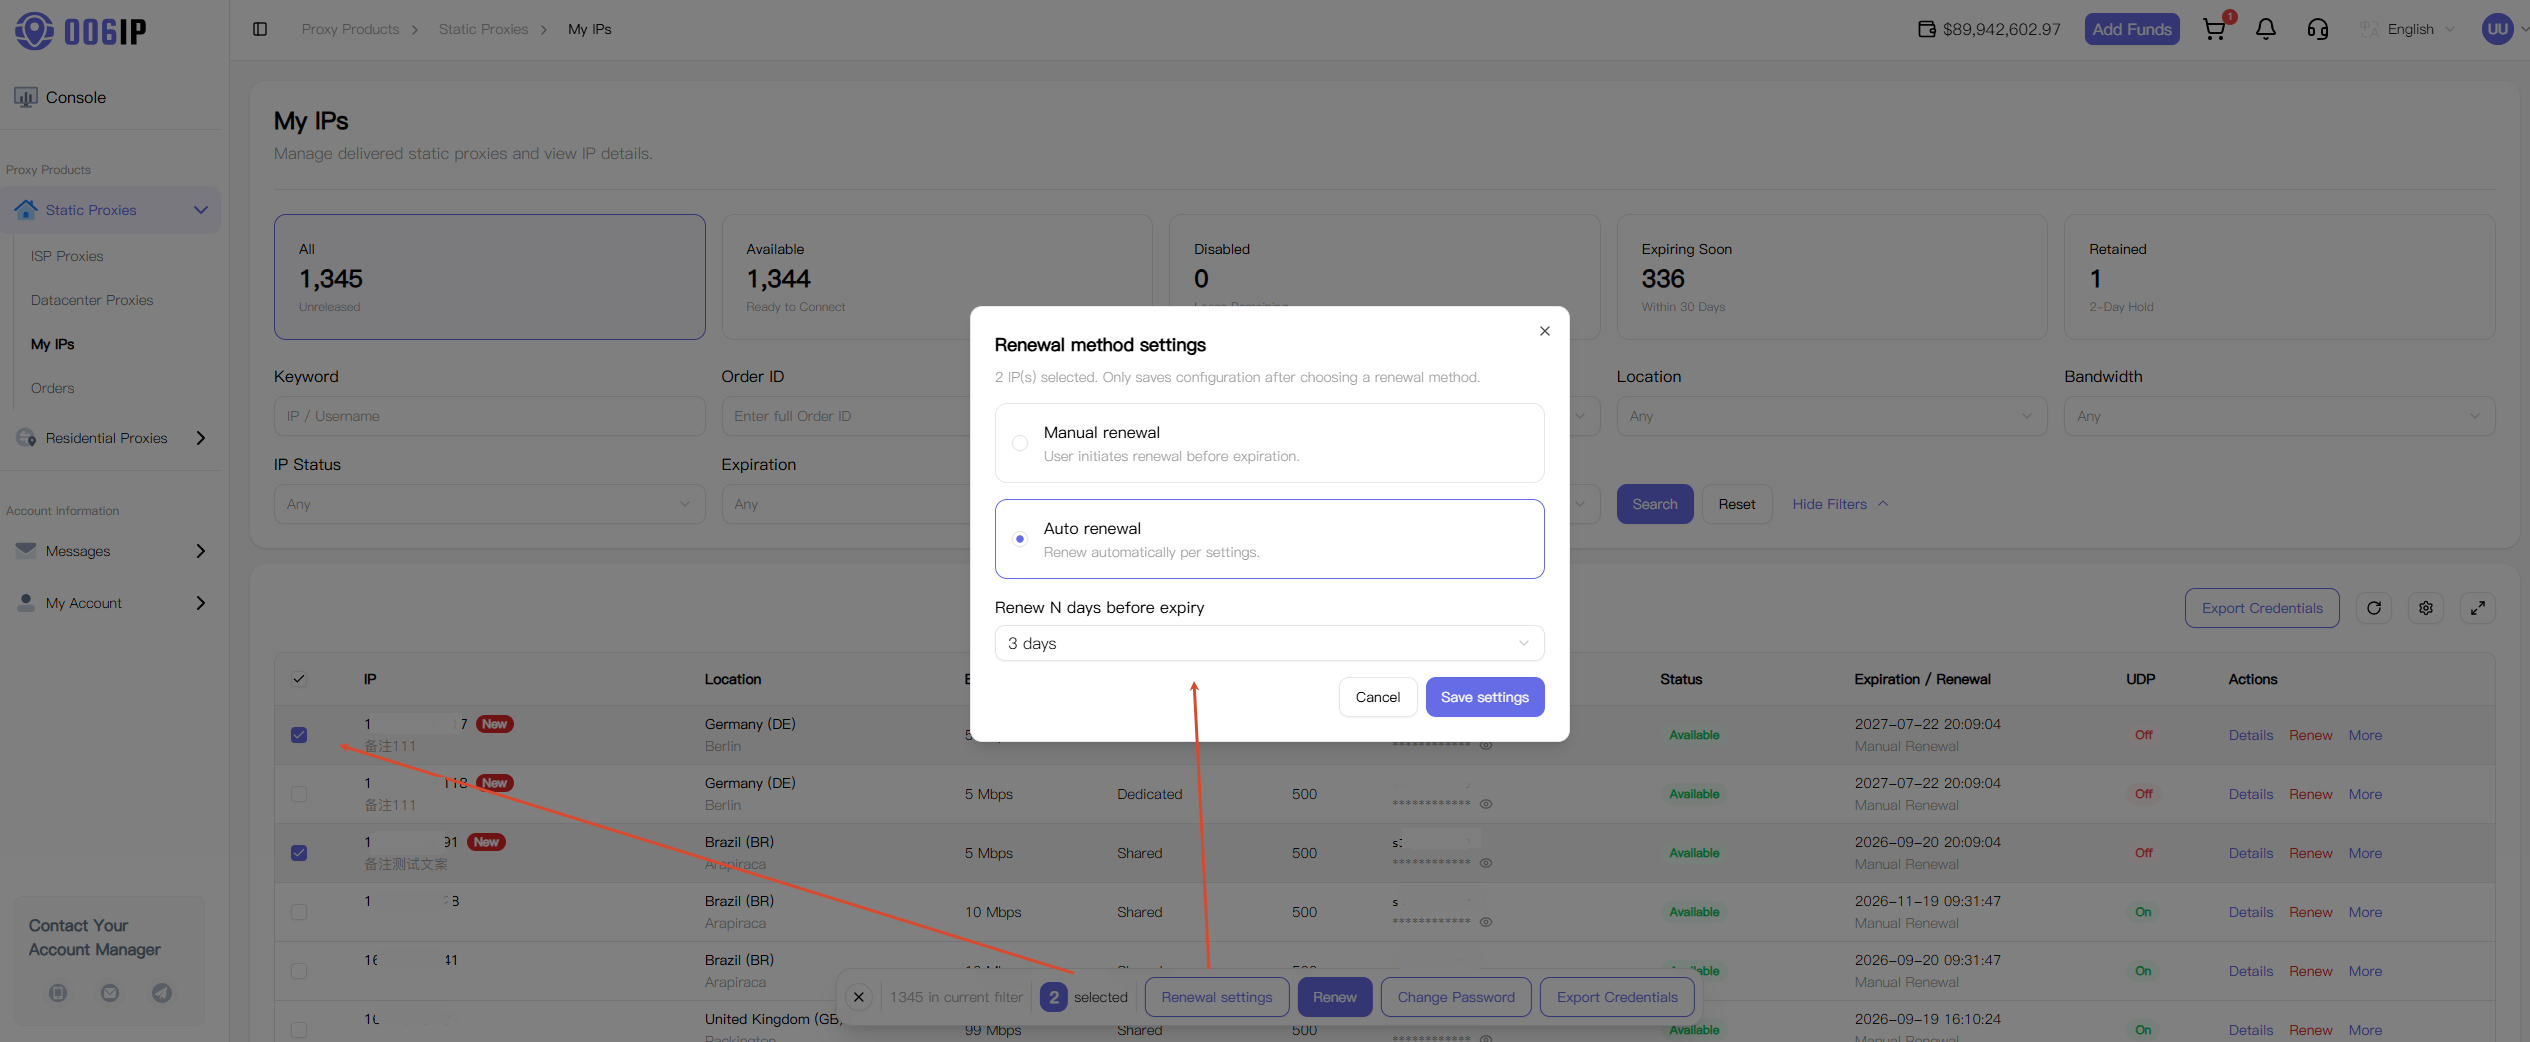
Enable Auto-Renewal and set a trigger threshold (e.g. renew 3 days before expiry). The system deducts your account balance and extends authorization automatically, reducing the risk of accidental release due to missed manual renewals.
Manual Renewal
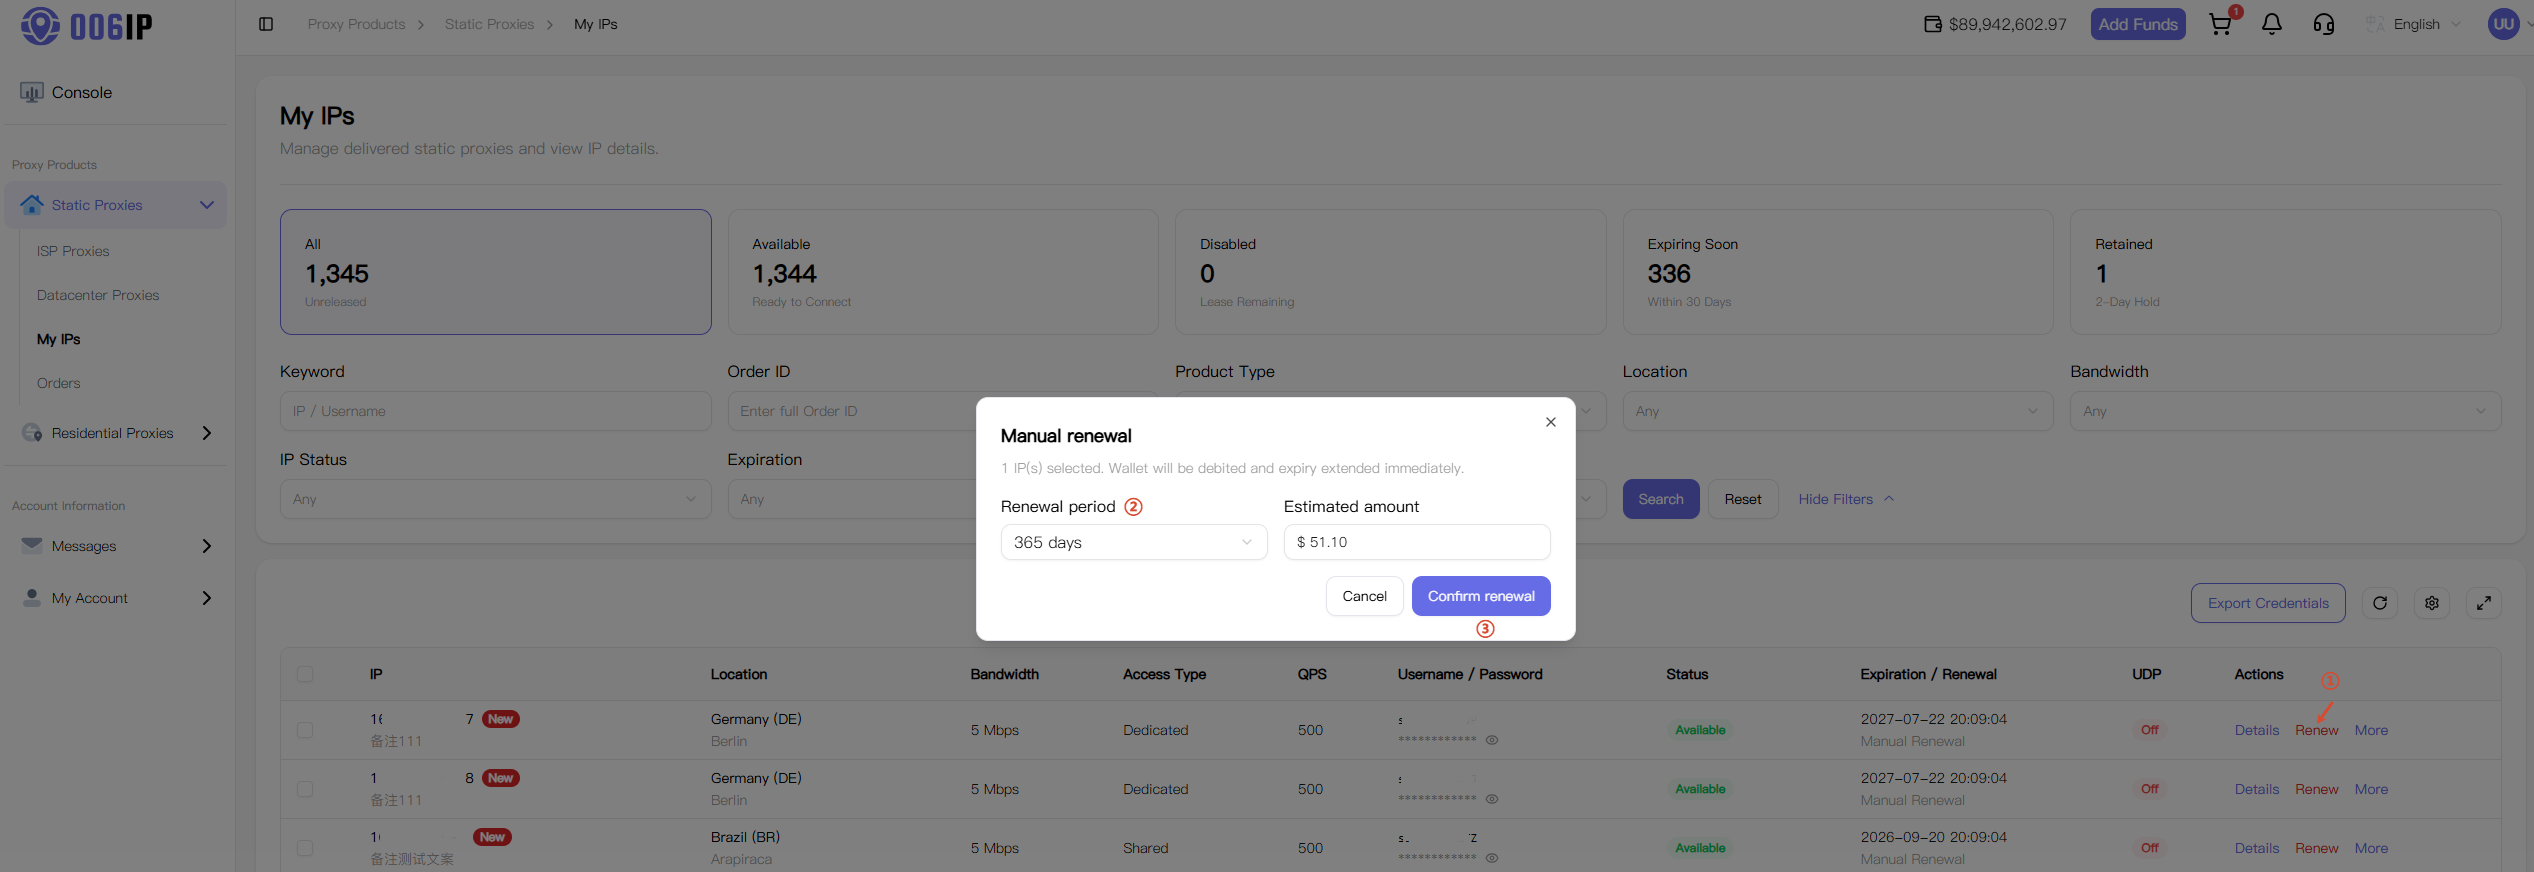
Use Manual Renewal for one-off extensions. In the dialog, select a Renewal period (e.g. 30 days). The system calculates the estimated amount based on selected nodes and duration.
Export static IP credentials
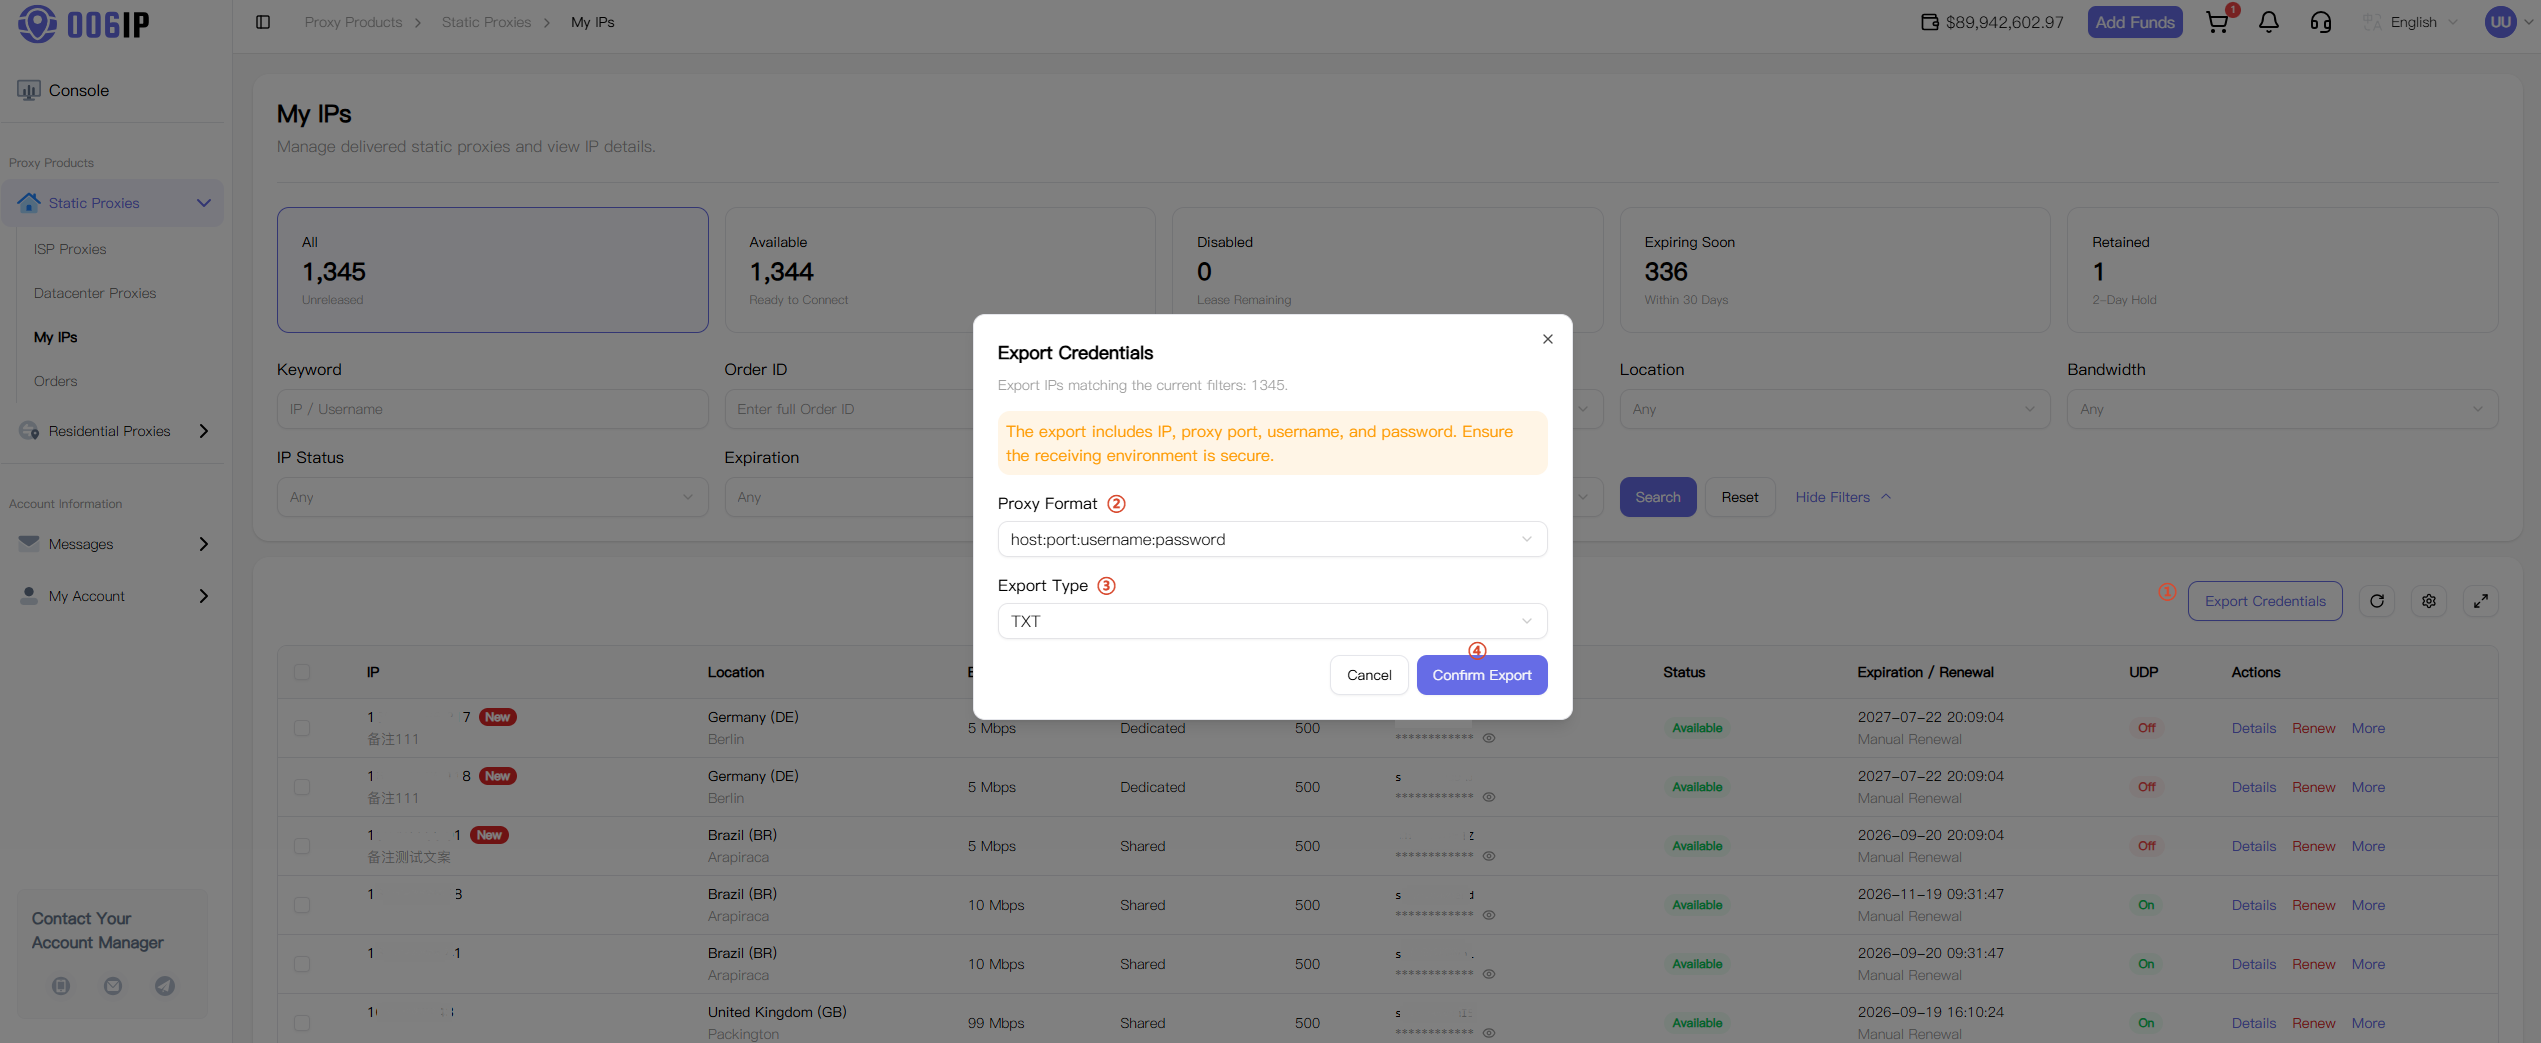
For large-scale deployment and automation, export connection credentials for selected nodes:
-
Start export: On the list page, click Export Credentials to open the configuration panel. By default, the export scope follows your current filters and targets the matching IP range.
-
Choose output format: Use the Proxy Format dropdown to match third-party tools or scripts (e.g.
host:port:username:password). -
Export Type: Supports
txt,json, andcsv.
3. Test static IP connectivity
After obtaining credentials, verify connectivity and egress IP from your local terminal using curl:
IPv4 test commands
# http
curl -x http://username:password@IP:PORT https://ifconfig.co

# socks5
curl -x socks5h://username:password@IP:PORT https://ifconfig.co

Replace username:password@IP:PORT with your actual credentials. If connectivity and authentication succeed, the terminal returns the proxy's egress IP from the test site (e.g. ifconfig.co). Confirm it matches your purchased node IP.
IPv6 test commands
# http
curl -x http://username:password@[IPv6]:PORT https://v6.ipinfo.io

# socks5
curl -x socks5h://username:password@[IPv6]:PORT https://v6.ipinfo.io

Replace the placeholders with your node credentials. On success, the proxy forwards the request to an IPv6-only test endpoint (e.g. v6.ipinfo.io) and returns a JSON snapshot including egress IPv6 address, city, ASN, and related network details.