Clash Verge Chain Proxy Guide
If you already have a working overseas network environment, follow the "Configure Clash Verge" section. If you do not, follow the "Chain Proxy" section first.
006ip provides residential proxy infrastructure for businesses, developers, and cross-border teams, including dynamic residential IPs and static residential IPs. The platform supports country/region and city-level targeting, plus dashboard options such as IP allowlists, authentication methods, and location modes—suitable for compliant data collection, localized page testing, price monitoring, ad verification, and maintaining cross-border business environments.
Static residential IPs offer long-lived fixed egress addresses and are a better fit when you need continuity and connection stability. This guide walks through registration, trial traffic, purchasing, exporting credentials, and configuring proxies in Clash Verge.
Need help? Contact us anytime:
- Telegram: https://telegram.me/ip006ip
- Phone:
15673887335- Email: support@006ip.com
Getting Started
1. Create and sign in to a 006ip account
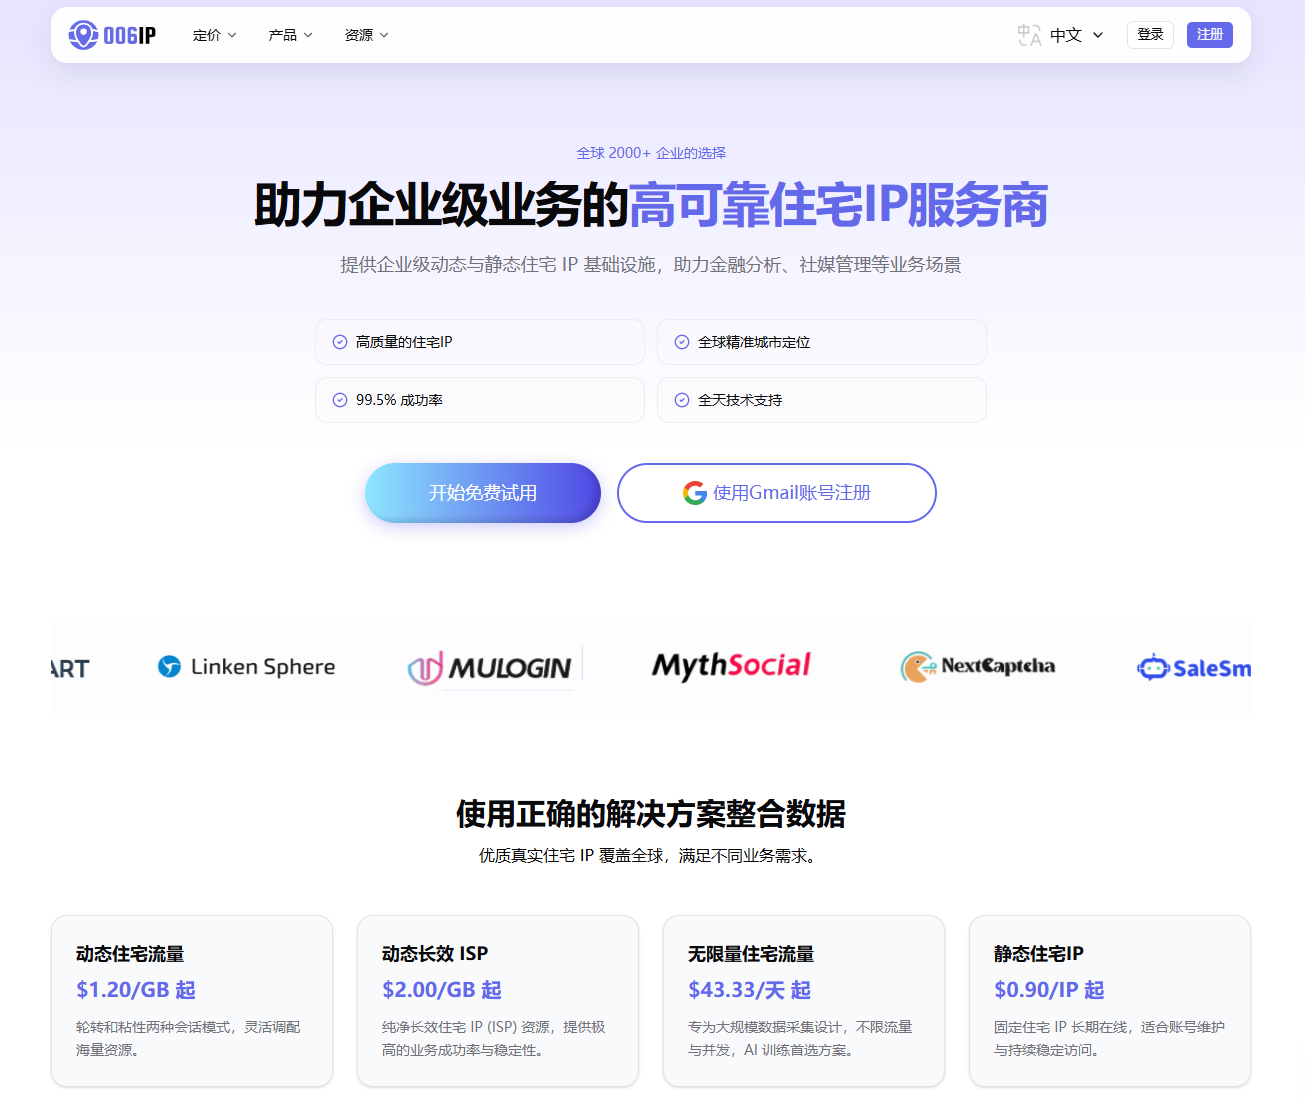
Step 1: Open the 006ip website, then click Register in the top-right corner. If you already have an account, click Log In.
Step 2: On the registration page, choose one of the following methods:
Option A: Email registration
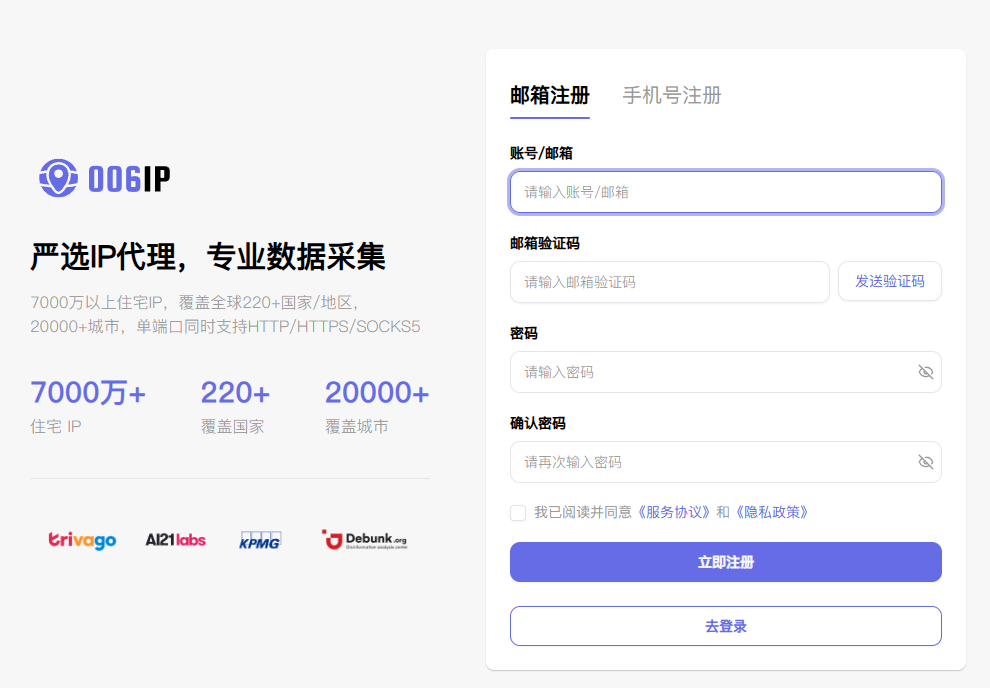
Select Email registration, then enter your account/email, email verification code, password, and confirm password. Click Send code, check your inbox for the code, accept the Terms of Service and Privacy Policy, then click Register now.
Option B: Phone registration
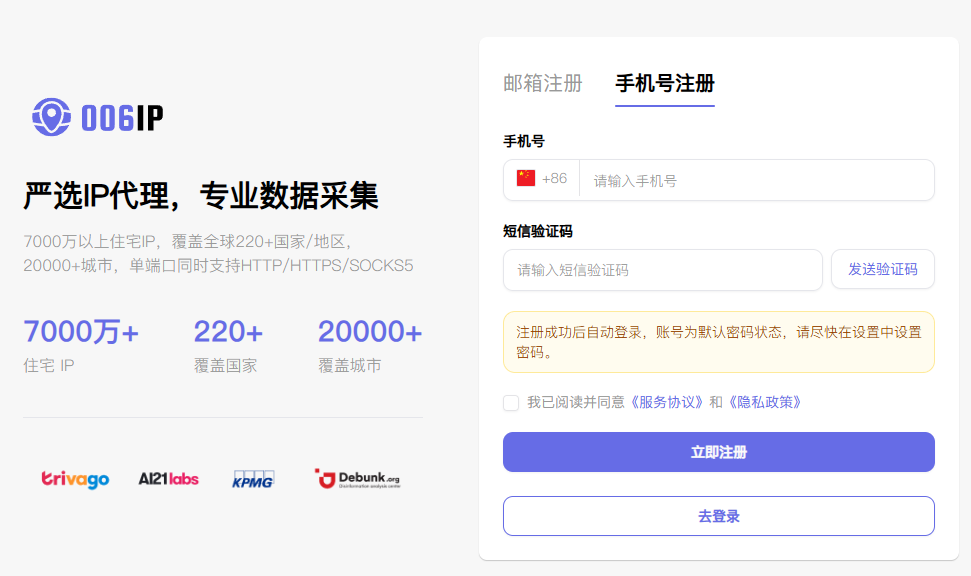
Select Phone registration, confirm the country/region code, enter your phone number, click Send code, and enter the SMS code. Accept the Terms of Service and Privacy Policy, then click Register now.
After phone registration succeeds, you are signed in automatically with a default password. Set your own login password in account settings as soon as possible.
The homepage also offers Sign up with Gmail. If you use Gmail, follow the on-page authorization flow.
2. Claim trial traffic
006ip currently offers a new-user trial: contact support to receive 1GB trial traffic for free. Eligibility, available products, and validity follow the campaign page and support reply.
Use trial traffic first to validate target regions, protocol compatibility, and business connectivity before choosing a paid plan.
3. Purchase static residential proxies
After signing in to the 006ip dashboard, open Static Proxies in the left sidebar, then choose ISP Proxies or Datacenter Proxies to enter the purchase page.
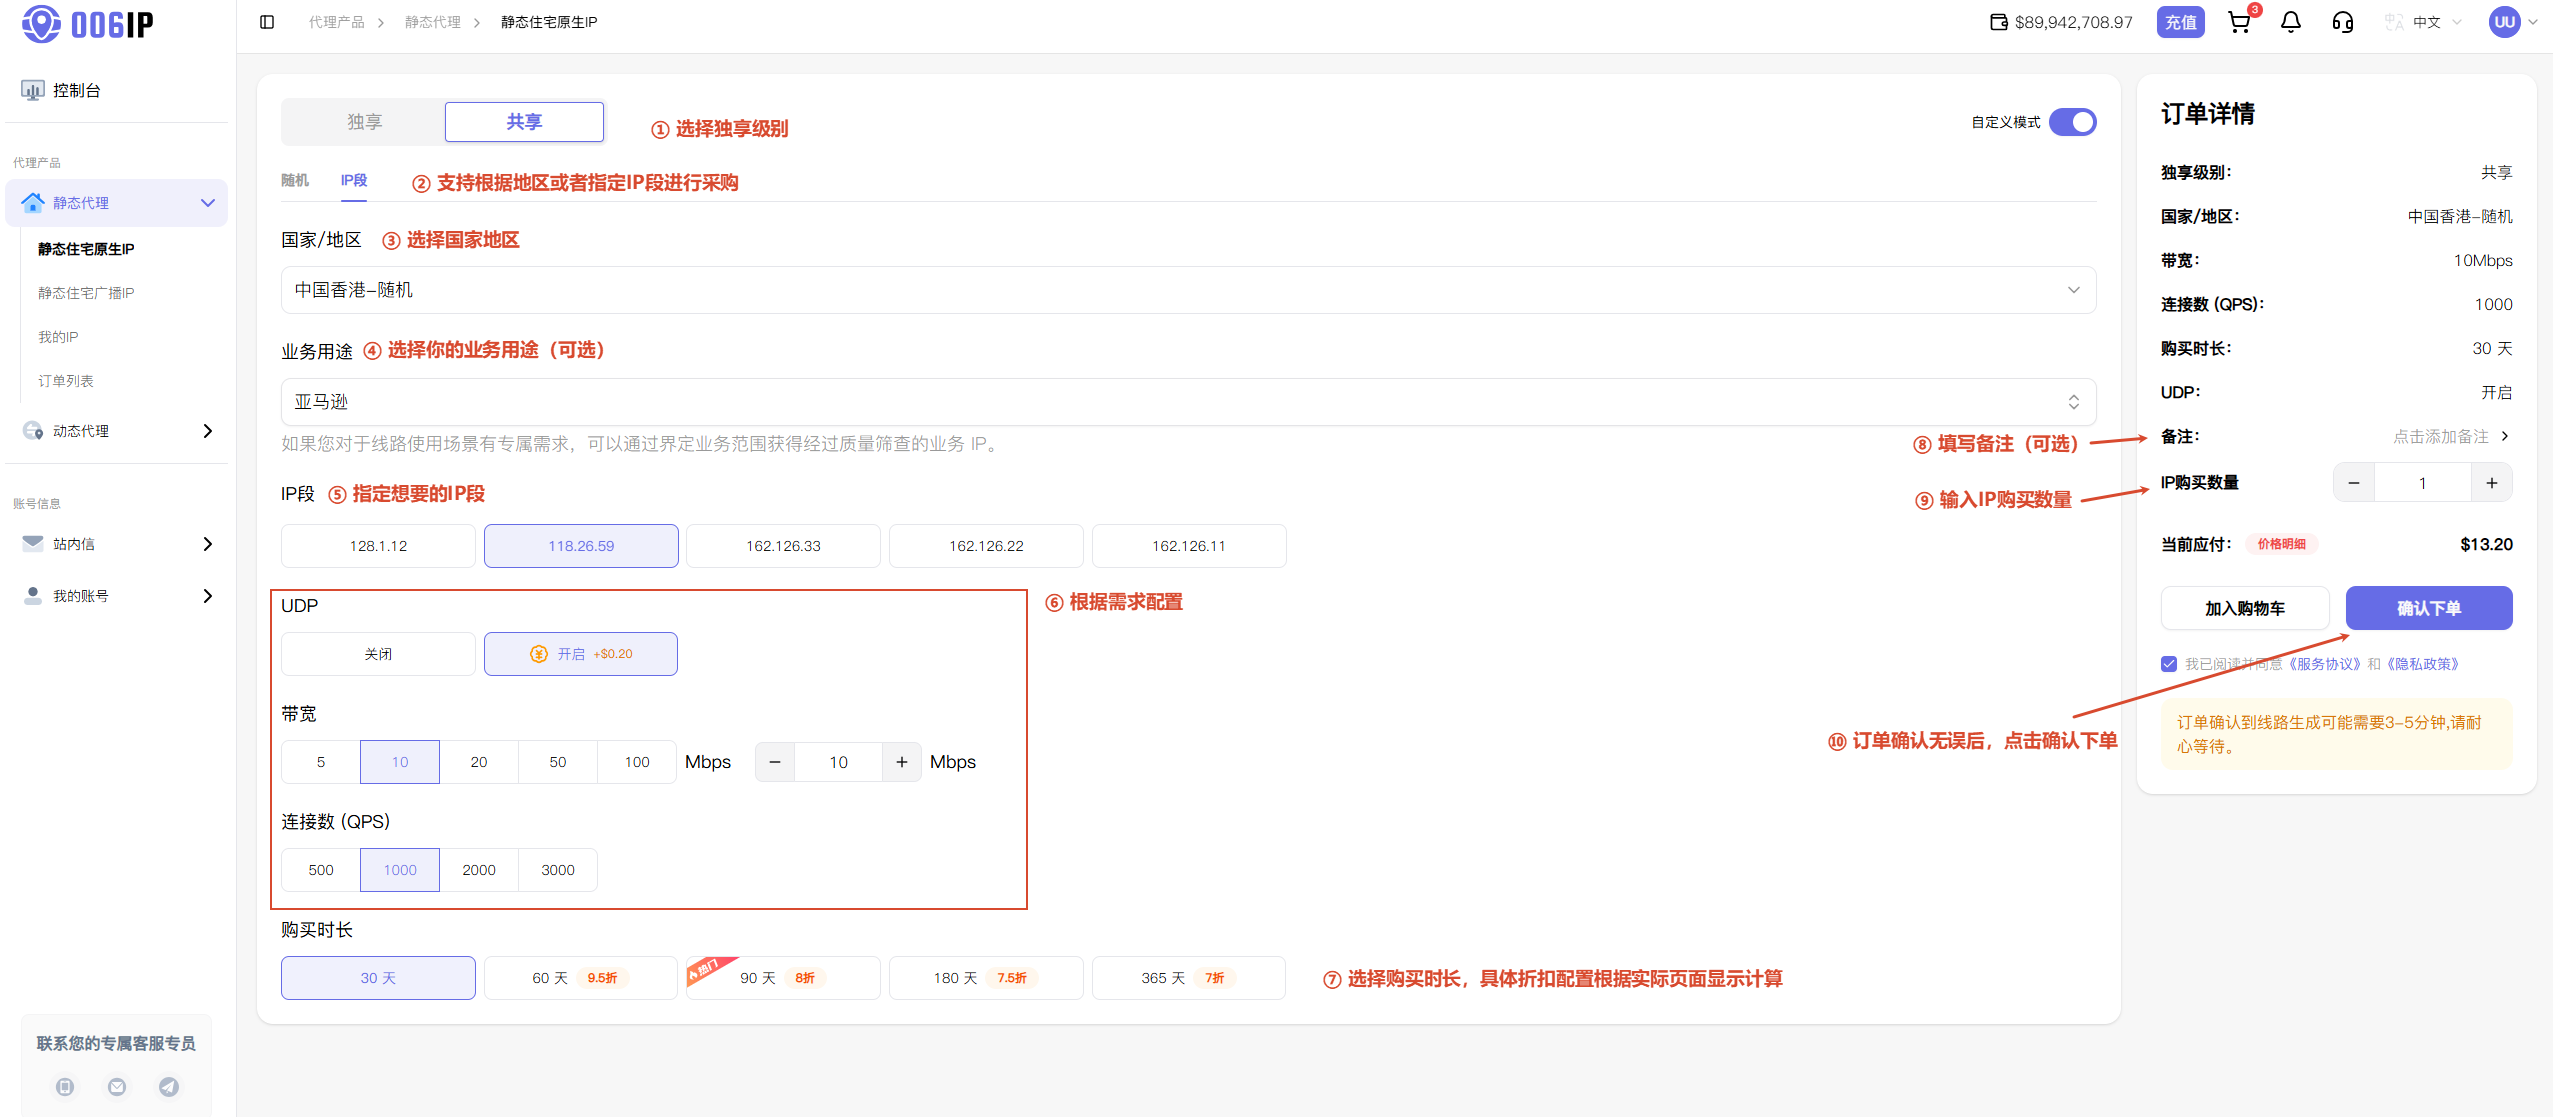
Step 1: Choose a purchase mode and set proxy attributes
The purchase page provides Quick Configuration and Custom Configuration. Both modes calculate pricing in real time based on your selections, but they fit different needs.
(1) Quick Configuration
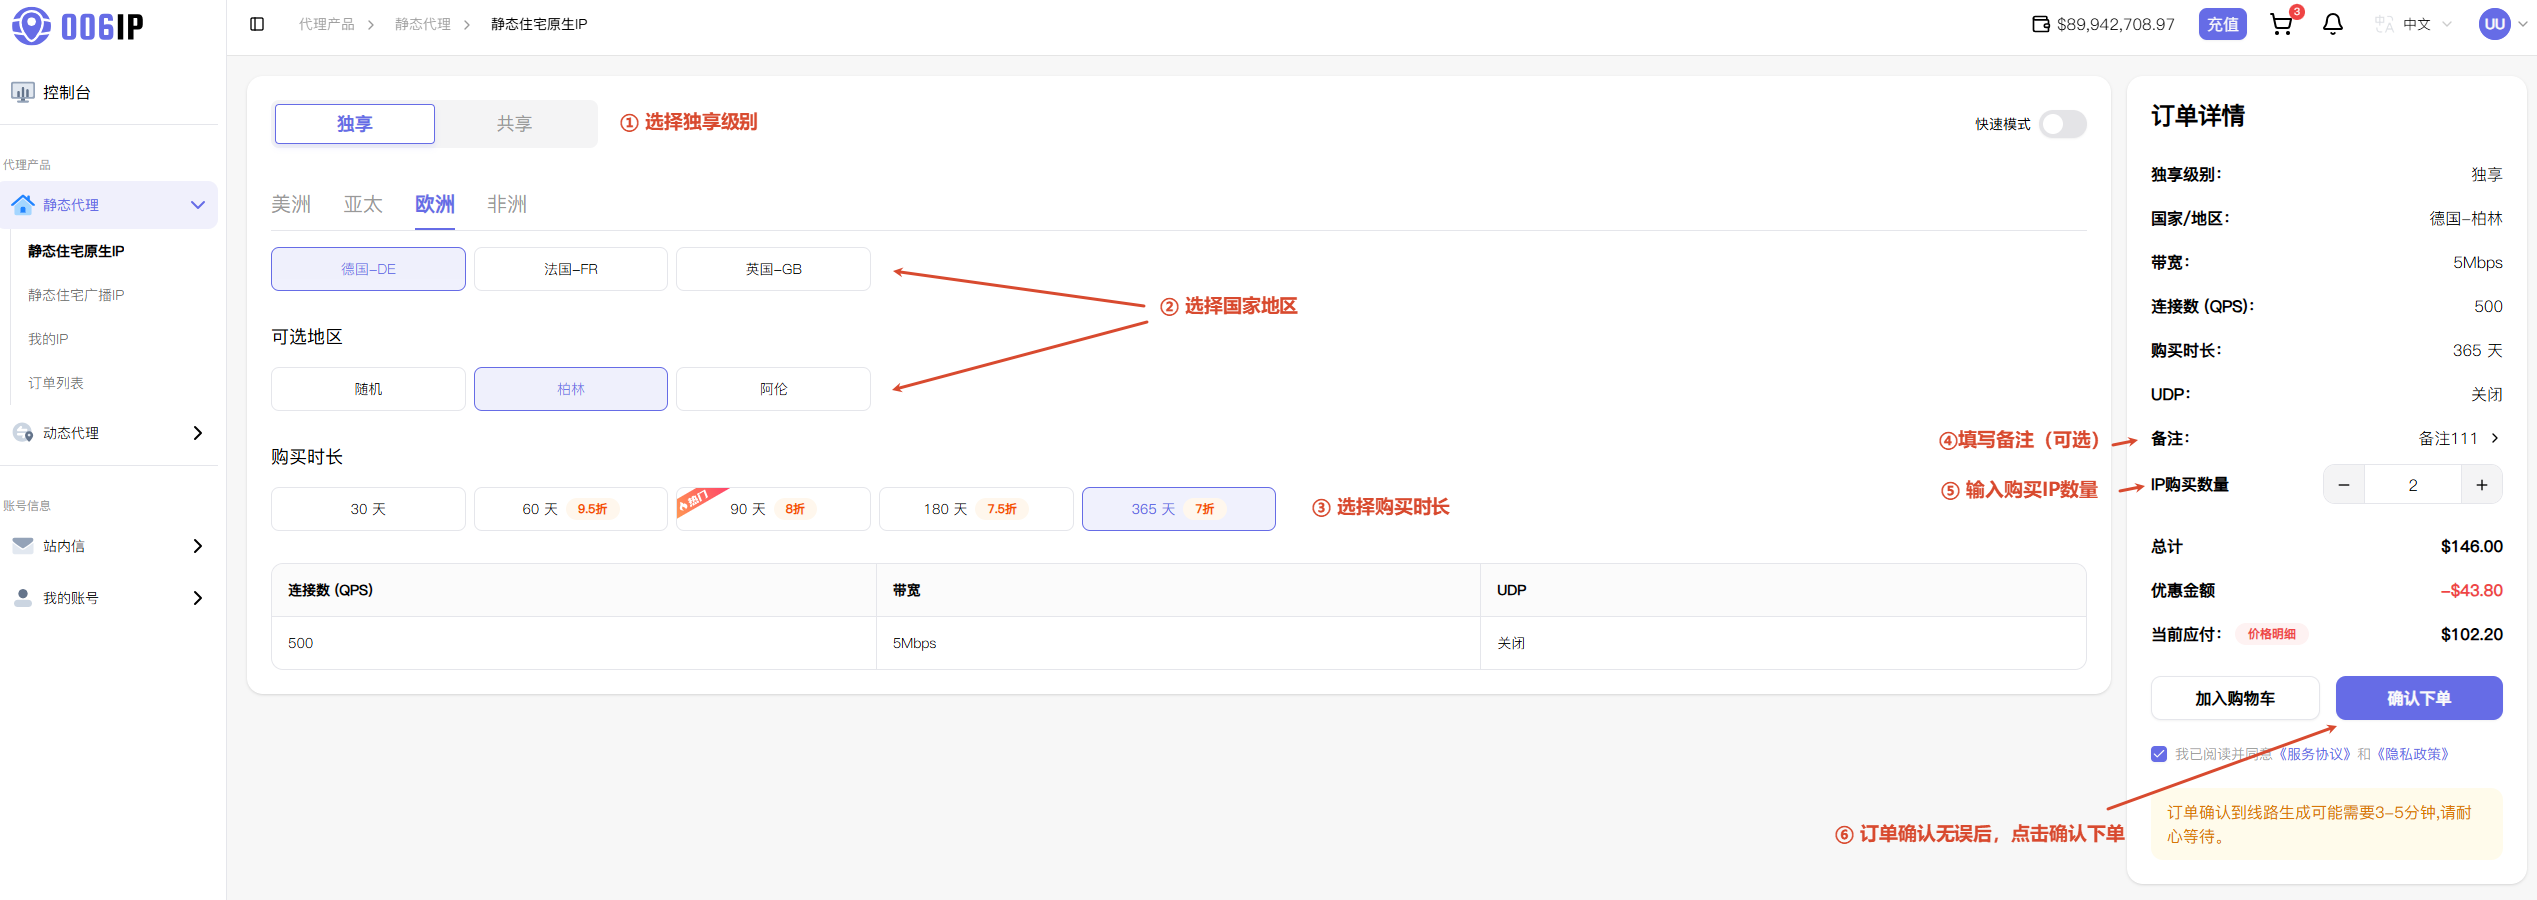
Quick Configuration is for users who want platform default network settings and a fast checkout. Configure:
| Parameter | Description |
|---|---|
| Access Type | Choose Dedicated or Shared. Dedicated IPs suit stricter purity, stability, and isolation needs; Shared IPs suit cost-sensitive general access. |
| Country / region and city | Target by country/region and city, or choose Random range for country-wide distribution. |
| Period | Plans from 30–365 days; longer terms may include tiered discounts. Final pricing follows the purchase page. |
| Fixed configuration | Connections (QPS), Bandwidth, and UDP use the default values shown on the page. |
(2) Custom Configuration
Enable Custom Configuration to purchase by IP segment and customize Connections (QPS), Bandwidth, and UDP. You can also set Use case, allocate quantity by city/segment inventory, and choose a Period. Different settings affect pricing—review the Order Summary on the right before submitting.
Step 2: Confirm the order and pay
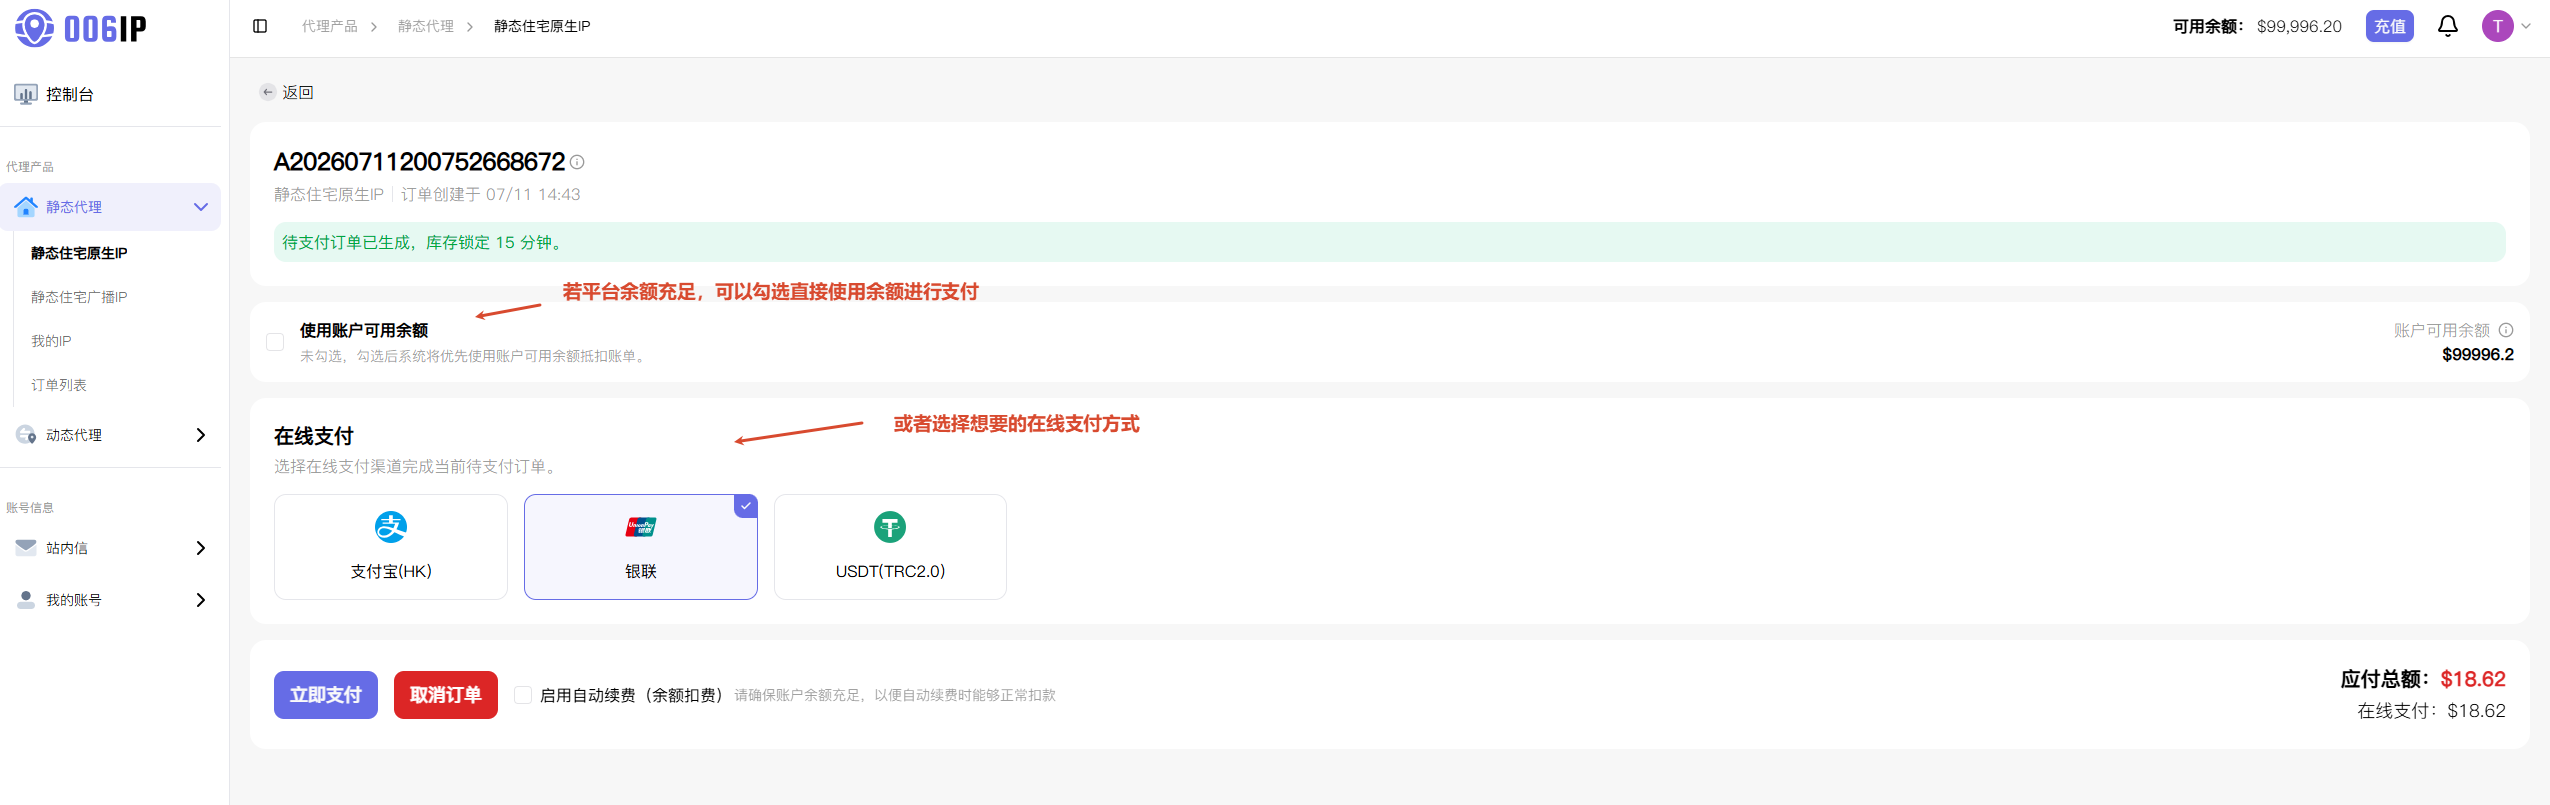
On the checkout page, selected IP inventory is locked for 15 minutes. If payment is not completed in time, resources are released and you must place the order again.
Supported payment methods include:
- Account balance
- Online payment
- Balance + online combined payment
If balance is insufficient, the available balance is applied first and the remainder can be paid online. Balance payments require your 006ip payment password. Available online channels and currencies follow the checkout page.
4. View and export proxy connection details
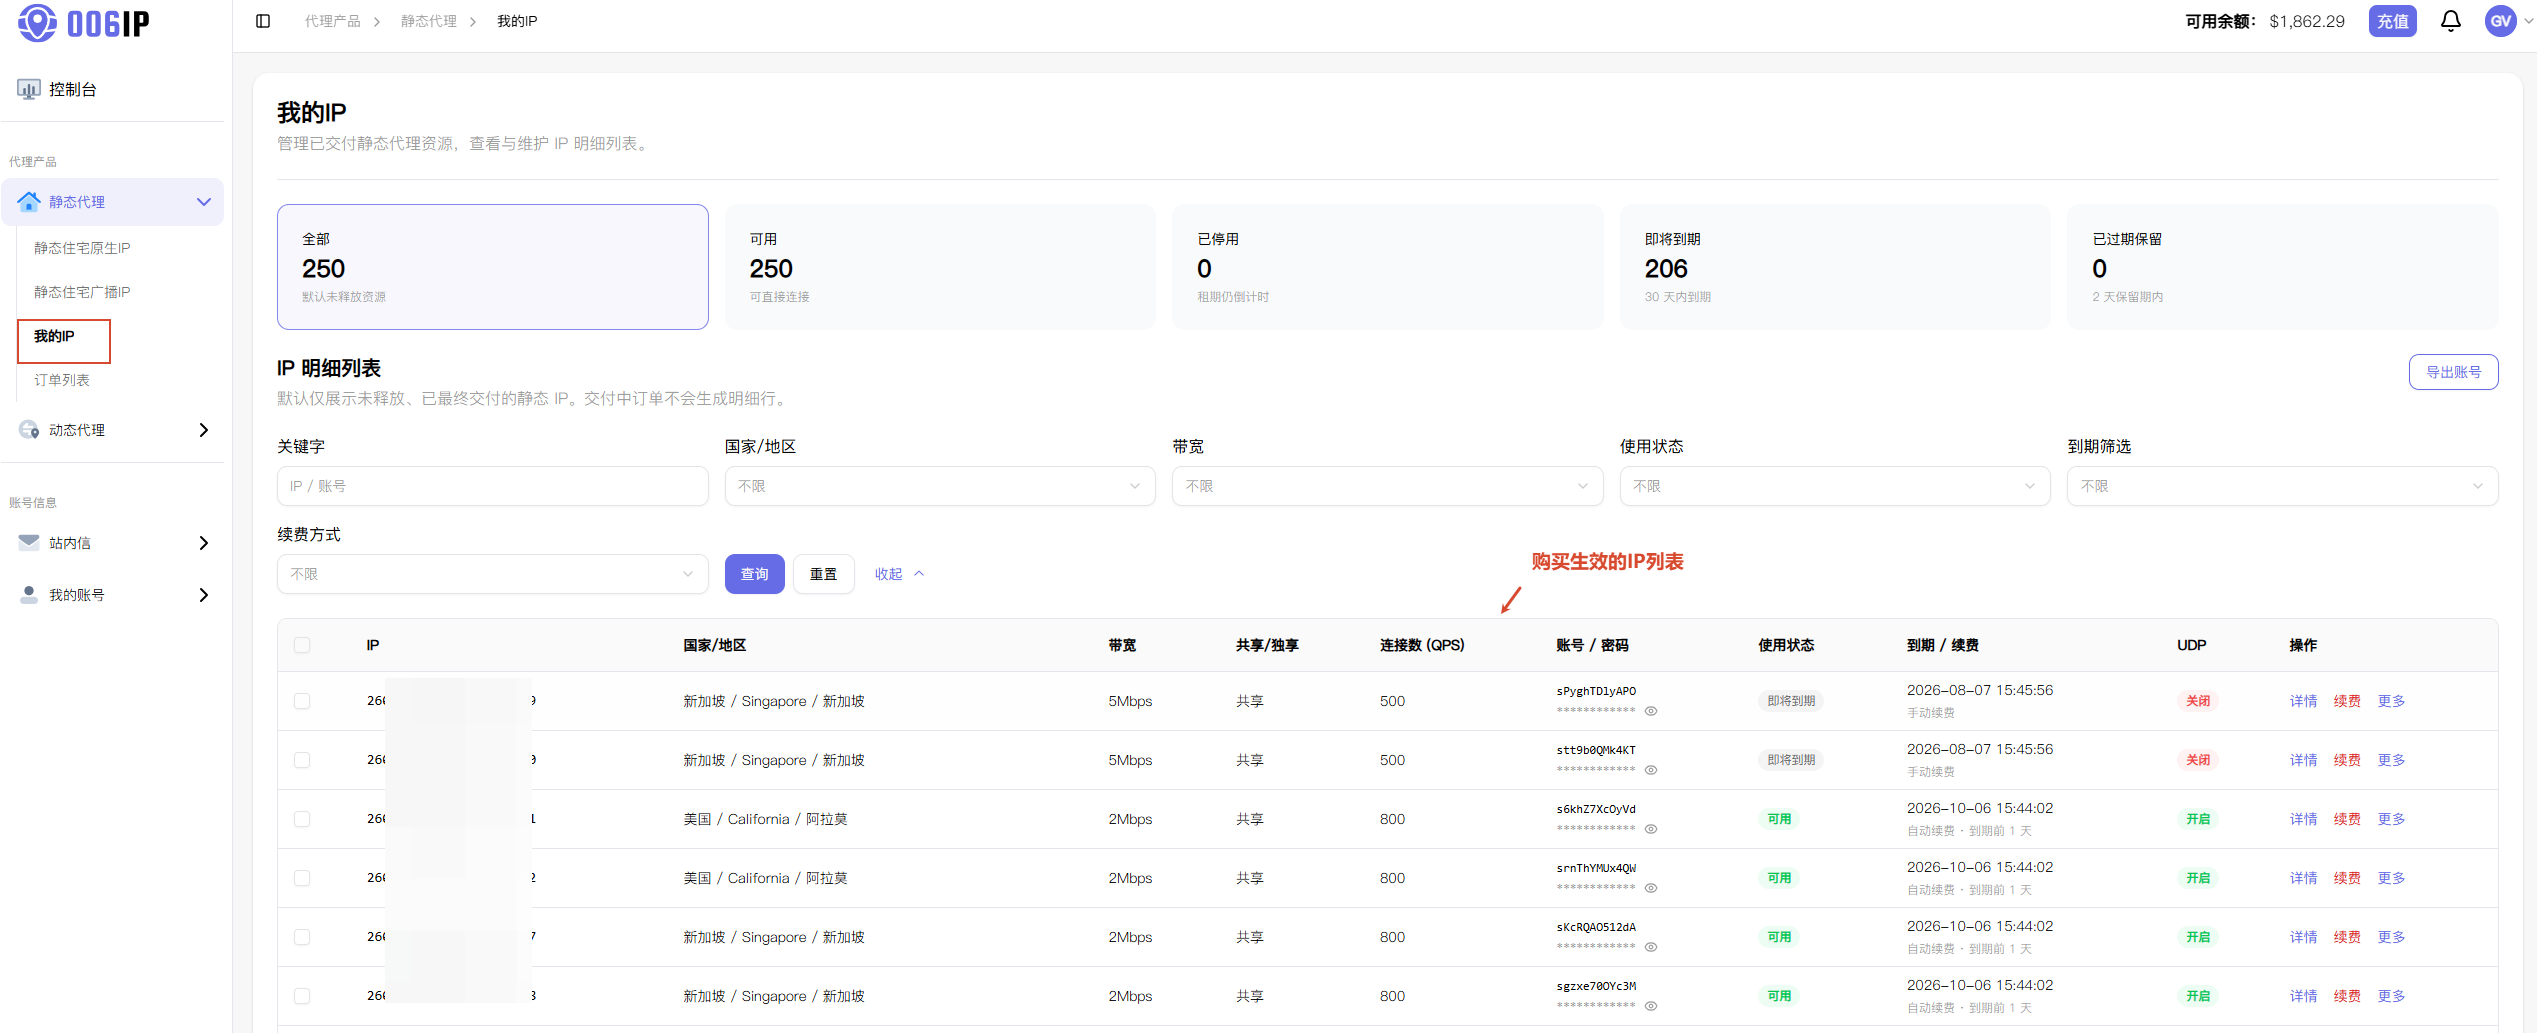
After payment succeeds, open My IPs to view purchased static IPs. The list shows bandwidth, QPS, UDP status, expiry, and resource state, and supports renew, disable, enable, and details.
Before configuring Clash Verge, export these four connection fields:
- Proxy IP address
- Port
- Username
- Password
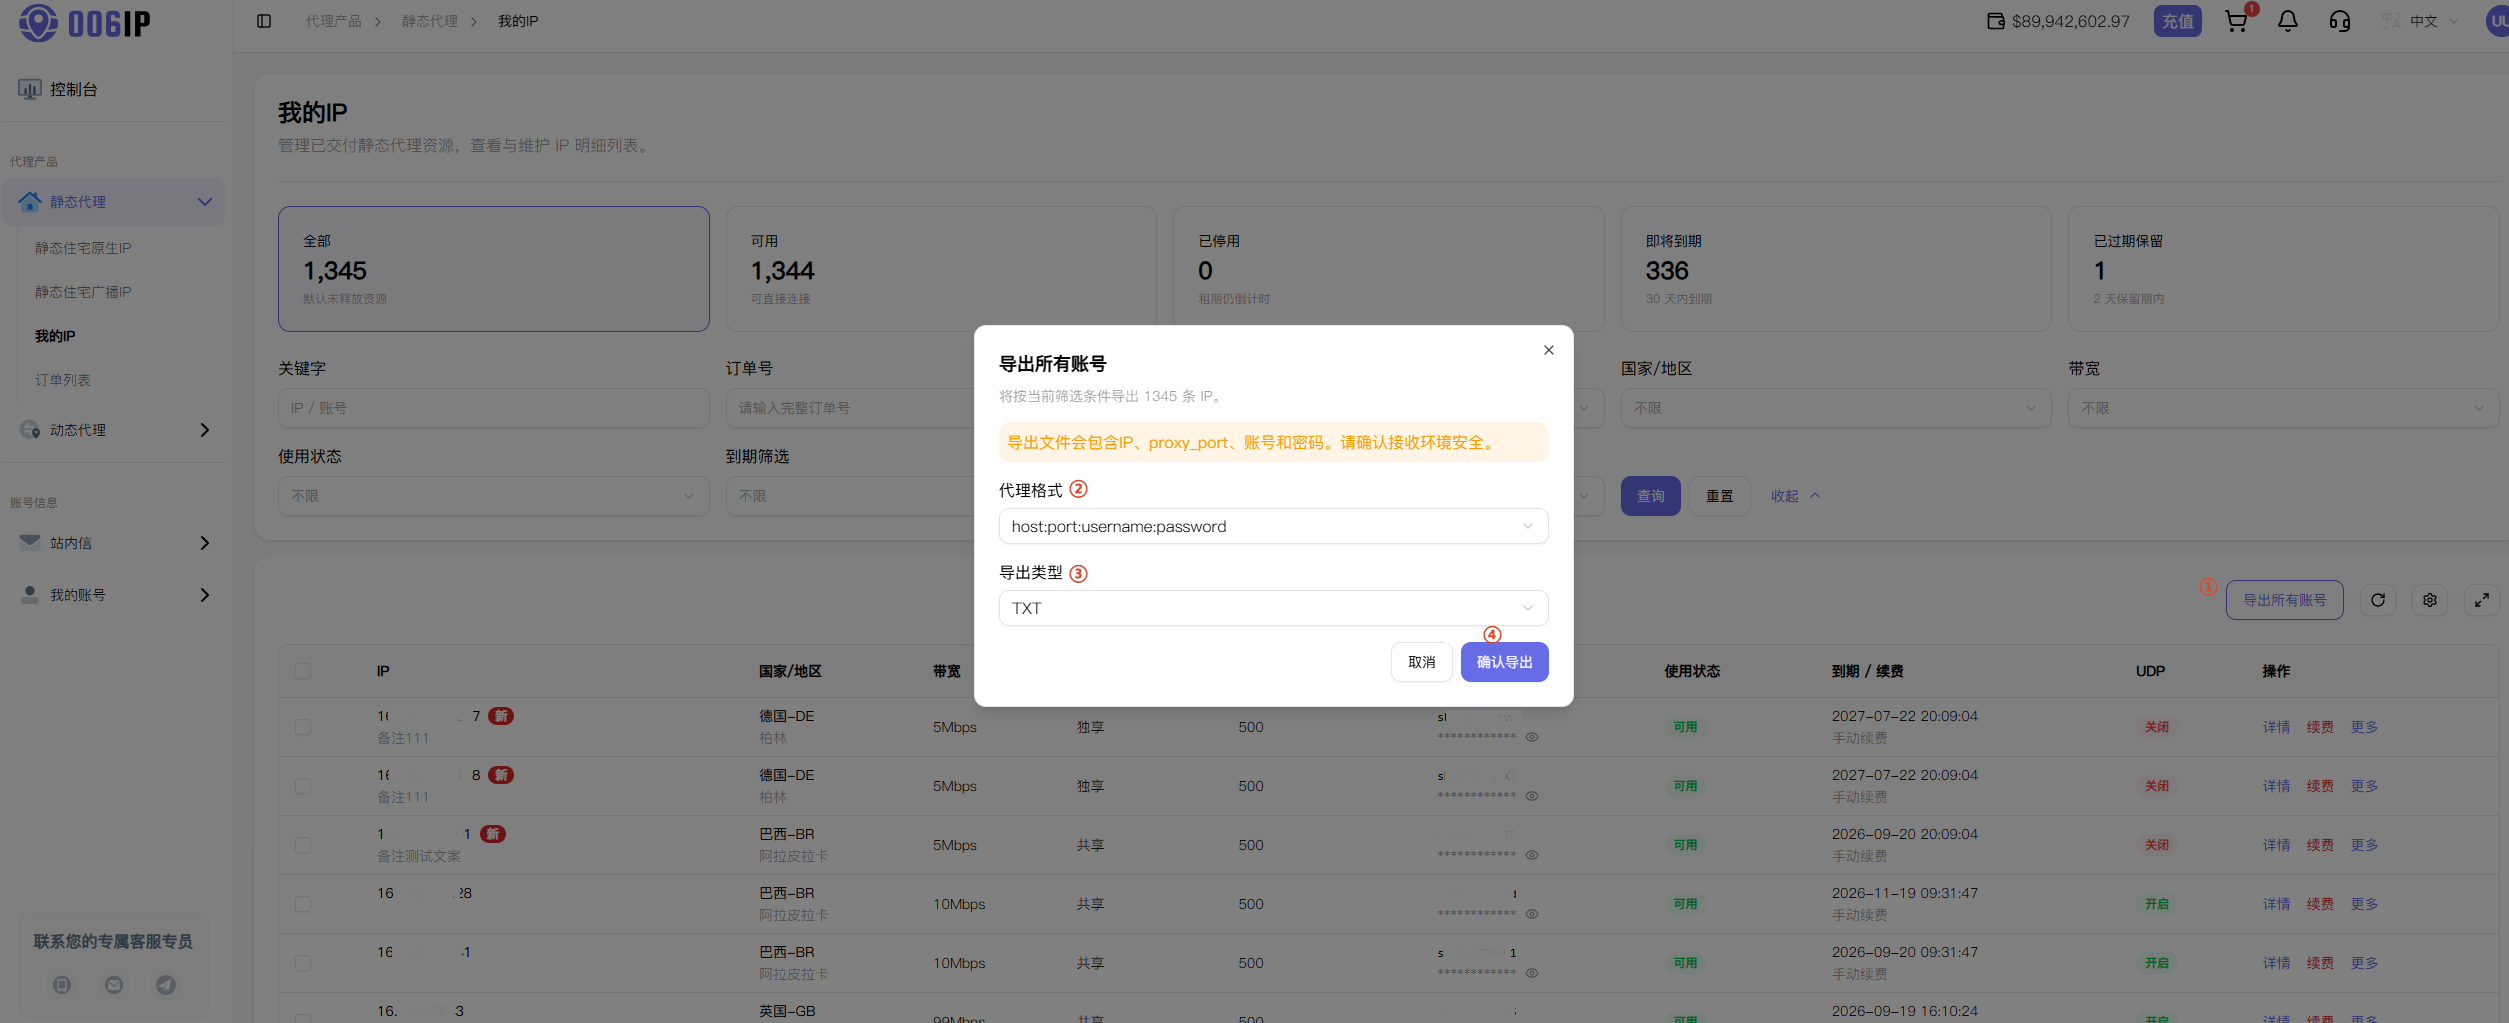
On My IPs, click Export Credentials in the top-right corner and choose a format that fits your client. Clash Verge can use:
IP:PORT:USERNAME:PASSWORD
Exported files contain plaintext credentials. Store the file securely and do not share credentials via public chats, screenshots, or untrusted channels.
For purchase, renewal, and export details, see the 006ip Static Proxy User Guide and the latest prompts in the dashboard.
Configure Clash Verge
This section is written for Clash Verge, a Windows / macOS proxy client based on Clash Meta. Its UI and workflow differ from classic Clash—follow the Clash Verge steps below.
Complete the purchase flow above and have your proxy server address, port, username, and password ready.
1. Prepare proxy connection details
Confirm you have:
- Proxy server address
- Port
- Username
- Password
2. Edit the Clash Verge configuration file
Open Clash Verge and follow these steps:
① Create a local YAML file
Create a text file and paste the content below. Replace placeholders with your real values (keep the English quotation marks):
proxies:
  - name: "proxy1"
    type: socks5
    server: your-proxy-server-address
    port: 7778
    username: "your-username"
    password: "your-password"
    udp: true
If Clash Verge already has other configs, merge the
proxies:section into the existing file and keep your original nodes.
② Create a profile and import the file
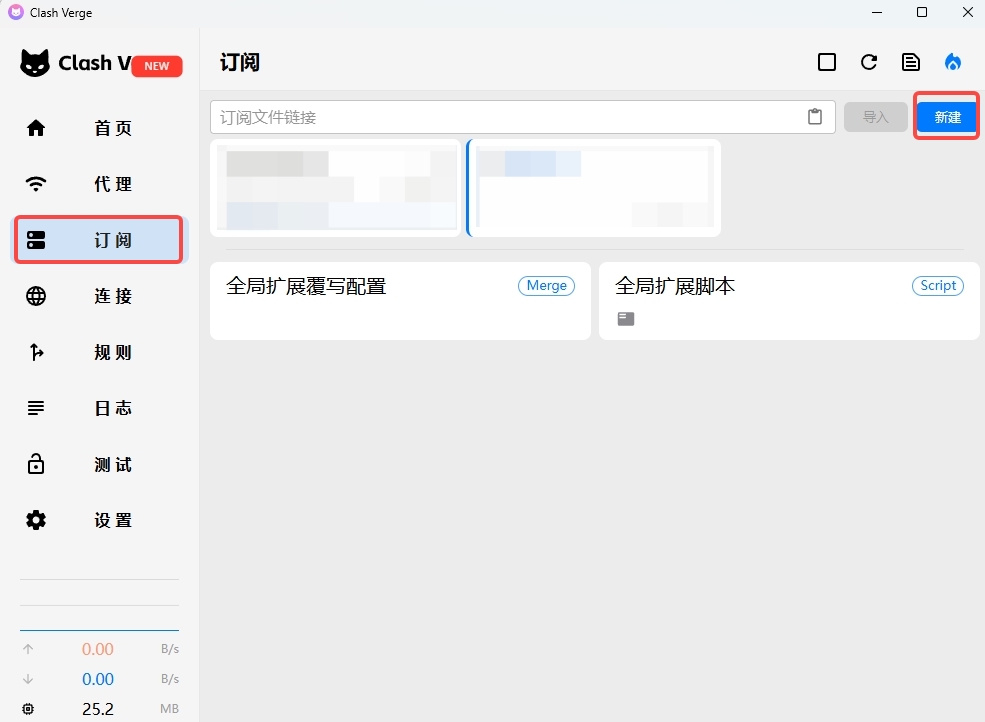
- Click Profiles in the left sidebar, then click New on the right.
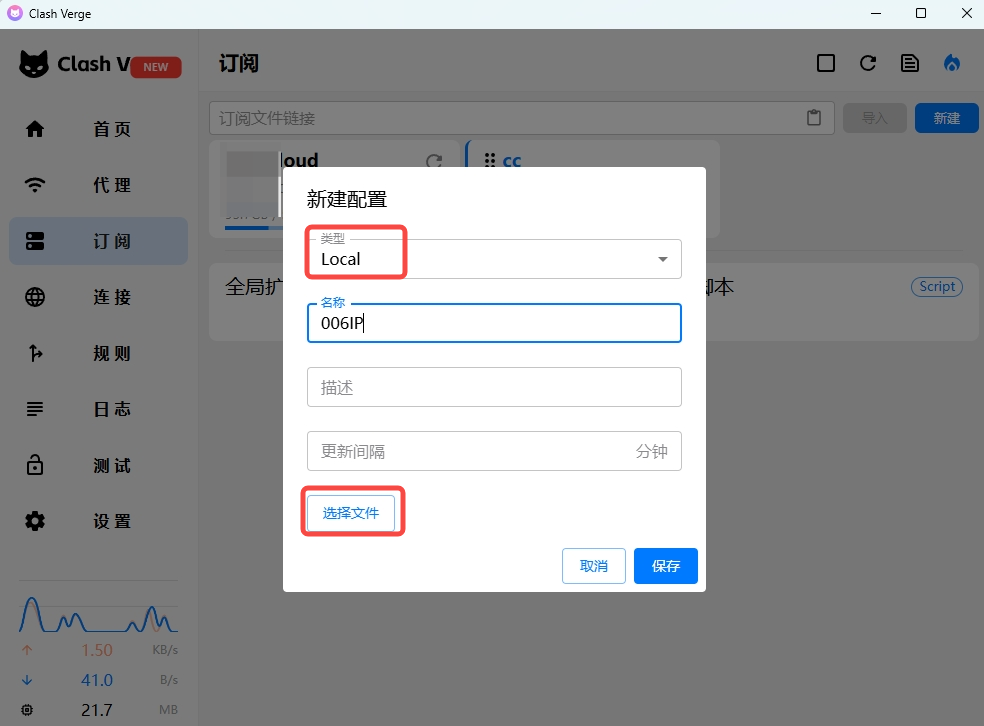
- In the New Profile dialog:
- Type:
Local - Name:
006IP(or another recognizable name) - Click Choose File and select the YAML file you created
- Click Save
- Type:
③ Review the imported configuration
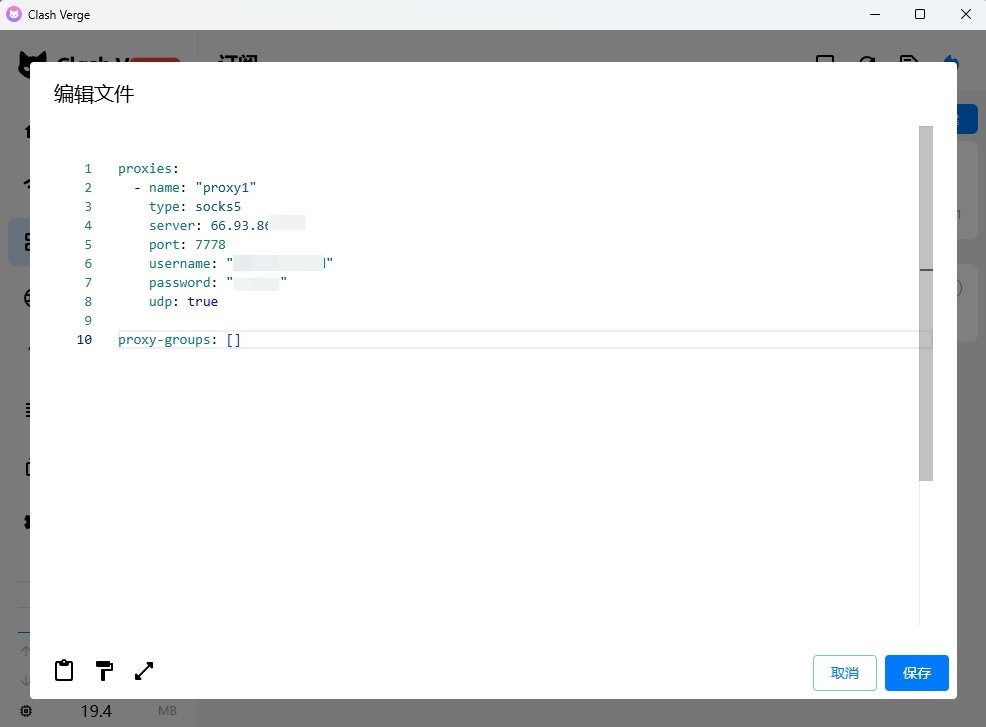
After import, right-click the 006IP profile card and choose Edit File to view or adjust the proxy settings.
④ Activate the profile
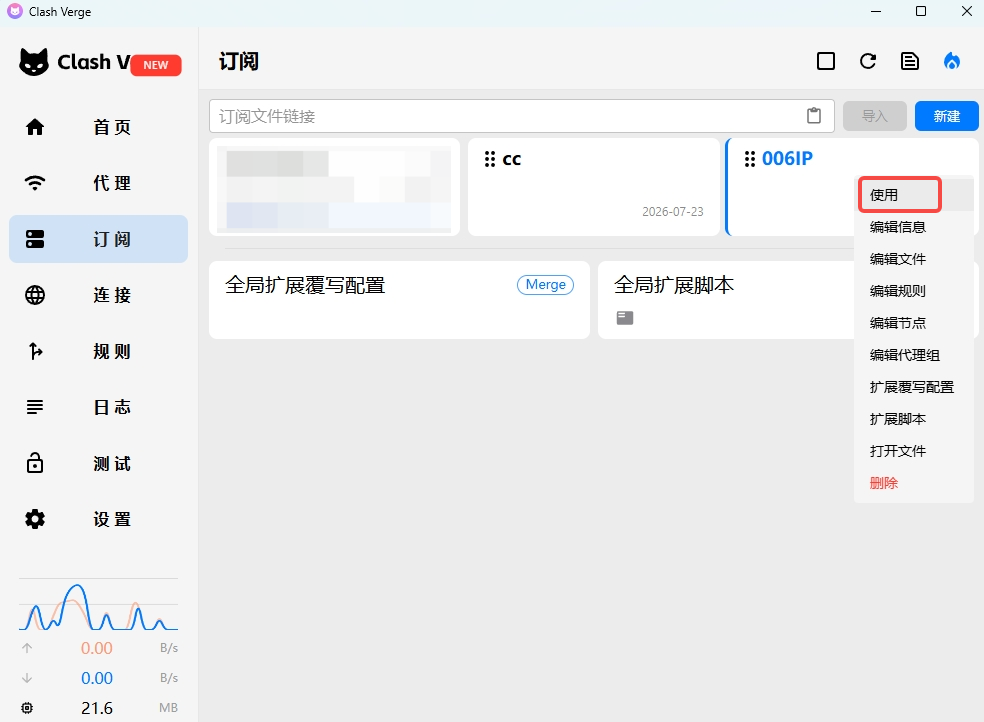
Return to Profiles, find the 006IP card, right-click it, and choose Use.
3. Switch to the 006IP proxy node
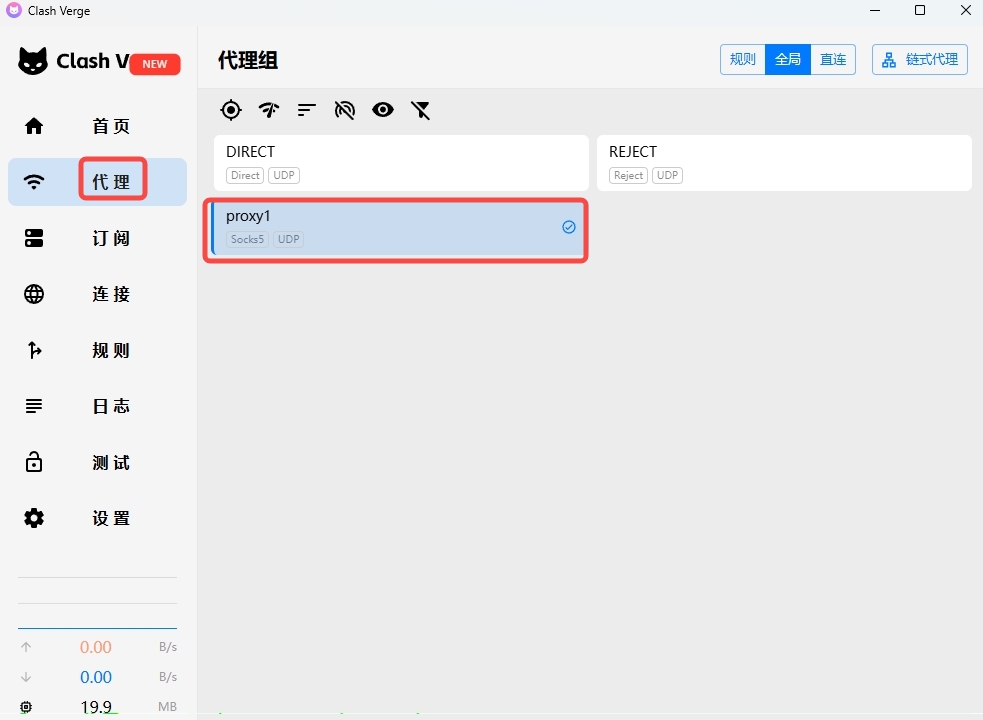
In the left sidebar, open Proxies. Find the 006IP node (proxy1) and select it.
4. Enable system proxy and verify
Confirm both:
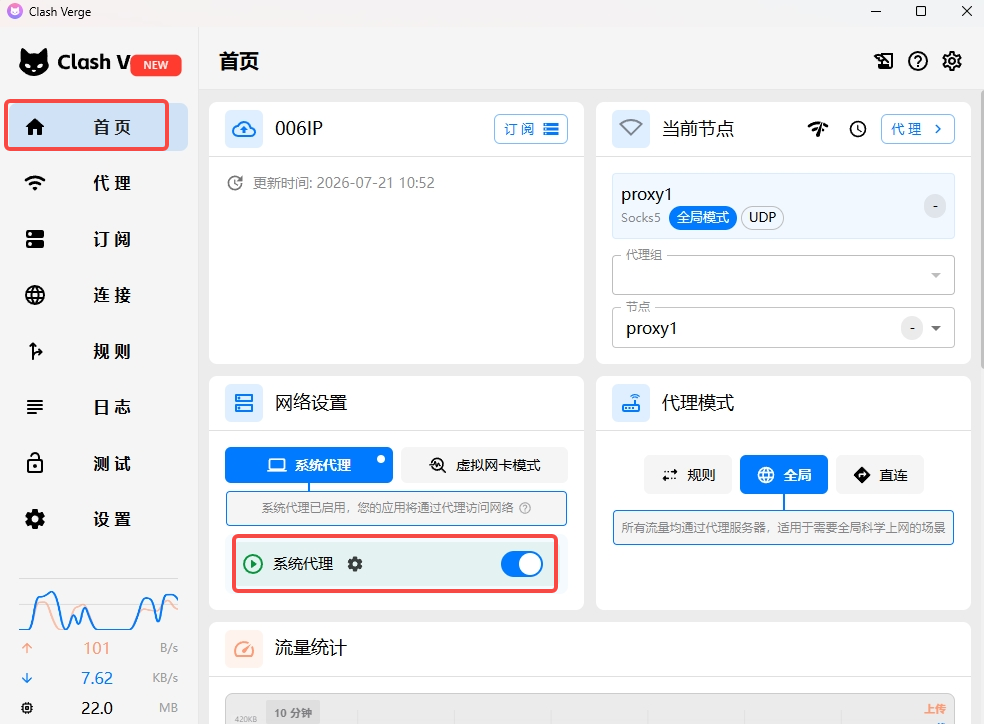
- System proxy is on: Open Home and make sure System Proxy is enabled
- Correct node is active: Home should show the selected 006IP node name
Open a browser and visit https://ipinfo.io or another IP lookup site. If the returned IP matches your purchased region, configuration succeeded.
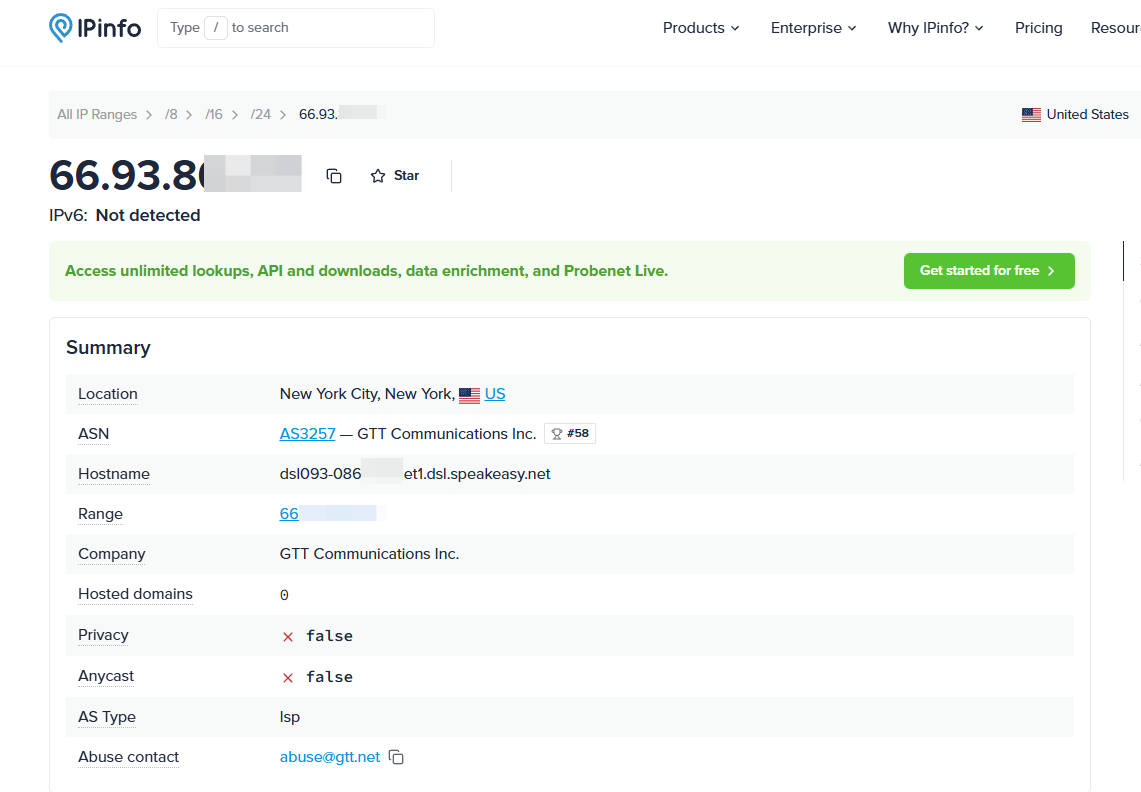
If the check shows your local IP, verify: ① the 006IP node is selected on Proxies; ② system proxy is enabled on Home; ③ placeholders in the YAML file were replaced with real credentials.
5. Rule-based split routing (optional)
To send only specific traffic through 006ip while other traffic uses existing nodes or direct connection, add rules:
rules:
  - DOMAIN-SUFFIX,target-website.com,proxy1
  - IP-CIDR,10.0.0.0/8,DIRECT
  - MATCH,Proxy
Only requests to the target domain (e.g. target-website.com) go through the 006ip proxy via proxy1; other traffic follows your existing rules.
Chain Proxy
If your local network cannot directly connect to overseas proxy servers, configure a two-hop chain in Clash Verge: first connect through a reachable upstream proxy, then connect to the target-country static residential proxy.
The full path is:
Local machine → Upstream proxy (
proxy1) → Downstream proxy (proxy2) → Target website
proxy1 is only used to establish a stable overseas path. proxy2 is the final egress IP used by your business traffic. After setup, IP check tools should show the IP and location of proxy2 (not your local IP, and not proxy1).
1. Prepare two proxy nodes
Before configuration, prepare:
| Node | Purpose | Recommendation |
|---|---|---|
proxy1 | Upstream proxy for overseas connectivity | Use a stable, low-latency overseas node reachable from your local network |
proxy2 | Final business egress IP | Use the static residential proxy for your target country/region |
2. Add both nodes to one config file
① Create a local YAML file
Create a text file and place both nodes under the same proxies list (replace sample values with real credentials):
proxies:
  # First hop: reachable overseas upstream proxy
  - name: "proxy1"
    type: socks5
    server: your-upstream-proxy-server
    port: your-upstream-port
    username: "your-upstream-username"
    password: "your-upstream-password"
    udp: true

  # Second hop: target-country static residential proxy
  - name: "proxy2"
    type: http
    server: your-downstream-proxy-server
    port: your-downstream-port
    username: "your-downstream-username"
    password: "your-downstream-password"
② Create a profile and import the file
Open Profiles in the left sidebar, then click New.
In the New Profile dialog:
- Type:
Local - Name:
006IP(or any recognizable name) - Click Choose File and select your YAML file
- Click Save
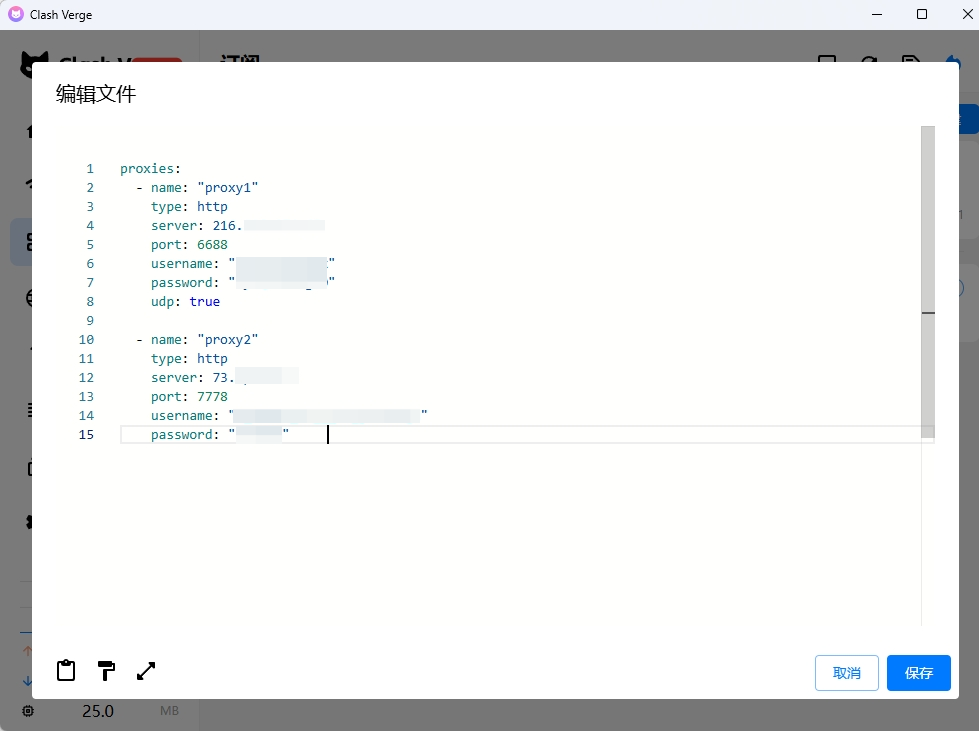
Notes:
typemust match the actual protocol supported by each node.portmust be the real port value; do not copy placeholders directly.- If your file already has
proxies:, append missing nodes to that existing list. Do not create a secondproxies:.
③ Activate the profile
Return to Profiles, right-click the 006IP card, and choose Use (activate it), otherwise settings may not take effect.
3. Build the chain in the correct order
Open Proxies in Clash Verge and do the following:
- Click Chain Proxy in the top-right to enter chain mode.
- Click upstream node
proxy1to add it as hop 1. - Click downstream node
proxy2to add it as hop 2. - Verify the right-side order is
1 proxy1,2 proxy2. - Click Connect to enable this chain.
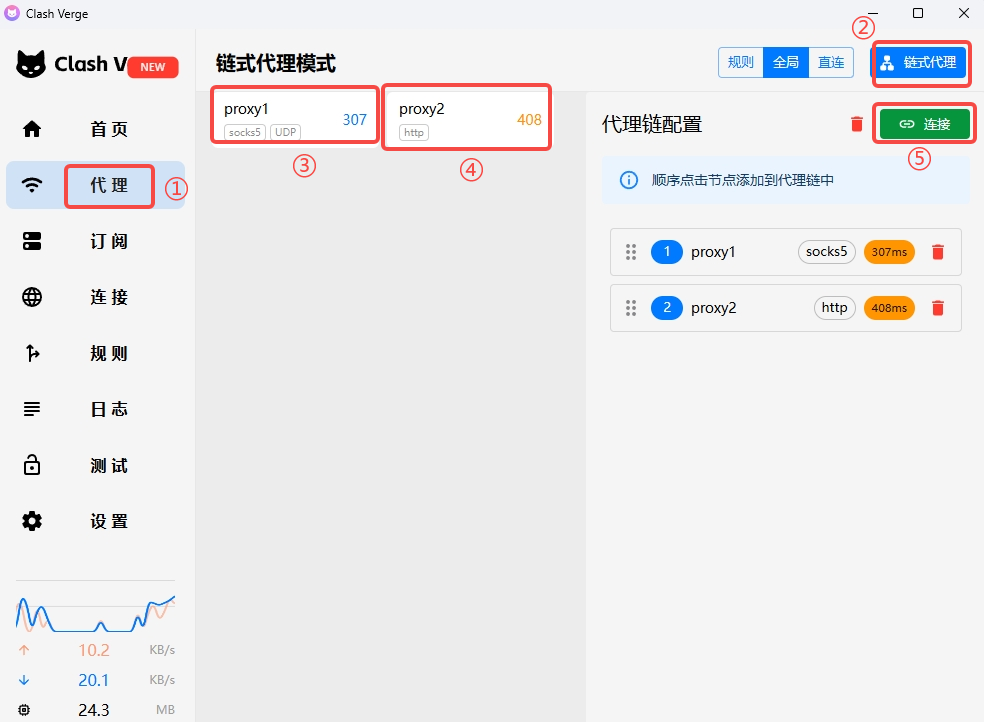
Do not reverse node order. Correct order is upstream first, downstream second. If order is wrong, remove and re-add nodes.
4. Enable system proxy and verify final egress
Return to Home and ensure System Proxy is enabled. Then open https://ipinfo.io (or another trusted IP check site) and verify:
- Current IP matches the target IP purchased from 006IP
- Country/region, city, and ASN match the selected route
- Result stays stable after refresh and does not fall back to local IP
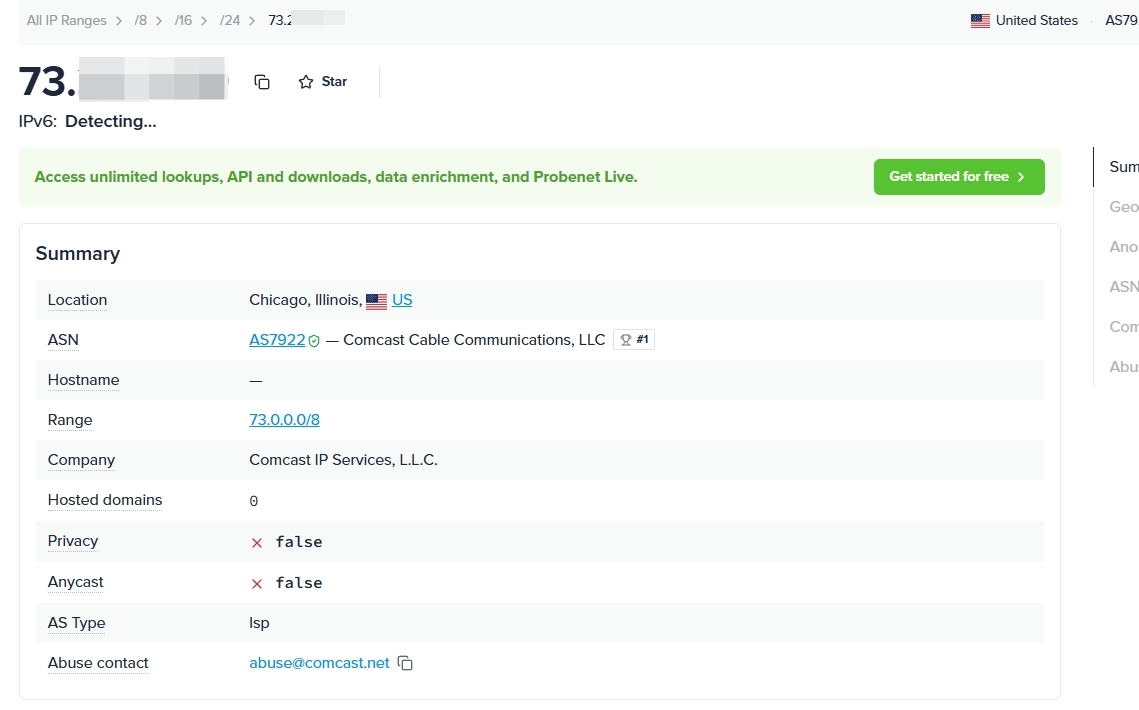
If the page shows the target IP of proxy2, chain proxy is active. Because traffic passes two hops, latency is usually higher than single-node mode—this is expected.
5. Common troubleshooting
| Symptom | What to check |
|---|---|
proxy1 / proxy2 not shown | Check YAML indentation, save file, then reactivate profile |
| No latency or connect failure | Re-check server, port, protocol, username, and password for both nodes |
| Result still shows local IP | Ensure profile is updated, system proxy is on, and Connect is clicked in chain mode |
| Result shows upstream IP | Check whether proxy2 is missing, and whether order is proxy1 → proxy2 |
| Connected but slow | Use a lower-latency, more stable upstream node and avoid unnecessary proxy layers |
UI names and button positions may vary slightly by Clash Verge version. Follow your current client UI. Use proxies only for legal/compliant scenarios and follow target website terms and local laws.
If you run into issues not covered above, contact us:
- Telegram: https://telegram.me/ip006ip
- Phone: 15673887335
- Email: support@006ip.com
For purchase, renewal, and credential export details, see the 006ip Static Proxy User Guide.