v2rayN Chain Proxy Guide
If you already have a working overseas network environment, follow the "Configure v2rayN" section. If you do not, follow the "Chain Proxy" section first.
006ip provides residential proxy infrastructure for businesses, developers, and cross-border teams, including dynamic residential IPs and static residential IPs. The platform supports country/region and city-level targeting, plus dashboard options such as IP allowlists, authentication methods, and location modes—suitable for compliant data collection, localized page testing, price monitoring, ad verification, and maintaining cross-border business environments.
Static residential IPs offer long-lived fixed egress addresses and are a better fit when you need continuity and connection stability. This guide walks through registration, trial traffic, purchasing, exporting credentials, and configuring proxies in v2rayN.
Need help? Contact us anytime:
- Telegram: https://telegram.me/ip006ip
- Phone:
15673887335- Email: support@006ip.com
Getting Started
1. Create and sign in to a 006ip account
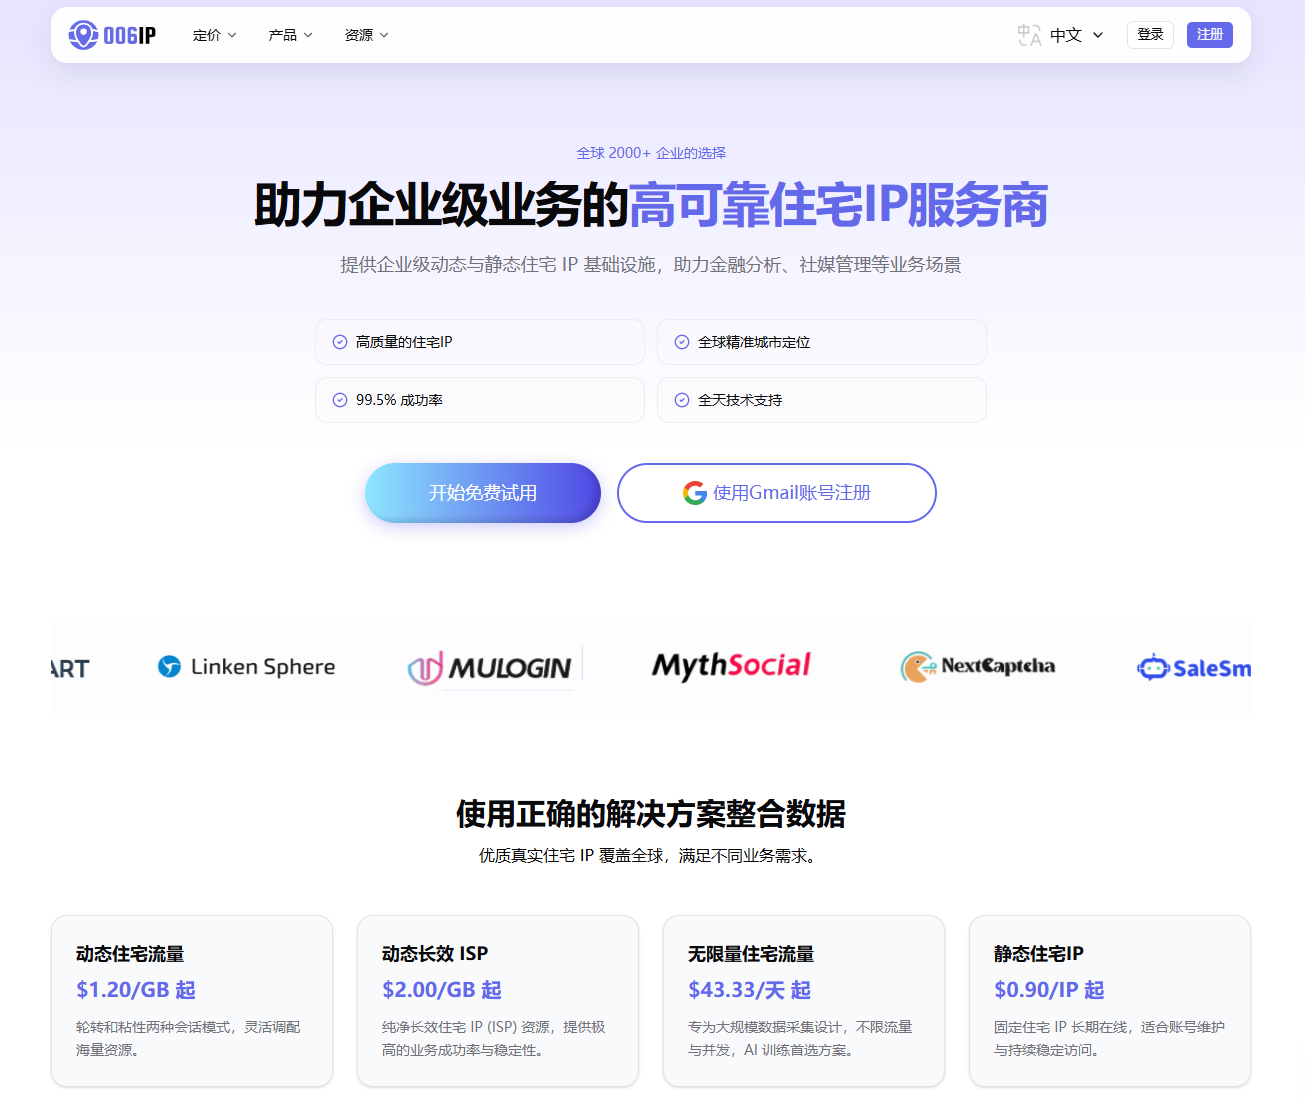
Step 1: Open the 006ip website, then click Register in the top-right corner. If you already have an account, click Log In.
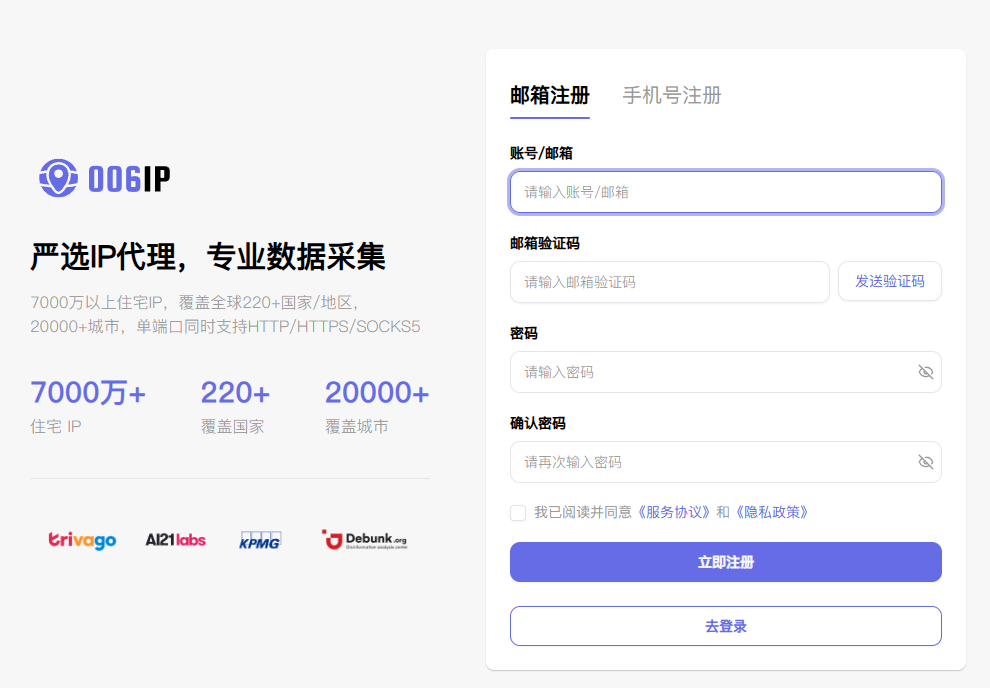
Step 2: On the registration page, choose one of the following methods:
Option A: Email registration
Select Email registration, then enter your account/email, email verification code, password, and confirm password. Click Send code, check your inbox for the code, accept the Terms of Service and Privacy Policy, then click Register now.
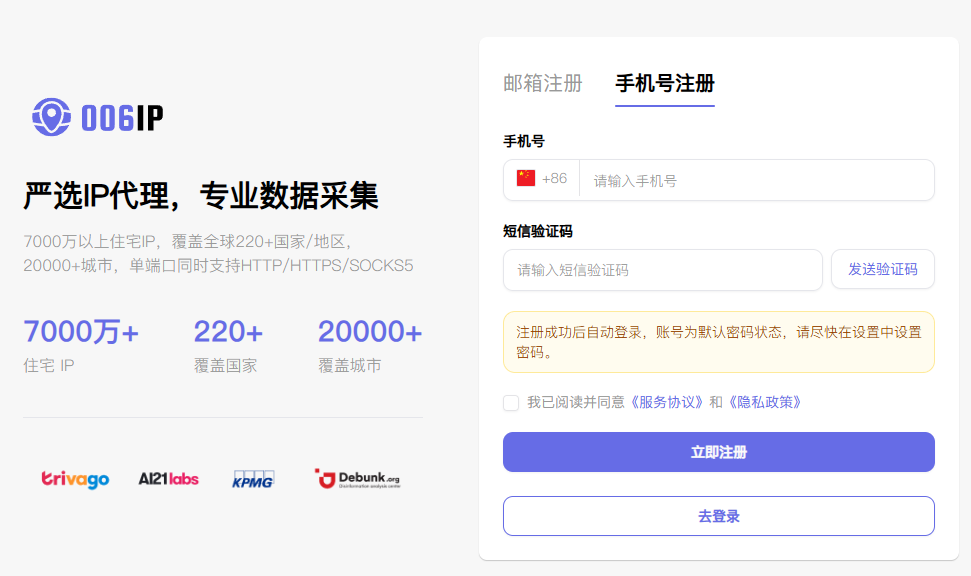
Option B: Phone registration
Select Phone registration, confirm the country/region code, enter your phone number, click Send code, and enter the SMS code. Accept the Terms of Service and Privacy Policy, then click Register now.
After phone registration succeeds, you are signed in automatically with a default password. Set your own login password in account settings as soon as possible.
The homepage also offers Sign up with Gmail. If you use Gmail, follow the on-page authorization flow.
2. Claim trial traffic
006ip currently offers a new-user trial: contact support to receive 1GB trial traffic for free. Eligibility, available products, and validity follow the campaign page and support reply.
Use trial traffic first to validate target regions, protocol compatibility, and business connectivity before choosing a paid plan.
3. Purchase static residential proxies
After signing in to the 006ip dashboard, open Static Proxies in the left sidebar, then choose ISP Proxies or Datacenter Proxies to enter the purchase page.
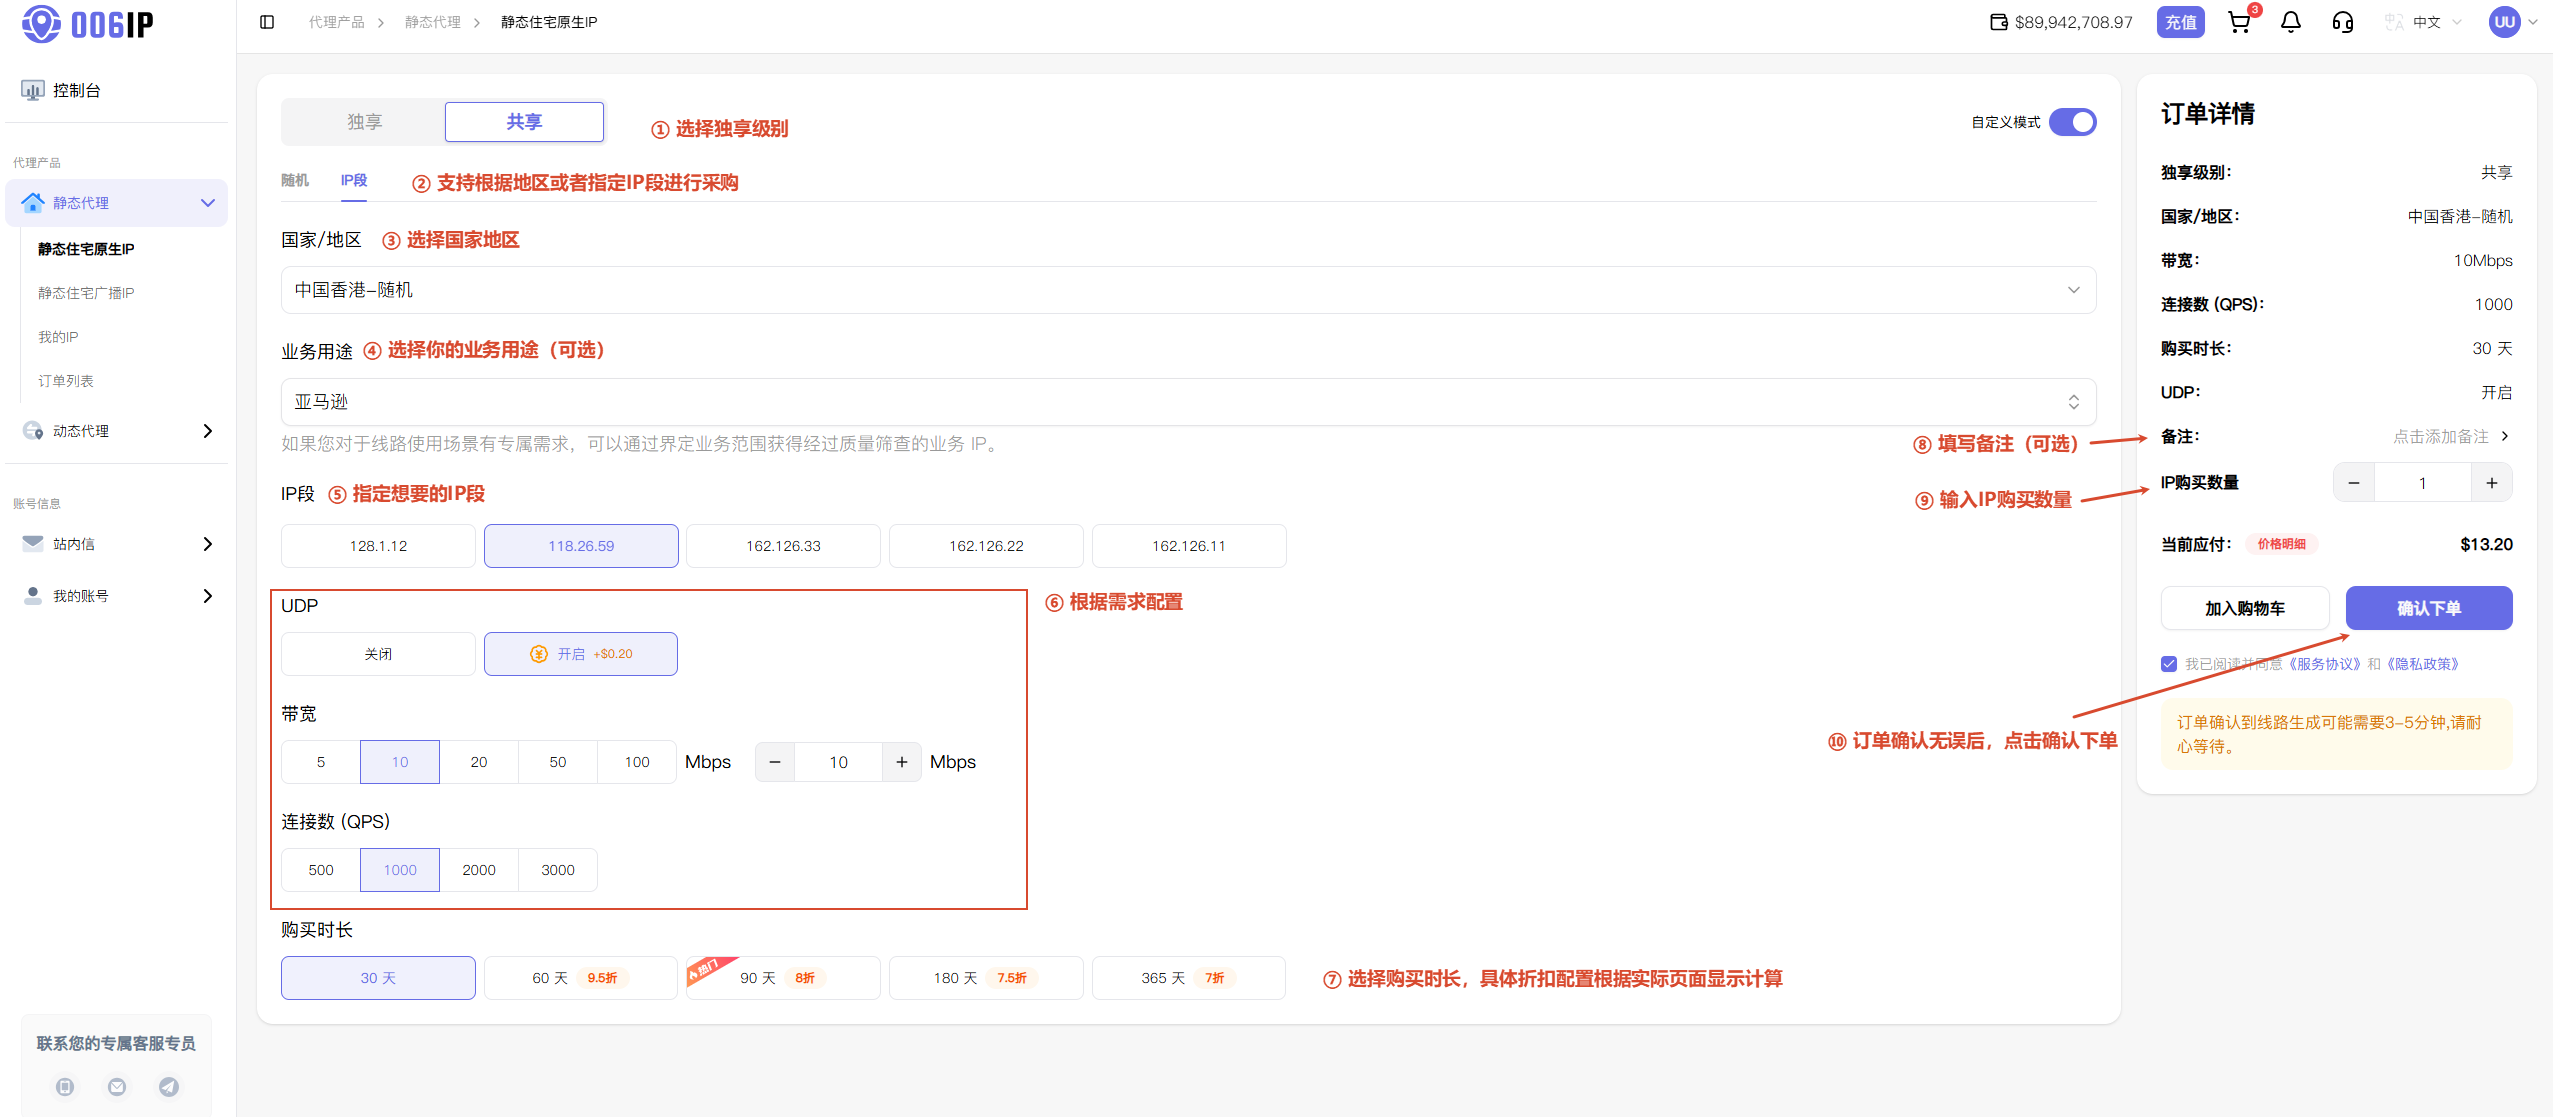
Step 1: Choose a purchase mode and set proxy attributes
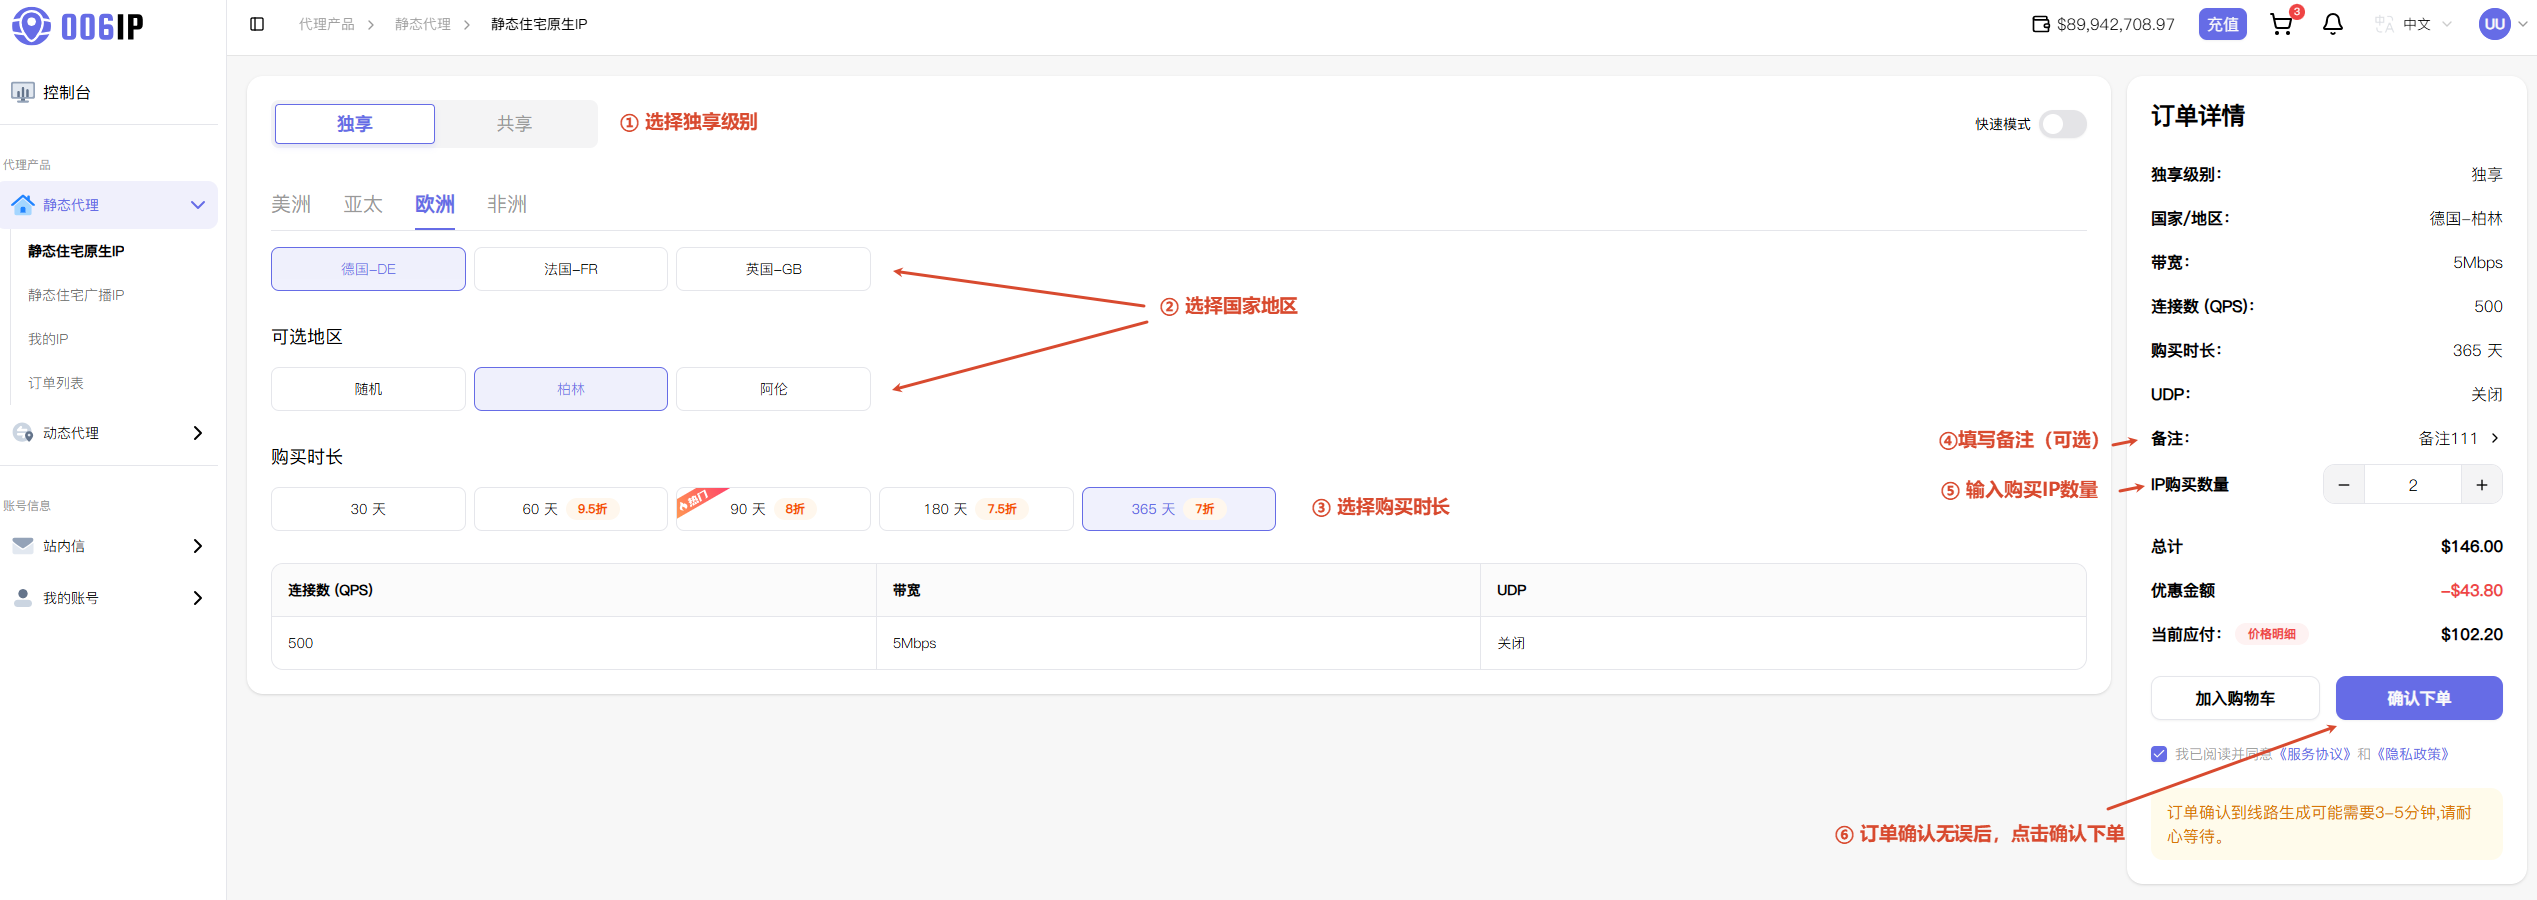
The purchase page provides Quick Configuration and Custom Configuration. Both modes calculate pricing in real time based on your selections, but they fit different needs.
(1) Quick Configuration
| Parameter | Description |
|---|---|
| Access Type | Choose Dedicated or Shared. Dedicated IPs suit stricter purity, stability, and isolation needs; Shared IPs suit cost-sensitive general access. |
| Country / region and city | Target by country/region and city, or choose Random range for country-wide distribution. |
| Period | Plans from 30–365 days; longer terms may include tiered discounts. Final pricing follows the purchase page. |
| Fixed configuration | Connections (QPS), Bandwidth, and UDP use the default values shown on the page. |
(2) Custom Configuration
Enable Custom Configuration to purchase by IP segment and customize Connections (QPS), Bandwidth, and UDP. You can also set Use case, allocate quantity by city/segment inventory, and choose a Period. Different settings affect pricing—review the Order Summary on the right before submitting.
Step 2: Confirm the order and pay
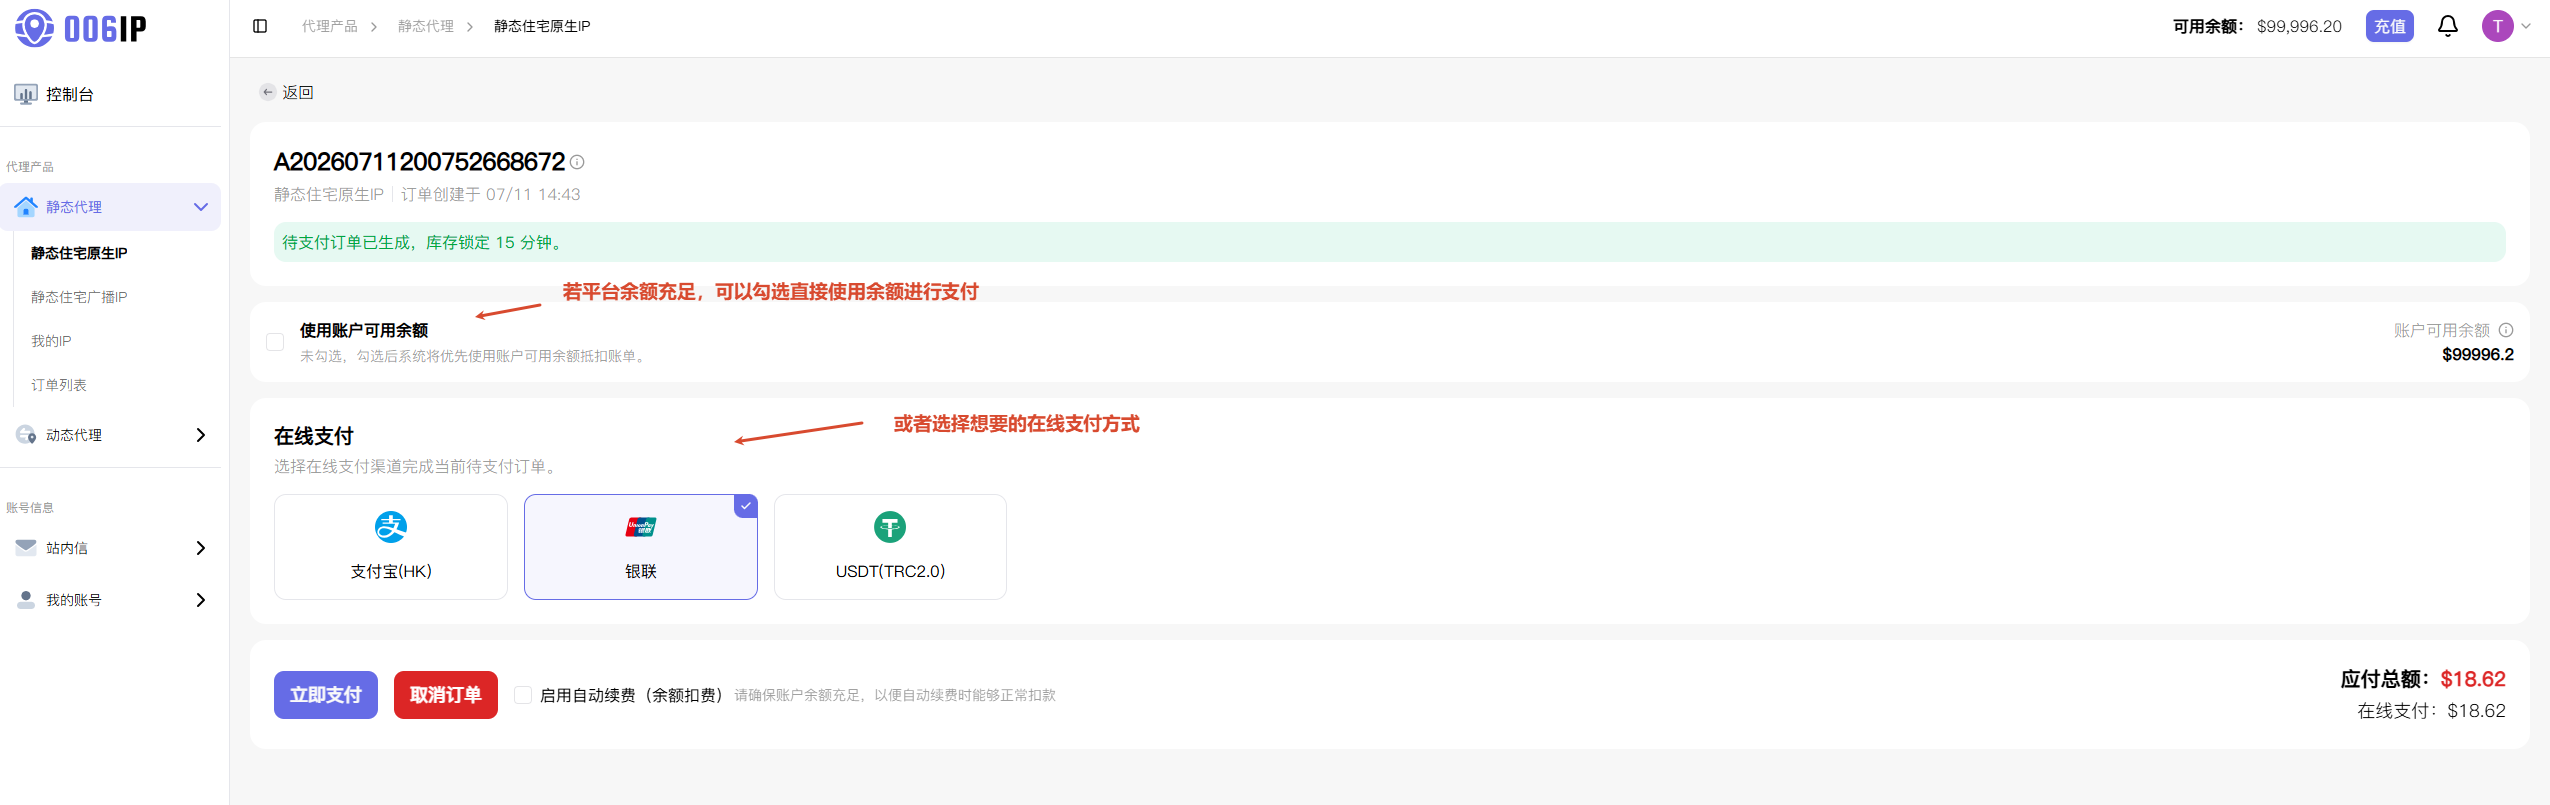
On the checkout page, selected IP inventory is locked for 15 minutes. If payment is not completed in time, resources are released and you must place the order again.
Supported payment methods include:
- Account balance
- Online payment
- Balance + online combined payment
If balance is insufficient, the available balance is applied first and the remainder can be paid online. Balance payments require your 006ip payment password. Available online channels and currencies follow the checkout page.
4. View and export proxy connection details
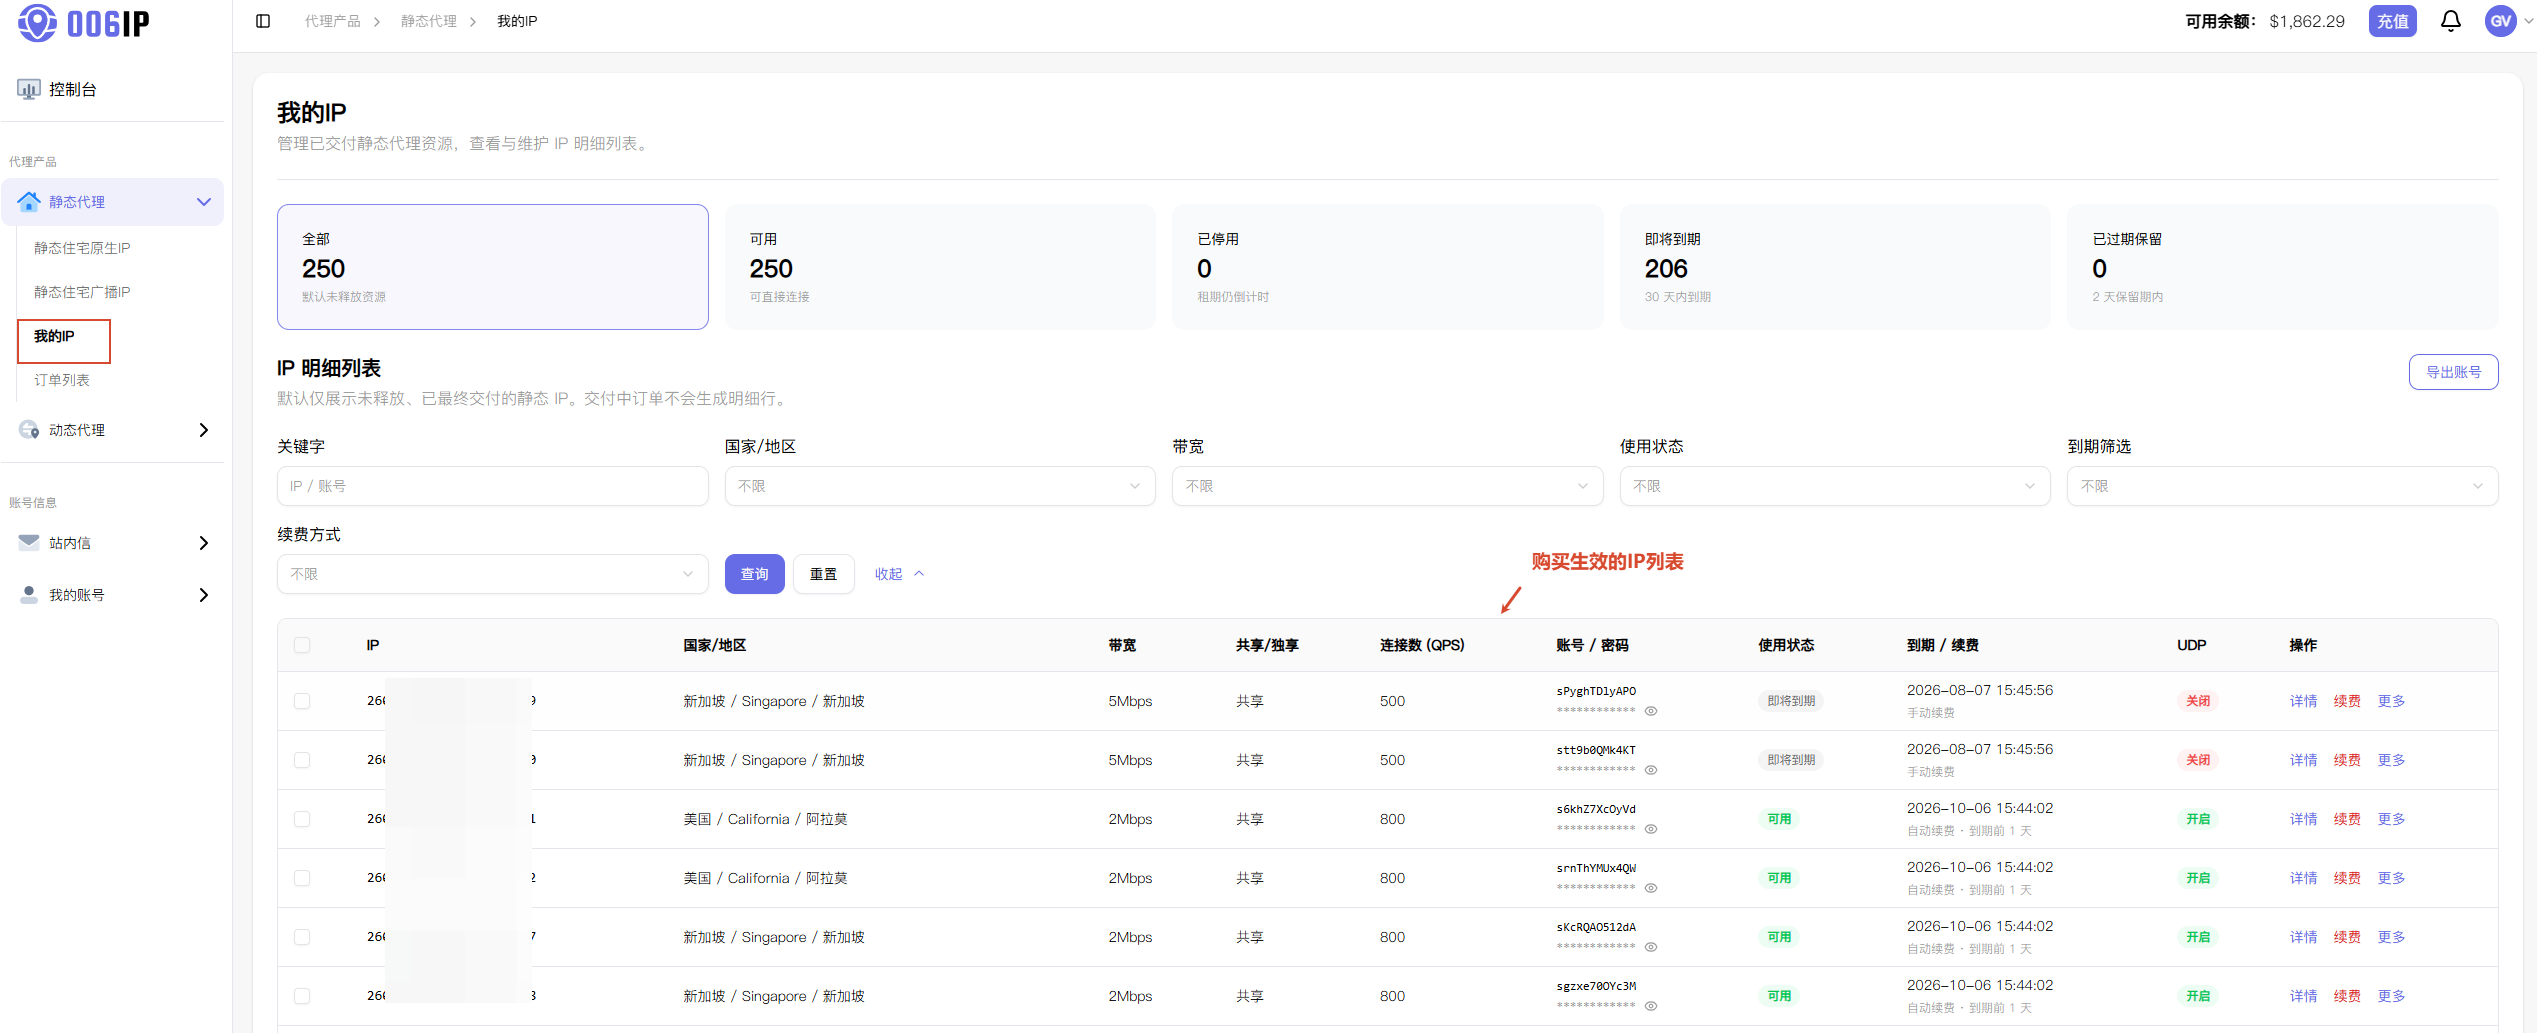
After payment succeeds, open My IPs to view purchased static IPs. The list shows bandwidth, QPS, UDP status, expiry, and resource state, and supports renew, disable, enable, and details.
Before configuring v2rayN, export these four connection fields:
- Proxy IP address
- Port
- Username
- Password
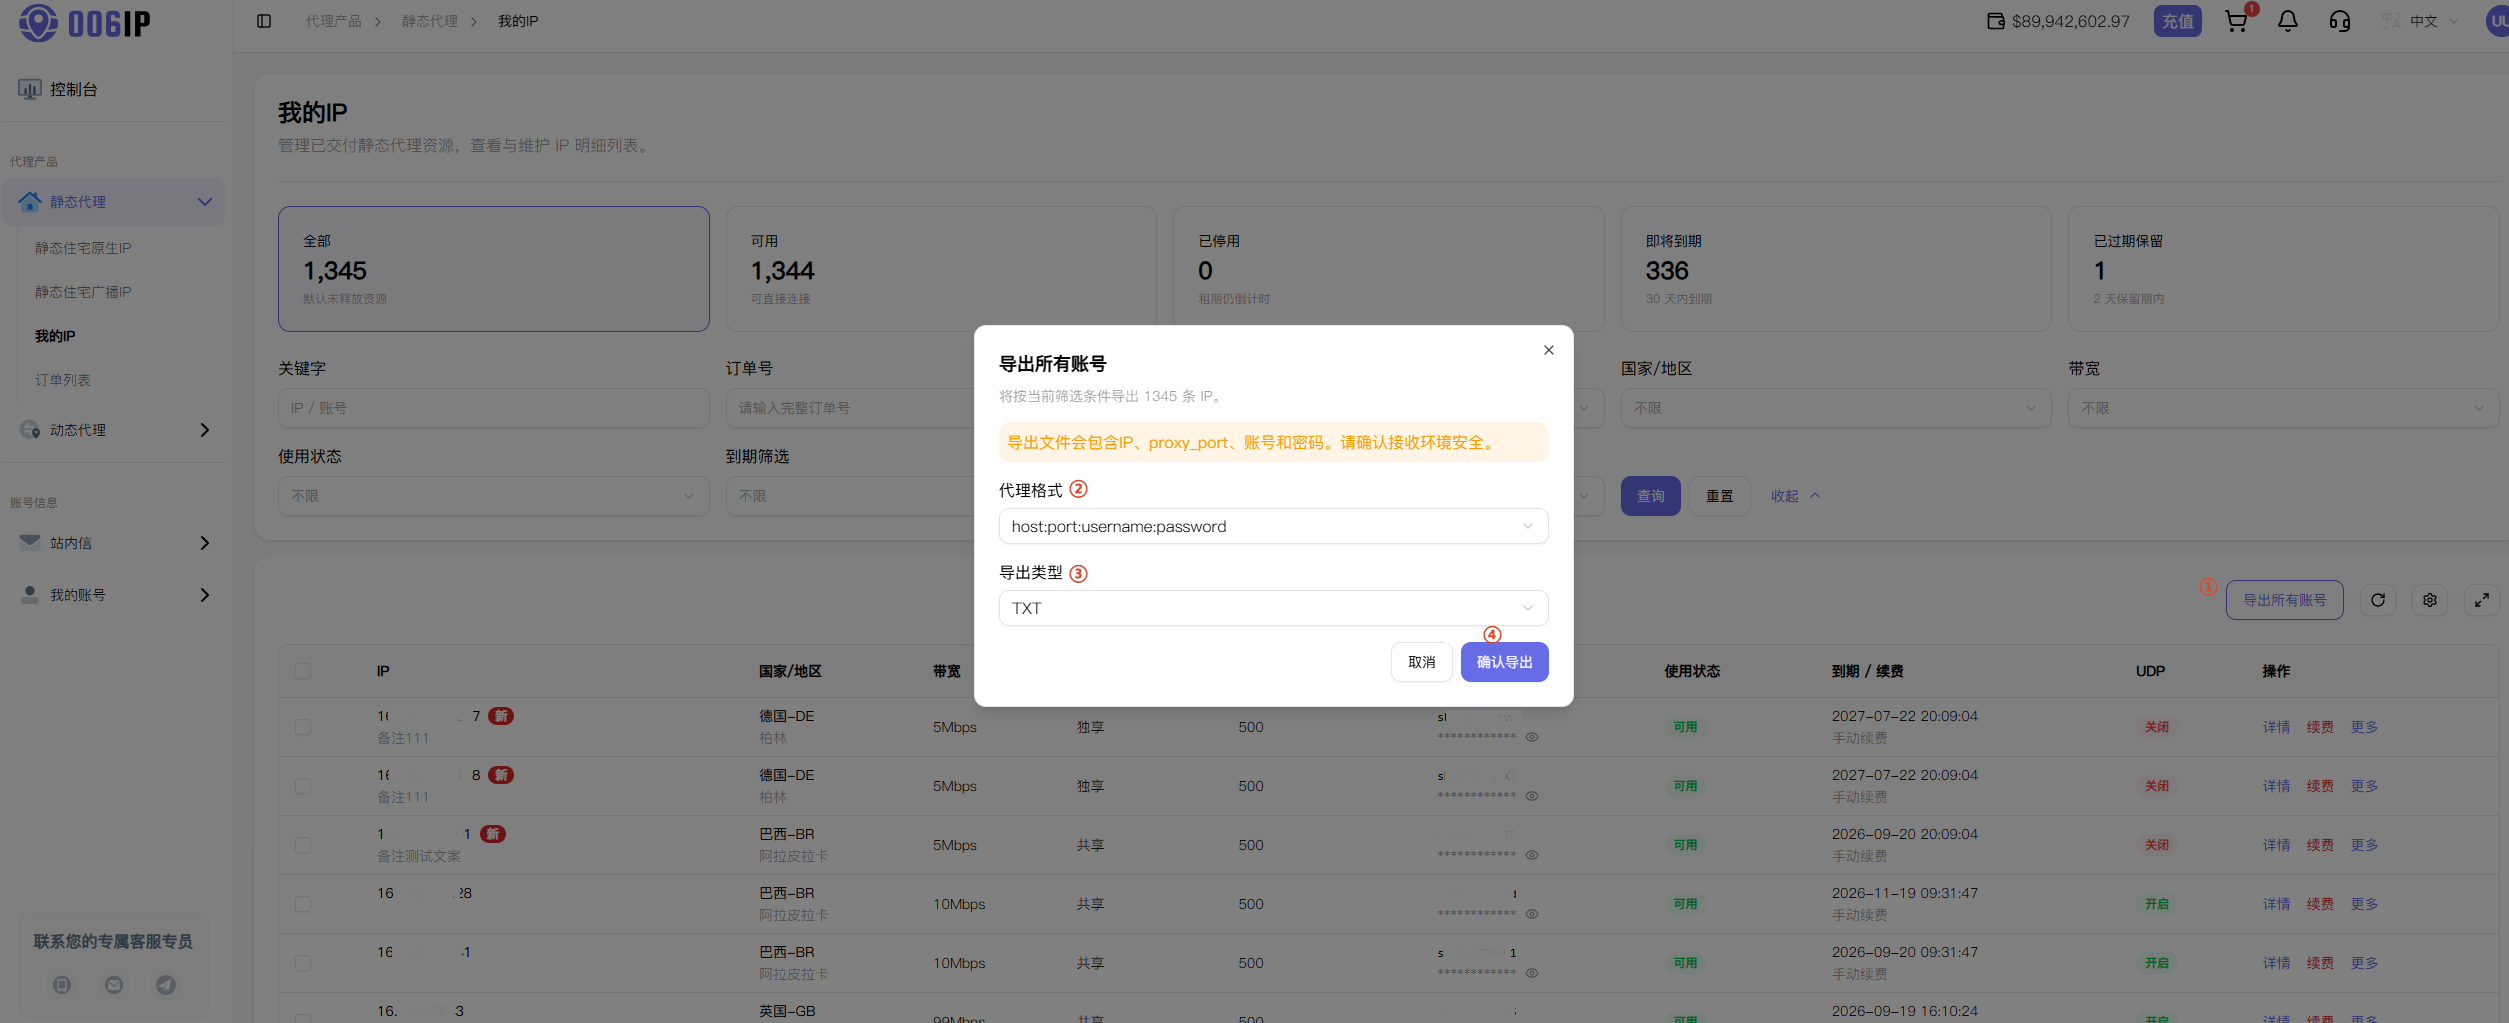
On My IPs, click Export Credentials in the top-right corner and choose a format that fits your client. v2rayN can use:
IP:PORT:USERNAME:PASSWORD
Exported files contain plaintext credentials. Store the file securely and do not share credentials via public chats, screenshots, or untrusted channels.
For purchase, renewal, and export details, see the 006ip Static Proxy User Guide and the latest prompts in the dashboard.
Configure v2rayN
This section is written for v2rayN, a Windows proxy client based on the V2Ray core. It supports SOCKS5 / HTTP and more. Steps below target v2rayN 7.x (6.x and earlier are similar).
Complete the purchase flow above and have your proxy server address, port, username, and password ready.
1. Prepare proxy connection details
Confirm you have:
- Proxy server address
- Port
- Username
- Password
Each line in the exported txt file is
server:port:username:passwordand can be used in that order.
2. Add an HTTP / SOCKS5 proxy server
Open v2rayN and follow these steps:
① Create a server from the Servers menu
- Click Servers in the top menu.
- Choose Add [HTTP] (or Add [SOCKS] for SOCKS5). Field layout is the same; only the protocol differs.
![v2rayN Servers menu — Add [HTTP]](https://cdn.006ip.com/docs/img/guide/static-proxy/v2rayn-step1.png)
② Fill in connection parameters
| Field | Value | Notes |
|---|---|---|
| Alias (remarks) | proxy1 or any recognizable name | Helps distinguish servers in the list |
| Address | Your proxy server address | e.g. xxx.xxx.xxx.xxx |
| Port | Your port | e.g. 7778 |
| Username (optional) | Your username | 006ip auth account |
| Password (optional) | Your password | 006ip auth password |
Leave other fields (transport, etc.) at defaults.
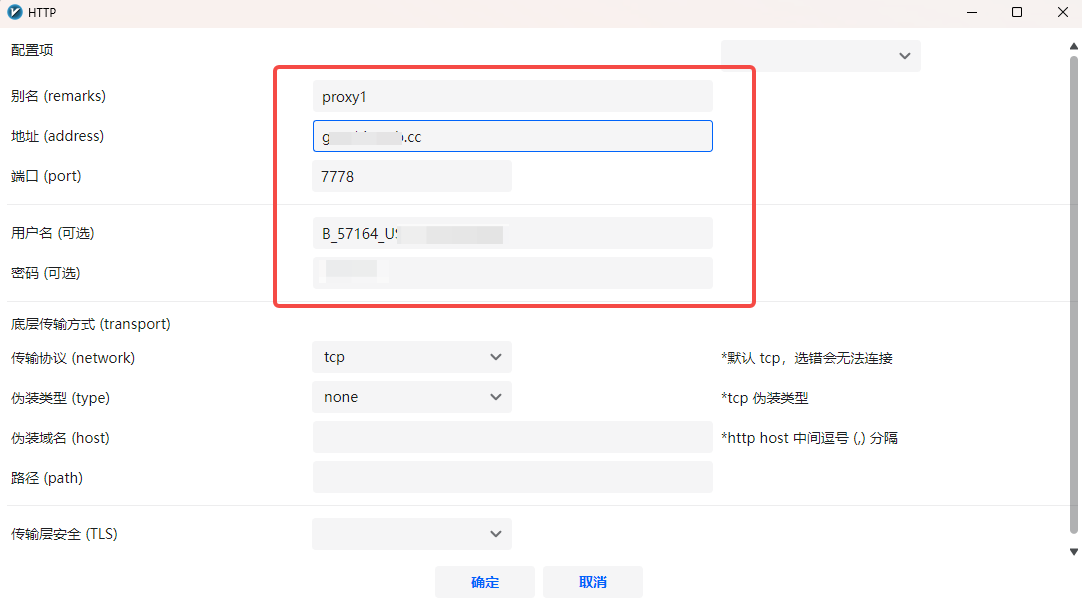
③ Save the server
Click OK. The new server appears in the main server list immediately.
3. Set as active and test latency
① Right-click to set active
In the server list, find the node (e.g. proxy1), right-click it, and choose Set as active server (or double-click). A red Active marker appears next to the name.
From the same menu you can run Test latency TcPing (multiple) to check connectivity.
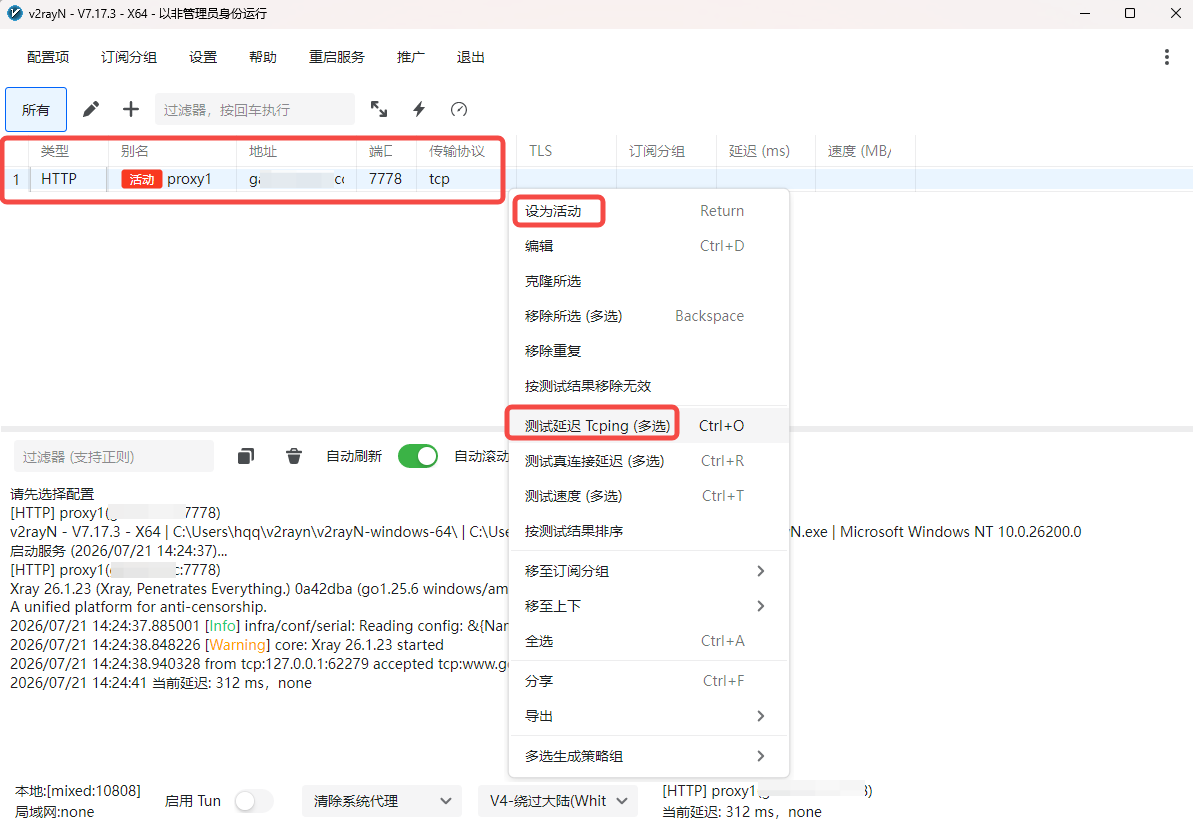
To manage multiple 006ip accounts, repeat step 2 for each line, then switch nodes as needed.
② Check test results
After the latency test, the Latency (ms) column shows a value (e.g. 353). A numeric result usually means the proxy path is reachable.
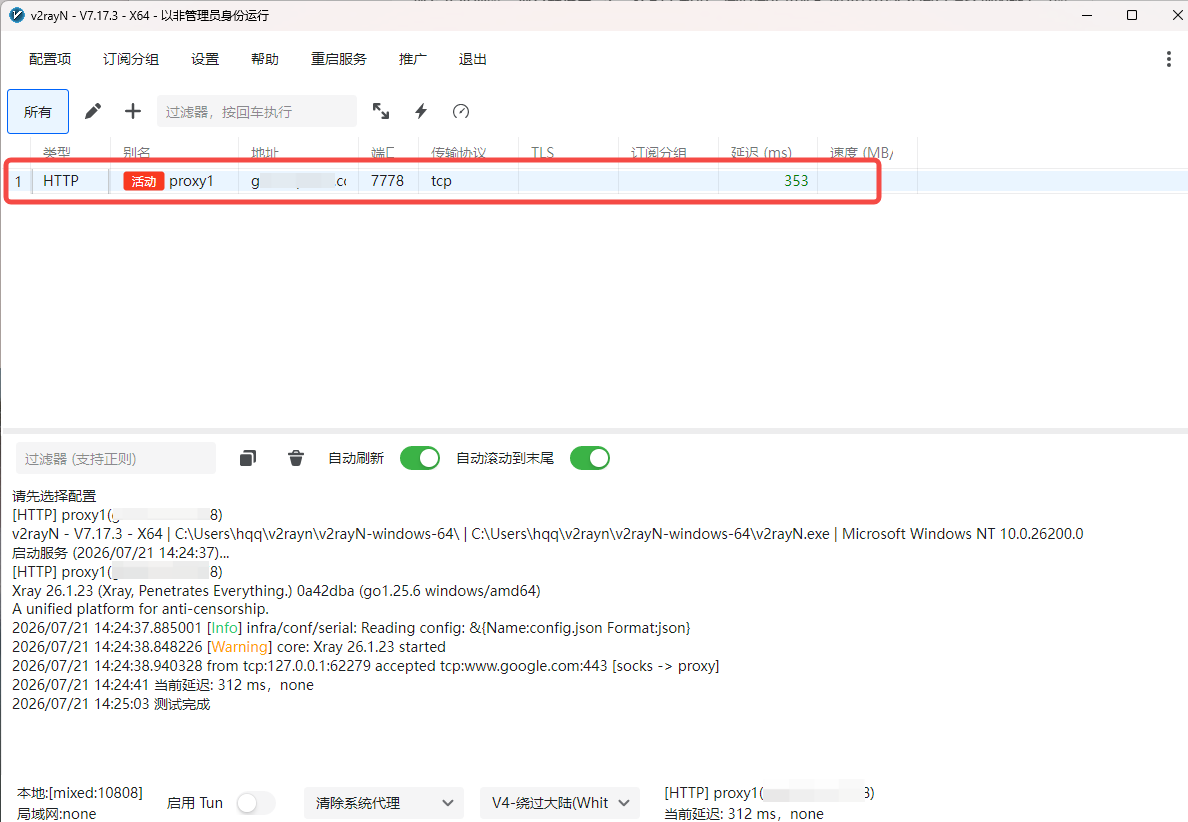
4. Enable Tun mode and verify egress IP
① Enable Tun
At the bottom of the v2rayN window, turn on Enable Tun (green when on). Tun mode routes system traffic through the selected proxy IP.
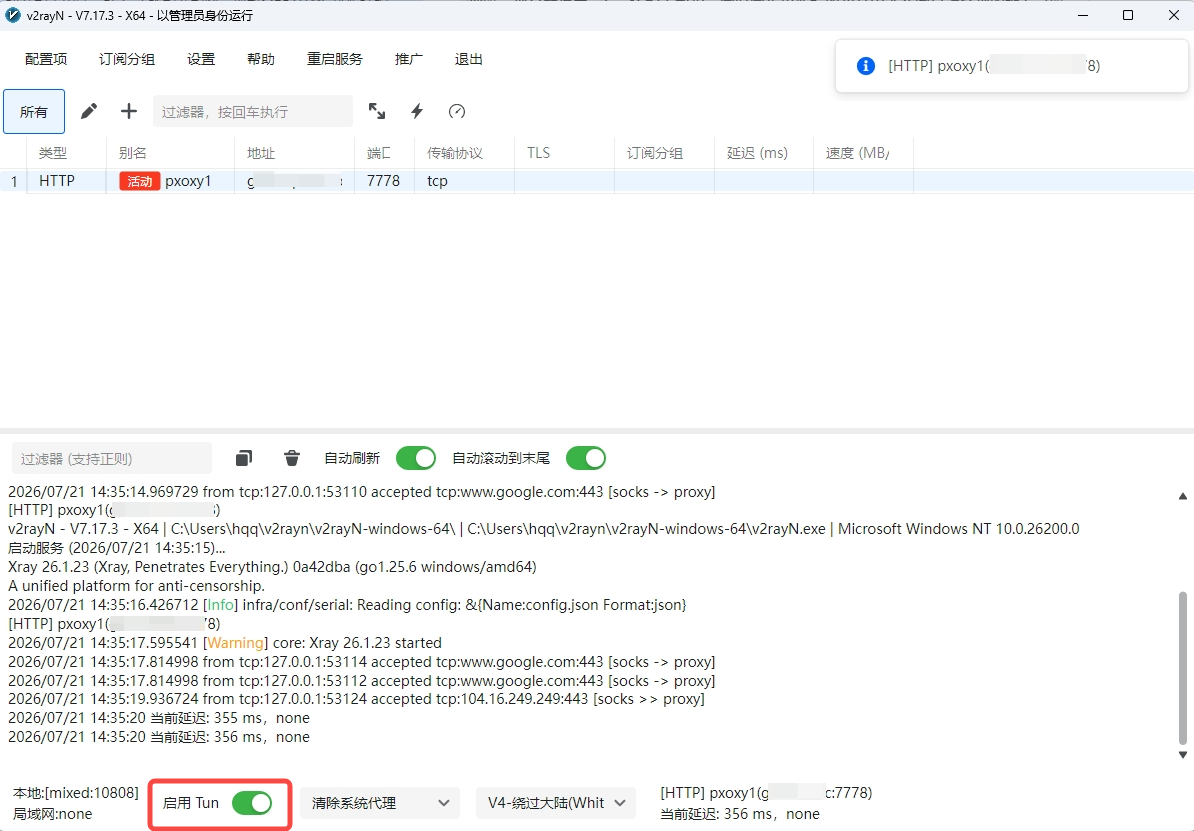
For browser-only proxying you can use PAC or system-proxy-only modes. For data collection and account workloads, Tun mode is recommended so all traffic shares one egress.
② Verify the proxy
Open a browser and visit https://ipinfo.io or another IP lookup site. Confirm the IP and location match your purchased region.
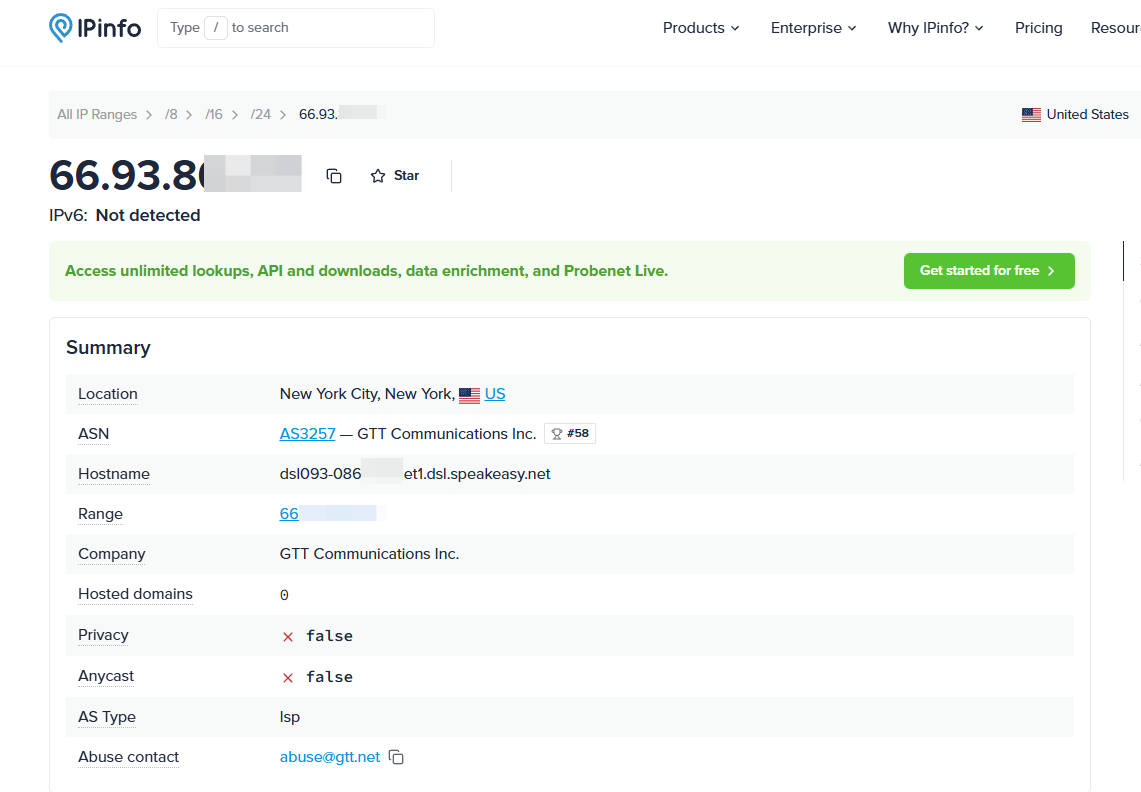
If the location matches, v2rayN is configured successfully.
If the check shows your local IP:
- Confirm the active server is the correct 006ip node (red Active marker)
- Confirm Enable Tun is on (green)
- Confirm address, port, username, and password match the dashboard exactly (no extra spaces)
- Right-click the node and run Test latency TcPing again
Chain Proxy
If your local network cannot directly connect to the downstream target-country proxy, configure a chain in v2rayN: connect to a reachable overseas upstream proxy first, then reach the downstream proxy through it.
Path order:
Local machine → Upstream proxy (overseas node) → Downstream proxy (target country) → Target website
Example: upstream is a Hong Kong node, downstream is a US node. After setup, websites should see the US downstream IP as final egress, not the HK upstream IP.
1. Prepare two proxy nodes
Prepare these:
| Node role | Purpose | Example alias |
|---|---|---|
| Upstream proxy | First hop forwarding local traffic overseas; must be directly reachable | proxy1-HK |
| Downstream proxy | Target-country proxy and final business egress | proxy2-US |
Both nodes require address, port, username, and password. Use unique aliases for easy management.
This section uses HTTP examples. If your node protocol is SOCKS5, choose Add [SOCKS] when adding nodes; the workflow is the same.
2. Create an upstream proxy group
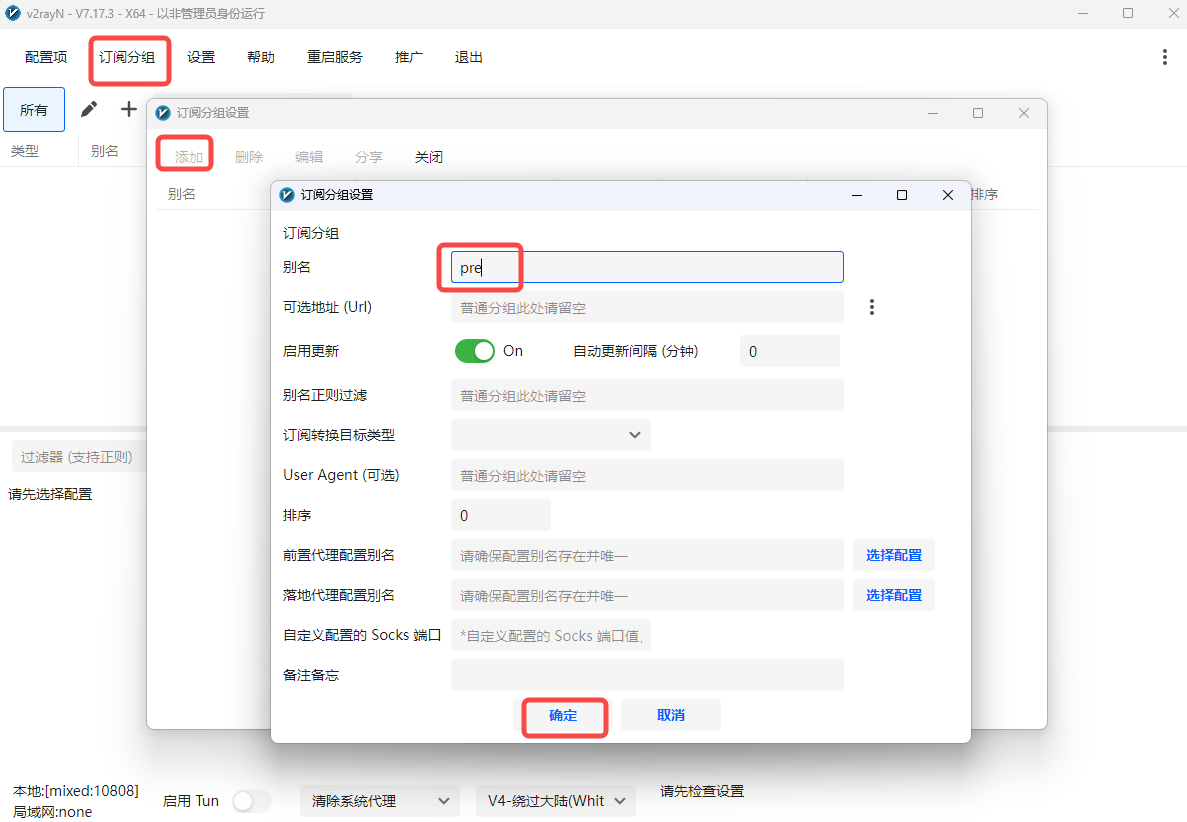
Open v2rayN, click Subscription Group on the top menu, and in Subscription Group Settings click Add.
Set alias to pre (or any recognizable name), leave other settings as default, and click OK. No subscription URL is required.
3. Add the upstream proxy in pre
Back in the main window:
- Select the
pregroup. - Click Servers → Add [HTTP].
- Fill upstream alias, address, port, username, and password (e.g. alias
proxy1-HK). - Keep other transport settings default and click OK.
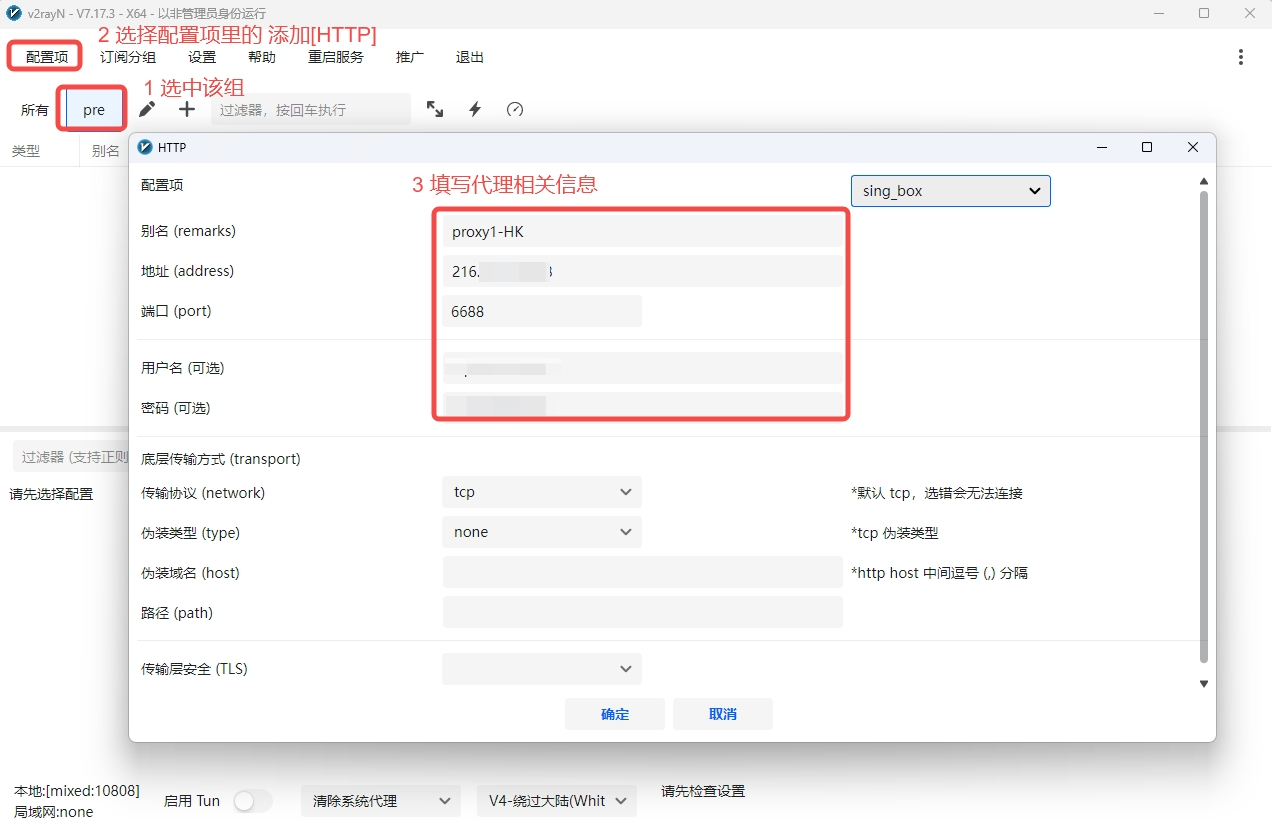
After saving, in pre group right-click this node and run Test latency TcPing (multiple). When latency value appears, set it as active to confirm upstream works.
The upstream proxy is hop 1. If it times out or fails, downstream proxy cannot be used.
4. Create downstream group and bind the upstream
Click Subscription Group → Add again to create a new group for downstream proxies.
- Set Alias to
land(customizable). - Find Pre-proxy config alias, then click Select config on the right.
- Select the upstream node you added, e.g.
proxy1-HK. - Save the group.
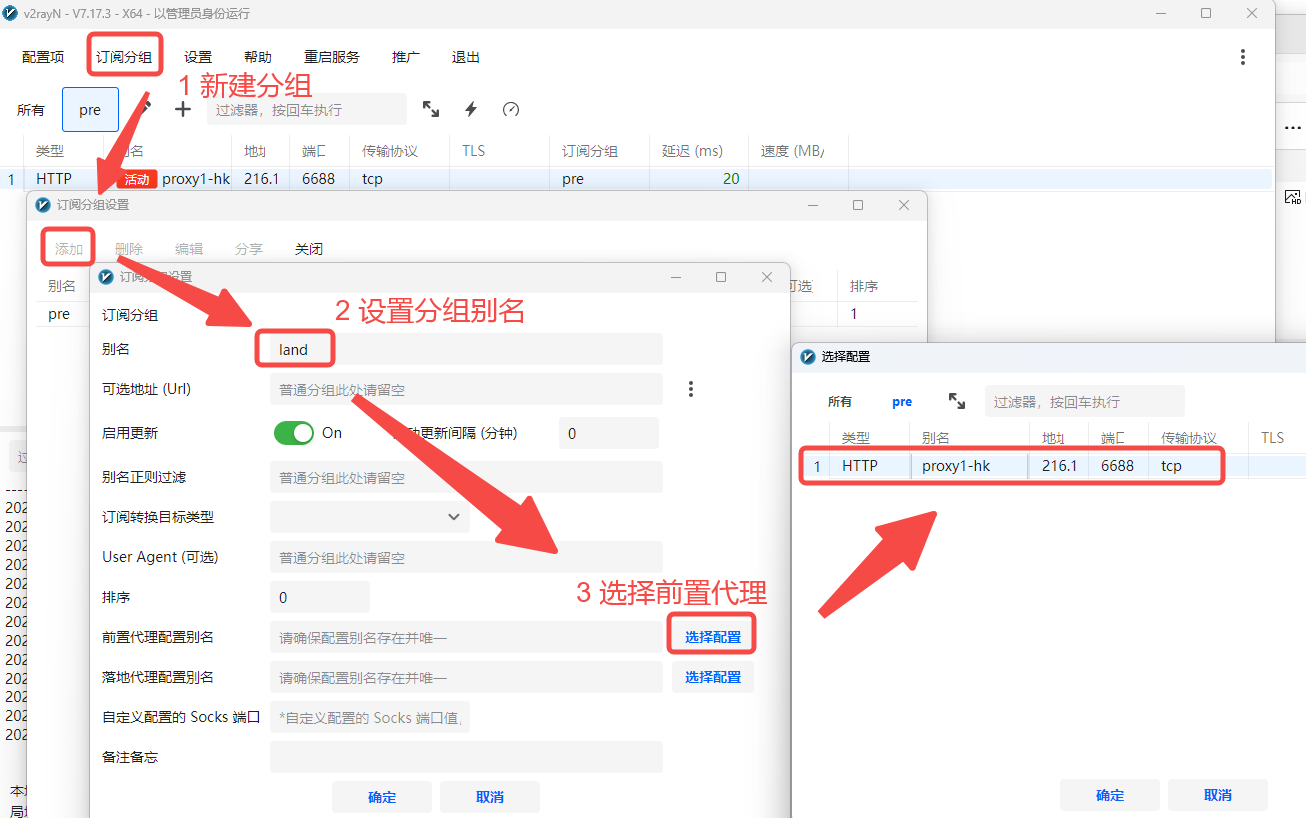
Make sure you select Pre-proxy config alias, not Landing proxy config alias below it. In this guide,
proxy1-HKis upstream, andproxy2-USis downstream final egress.
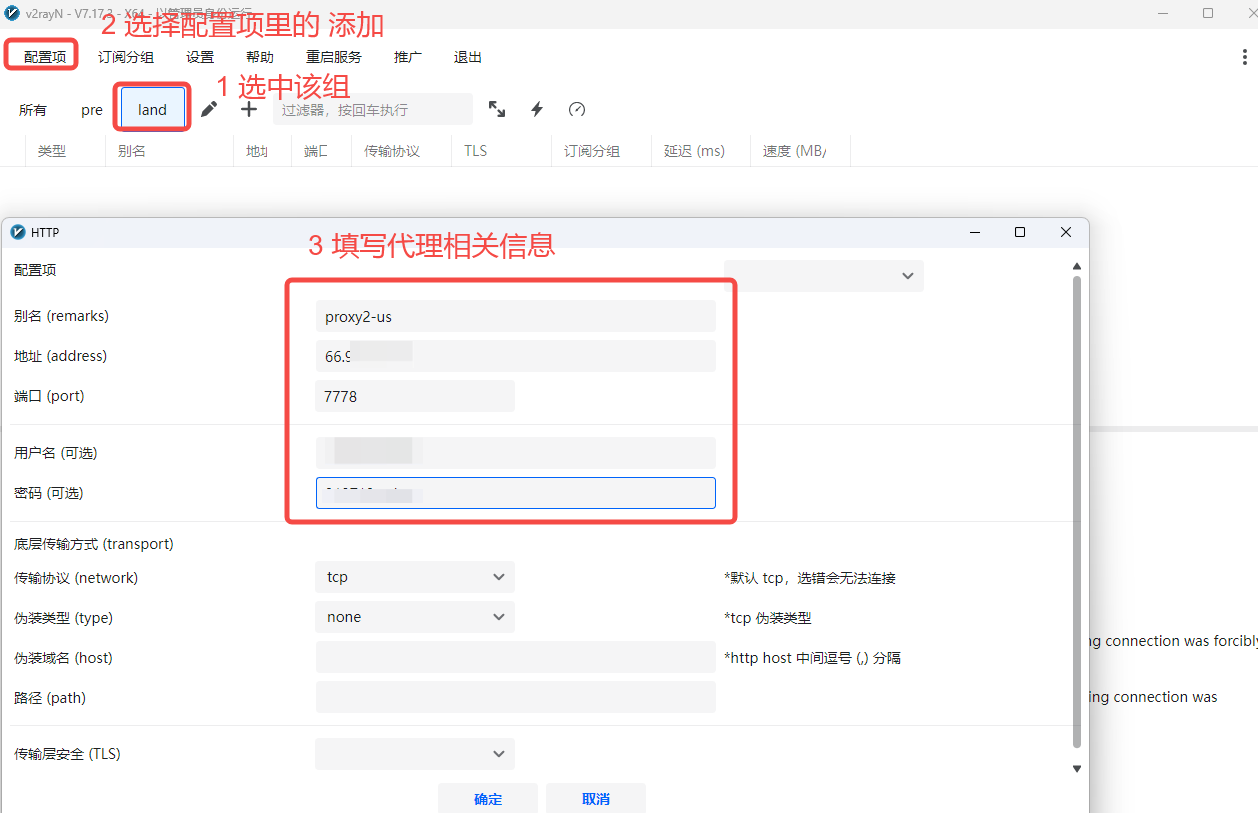
5. Add the downstream proxy in land
Back in main window, select land, then click Servers → Add [HTTP].
Fill downstream connection details:
| Field | Value |
|---|---|
| Alias (remarks) | e.g. proxy2-US |
| Address | Downstream proxy address |
| Port | Downstream proxy port |
| Username (optional) | Downstream username |
| Password (optional) | Downstream password |
Keep other fields default and click OK. Since land is bound to the upstream alias, downstream connections in this group are routed through proxy1-HK.
6. Activate downstream proxy and enable Tun
In land, set the downstream node (e.g. proxy2-US) as active. After the red Active marker appears, enable Enable Tun at the bottom.
Traffic path is now:
Local machine →
proxy1-HK→proxy2-US→ Target website
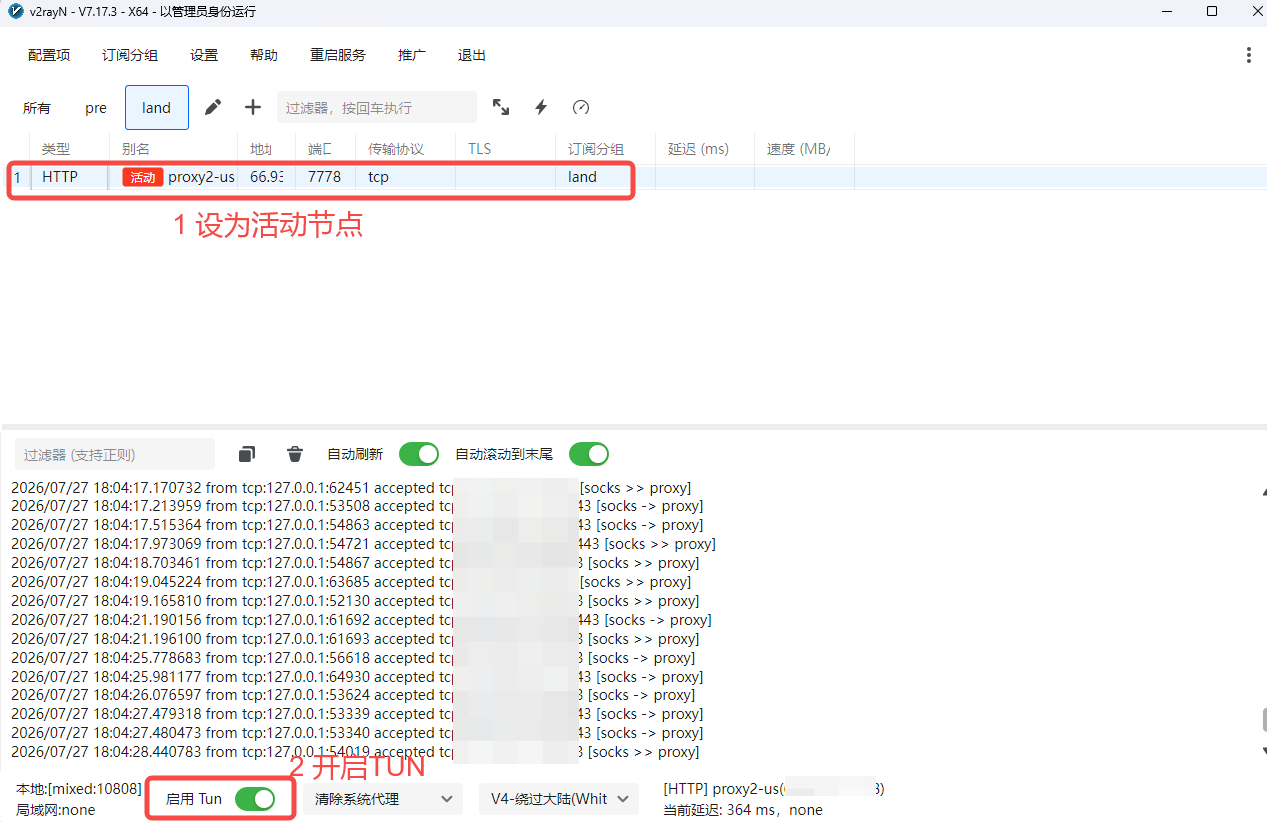
The node that must be active is the downstream node in
land, not the upstream node inpre. v2rayN automatically invokes upstream based on group binding.
7. Verify final egress IP
Open https://ipinfo.io and check IP/location:
Expected:
- Displayed IP equals the downstream proxy IP
- Country/region matches your purchased target route
- It is not your local public IP and not upstream egress IP
If all are true, chain proxy is configured successfully.
8. Common troubleshooting
Downstream proxy cannot connect or always times out
- Switch to
preand test upstream latency first. - Check whether
landactually selectsproxy1-HKin Pre-proxy config alias. - Re-check downstream address, port, username, and password (no extra spaces).
- Save changes and click Restart Service before re-testing.
IP check shows the upstream region
This usually means the active node is still upstream. Switch to land, set downstream node active, then re-enable Tun and refresh IP check.
IP check still shows local public IP
Ensure Enable Tun is green. Try running v2rayN as administrator. Also check whether browser or other proxy apps have conflicting proxy settings.
Chain connects but speed is slow
Chain mode adds one extra hop, so latency is usually higher than direct mode. Use a near, low-latency, stable upstream node and avoid stacking unnecessary proxy apps.
If you run into issues not covered above, contact us:
- Telegram: https://telegram.me/ip006ip
- Phone: 15673887335
- Email: support@006ip.com
For purchase, renewal, and credential export details, see the 006ip Static Proxy User Guide.